Fuse Panel 2000 Chevy Silverado Fuse Box Diagram
Welcome, fellow gearheads! Let's dive into the heart of your 2000 Chevy Silverado's electrical system: the fuse panel. Understanding your fuse box diagram is crucial whether you're diagnosing a blown fuse, adding aftermarket accessories, or simply gaining a deeper understanding of your truck's inner workings. Think of it as the roadmap to your Silverado's electrical health.
Why Bother with the Fuse Box Diagram?
Why should you care about this seemingly arcane document? Because it empowers you to troubleshoot electrical issues quickly and efficiently. Without it, you're essentially groping in the dark, potentially causing more damage than you fix. Here are a few key reasons:
- Troubleshooting Electrical Problems: A blown fuse is often the first sign of an electrical problem. The diagram helps you identify the culprit circuit and its corresponding components.
- Adding Aftermarket Accessories: Want to install new lights, a sound system, or a winch? The diagram shows you where to tap into the electrical system safely and appropriately.
- Preventing Electrical Fires: Using the wrong fuse or bypassing a fuse altogether can create a dangerous overload situation, potentially leading to a fire.
- General Understanding: For the mechanically inclined, understanding the fuse box layout provides valuable insight into the overall electrical architecture of your vehicle.
Key Specs and Main Parts of the 2000 Silverado Fuse Panel
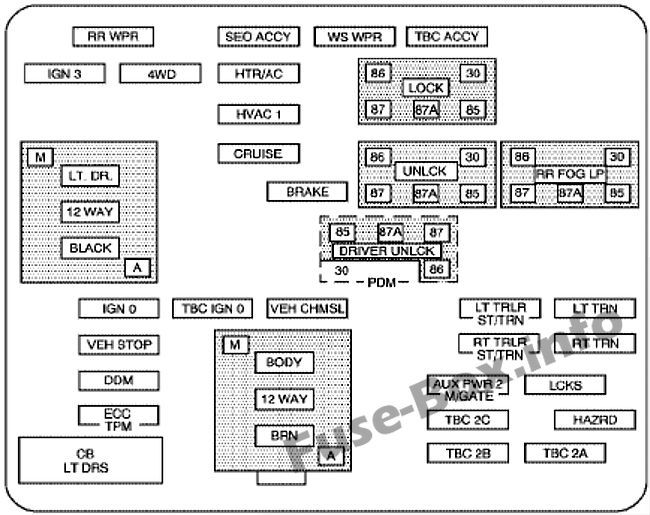
The 2000 Chevy Silverado typically has two main fuse boxes: one located under the hood (engine compartment) and another inside the cab, usually on the driver's side dash panel or behind a small access door. The under-hood fuse box generally handles high-current circuits related to engine management, lighting, and major accessories. The in-cab fuse box typically protects circuits related to interior lighting, the radio, power windows, and other comfort features.
Here's a breakdown of the common components you'll find:
- Fuses: These are the sacrificial links in the circuit, designed to blow and interrupt current flow when an overload occurs. They're typically color-coded to indicate their amperage rating (e.g., yellow = 20A, red = 10A). The rating, in *Amperes* (A), indicates the maximum current the fuse can handle before blowing.
- Relays: Relays are electromechanical switches that allow a low-current circuit to control a high-current circuit. For example, the headlight relay uses a small signal from the headlight switch to control the high current needed to power the headlights.
- Circuit Breakers: Unlike fuses, circuit breakers can be reset after tripping. They're often used for circuits that experience temporary overloads, such as power windows or power seats.
- Fuse Puller: A small plastic tool designed to safely remove fuses from the panel. Using pliers or other metal tools can damage the fuse box or create a short circuit.
- Fuse Panel Cover: This cover protects the fuses and often has a diagram printed on the inside, although it's always best to have a separate, more detailed diagram handy.
Decoding the Symbols: Lines, Colors, and Icons
The fuse box diagram isn't just a collection of squares and rectangles. It uses a standardized system of symbols to represent different components and circuit pathways. Understanding these symbols is essential for interpreting the diagram correctly.
- Solid Lines: Represent wires or conductive pathways. The thickness of the line may sometimes indicate the wire gauge (thicker lines = larger gauge wires).
- Dotted Lines: Often indicate grounding paths or connections.
- Squares or Rectangles: Represent components such as fuses, relays, and circuit breakers. The label inside the shape indicates the component's function (e.g., "IGN" for ignition, "PWR WDO" for power windows).
- Circles: Can represent connectors or test points within the circuit.
- Color Coding: While the diagram itself might be black and white, it's crucial to know the color codes used for the fuses themselves. Each color corresponds to a specific amperage rating. Refer to a fuse color code chart for accurate identification. Common colors include:
- Gray: 2 Amp
- Violet: 3 Amp
- Pink: 4 Amp
- Orange: 5 Amp
- Brown: 7.5 Amp
- Red: 10 Amp
- Blue: 15 Amp
- Yellow: 20 Amp
- Clear: 25 Amp
- Green: 30 Amp
- Icons: Some diagrams use icons to represent specific components, such as a light bulb for lighting circuits or a speaker for audio circuits.
How It Works: A Simplified Electrical Circuit
To understand how the fuse box diagram relates to the actual electrical system, it's helpful to understand the basics of an electrical circuit. A simple circuit consists of:
- Power Source: The battery provides the voltage (electrical potential) to drive current through the circuit.
- Load: The device that consumes electrical energy (e.g., a light bulb, a motor).
- Wiring: Conductors that connect the power source to the load and back.
- Switch: A device that opens or closes the circuit, allowing or preventing current flow.
- Fuse: The safety device that protects the circuit from overcurrent.
When the switch is closed, current flows from the battery, through the fuse, to the load, and back to the battery, completing the circuit and allowing the load to function. If an overload occurs (e.g., a short circuit), the current exceeds the fuse's rating, causing it to blow and interrupt the circuit, preventing damage to other components.
Real-World Use: Basic Troubleshooting Tips
Let's say your Silverado's radio suddenly stops working. Here's how you can use the fuse box diagram to troubleshoot the problem:
- Consult the Diagram: Locate the fuse box diagram (both under-hood and in-cab) and identify the fuse labeled for the radio or "audio system."
- Locate the Fuse: Open the appropriate fuse box and find the fuse corresponding to the radio, based on its location on the diagram.
- Inspect the Fuse: Visually inspect the fuse. If the metal strip inside is broken or blackened, the fuse is blown.
- Replace the Fuse: Replace the blown fuse with a new fuse of the same amperage rating. Never use a fuse with a higher amperage rating, as this could damage the circuit.
- Test the Radio: Turn on the radio to see if it works. If it still doesn't work, there may be a more serious problem in the circuit.
- If the Fuse Blows Again: If the new fuse blows immediately or shortly after being replaced, it indicates a persistent short circuit or overload in the radio circuit. Further diagnosis is required, potentially involving a multimeter to check for shorts and opens in the wiring.
Safety First: Handling Risky Components
Working with electrical systems can be dangerous. Here are some crucial safety precautions:
- Disconnect the Battery: Before working on any electrical components, disconnect the negative (-) terminal of the battery to prevent accidental shocks or short circuits.
- Use Insulated Tools: Use tools with insulated handles to protect yourself from electric shock.
- Never Bypass a Fuse: Never replace a fuse with a piece of wire or other conductive material. This bypasses the safety protection and can lead to serious damage or fire.
- Work in a Well-Lit Area: Ensure you have adequate lighting to see clearly and avoid mistakes.
- Consult a Professional: If you're not comfortable working with electrical systems, consult a qualified mechanic. Some circuits, like those related to the airbag system (SRS), should only be handled by trained professionals due to the potential for injury.
Remember, always double-check the fuse rating before replacing a blown fuse. Using a fuse with the wrong amperage can damage the circuit or even cause a fire. Furthermore, be cautious when working around components like the anti-lock braking system (ABS) and airbags, as these require specialized knowledge and handling.
Understanding your 2000 Chevy Silverado fuse box diagram is a powerful tool for maintaining and upgrading your truck. With this knowledge, you can tackle basic electrical troubleshooting tasks with confidence.
Ready to get your hands on a copy of the diagram? We have a printable PDF file available for download. This file contains detailed layouts of both the under-hood and in-cab fuse panels, complete with fuse descriptions and amperage ratings. Keep it handy for quick reference during your next electrical project! Stay safe, and happy wrenching!