Fuse Panel 2008 Nissan Altima Fuse Box Diagram
Understanding the fuse panel diagram for your 2008 Nissan Altima is crucial for tackling various electrical issues, performing modifications, or simply deepening your knowledge of your vehicle's inner workings. This isn't just some abstract piece of documentation; it's your roadmap to diagnosing and resolving electrical problems, preventing further damage, and ensuring the safety of your vehicle and yourself. Having a solid grasp of the fuse box layout and its associated diagram empowers you to confidently address electrical challenges that might otherwise require a trip to the mechanic. We have the file for the fuse box diagram, you can download it at the end of the article. This article aims to provide you with a comprehensive understanding of your Altima's fuse panel, equipping you with the knowledge to confidently navigate its complexities.
Purpose of the Fuse Box Diagram
The fuse box diagram serves as a critical reference point for several reasons:
- Troubleshooting Electrical Issues: When an electrical component fails (e.g., a light, the radio, or a power window), the fuse box diagram allows you to quickly identify and inspect the corresponding fuse. A blown fuse is often the culprit, and replacing it can restore functionality.
- Performing Electrical Modifications: If you're planning to add aftermarket accessories like a new sound system, auxiliary lights, or a dashcam, the diagram helps you locate suitable power sources and appropriately fuse your new circuits. This prevents overloading existing circuits and potentially causing fires.
- General Understanding of Vehicle Electrical System: Studying the diagram provides valuable insight into how different electrical components are interconnected and protected within your Altima.
- Preventative Maintenance: Periodically checking the fuses against the diagram can help identify potential issues before they escalate into major problems.
Key Specs and Main Parts of the 2008 Altima Fuse Box
Your 2008 Nissan Altima typically has two main fuse boxes:
- Interior Fuse Box: Usually located under the dashboard, often near the driver's side or passenger's side footwell. This box houses fuses for interior components like lights, the audio system, power windows, and the climate control system.
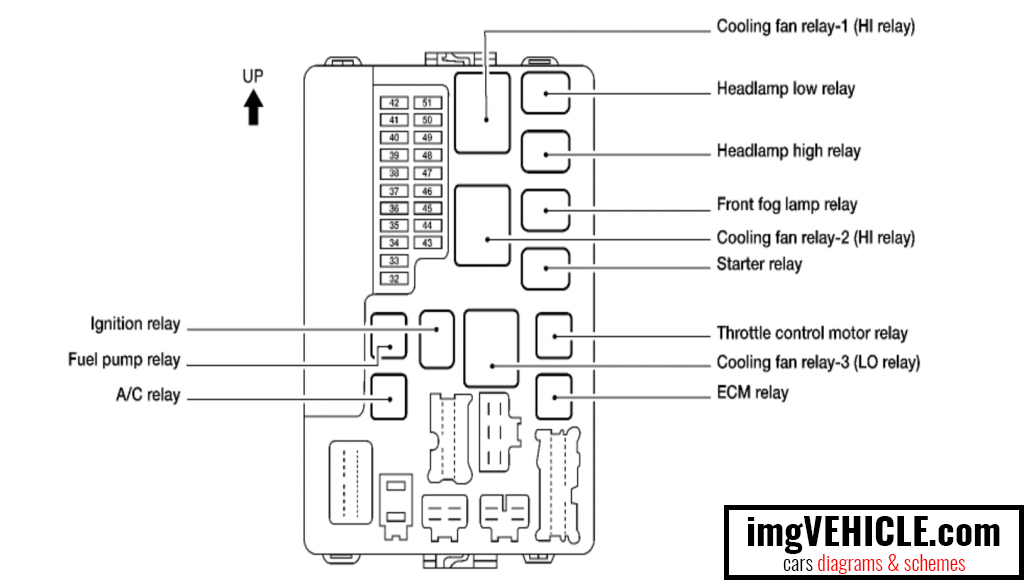
- Engine Compartment Fuse Box: Situated in the engine bay, this box contains fuses and relays for vital engine components, headlights, cooling fans, and other critical systems.
Key Specs to Note:
- Fuse Ampere Ratings: Each fuse is rated for a specific amperage (e.g., 5A, 10A, 15A, 20A, 30A). This rating indicates the maximum current the fuse can handle before it blows, protecting the circuit.
- Fuse Types: The 2008 Altima uses various fuse types, including blade fuses (ATO/ATC), mini-blade fuses, and potentially cartridge fuses for higher amperage applications. Always replace a blown fuse with one of the same type and amperage rating. Using a higher amperage fuse can overload the circuit and cause damage or a fire.
- Relays: Relays are electromechanical switches that allow a low-current circuit to control a high-current circuit. They are often used for components like headlights, fuel pumps, and cooling fans. The engine compartment fuse box often contains several relays.
Understanding Fuse Box Diagram Symbols
Fuse box diagrams use standardized symbols to represent various components and connections. Here's a breakdown of common symbols:
- Lines: Solid lines represent wires connecting different components. Thicker lines may indicate wires carrying higher current.
- Fuse Symbol: A zigzag line inside a rectangle typically represents a fuse. The diagram will usually indicate the amperage rating associated with that fuse.
- Relay Symbol: A relay is typically depicted as a square or rectangle with internal lines representing the coil and contacts.
- Ground Symbol: The ground symbol, often resembling a downward-pointing tree or a series of horizontal lines, indicates a connection to the vehicle's chassis, providing a return path for the electrical current.
- Color Coding: While not always present directly on the diagram itself, knowing the wire color codes in your Altima can be helpful. These codes, found in the service manual, indicate the function of each wire (e.g., red for power, black for ground).
- Component Icons: Some diagrams may use simplified icons to represent the components protected by each fuse (e.g., a light bulb for the headlights, a speaker for the audio system).
How It Works: The Fuse Box in Action
The fuse box acts as a central distribution point and protection mechanism for your Altima's electrical system. Each fuse protects a specific circuit from overcurrent. When excessive current flows through a circuit (due to a short circuit, faulty component, or overload), the fuse's internal filament melts, breaking the circuit and preventing damage to other components. This is why it's called a "fuse" – it sacrifices itself to protect the rest of the system.
Relays, on the other hand, allow low-current signals from switches or the engine control unit (ECU) to control high-current devices. For example, the headlight switch might only carry a small current, but it activates a relay that allows a much higher current to flow to the headlights themselves. This prevents the headlight switch from being overloaded and failing.
Real-World Use: Basic Troubleshooting Tips
Here's how to use the fuse box diagram to troubleshoot common electrical problems:
- Identify the Problem: Determine which component is not working (e.g., the cigarette lighter, the windshield wipers).
- Consult the Diagram: Use the fuse box diagram to locate the fuse associated with the malfunctioning component. Note: Some diagrams may be generic or inaccurate. Always double-check with your vehicle's owner's manual or a reliable online resource to ensure you're looking at the correct fuse. The downloadable file provided here is verified.
- Inspect the Fuse: Remove the fuse and visually inspect it. A blown fuse will typically have a broken filament or a blackened appearance.
- Test the Fuse: For a more accurate assessment, use a multimeter set to continuity mode to test the fuse. A good fuse will show continuity (a beep or a reading of 0 ohms). A blown fuse will show no continuity.
- Replace the Fuse: If the fuse is blown, replace it with a new fuse of the same type and amperage rating.
- Test the Component: After replacing the fuse, test the component to see if it's working again.
- If the Fuse Blows Again: If the new fuse blows immediately or shortly after being replaced, there's likely a more serious problem in the circuit, such as a short circuit or a faulty component. Further diagnosis by a qualified technician may be necessary.
Safety Precautions
Working with electrical systems can be dangerous. Here are some crucial safety precautions:
- Disconnect the Battery: Before working on any electrical component, disconnect the negative (-) battery terminal to prevent accidental shorts and electrical shocks.
- Use Insulated Tools: Always use insulated tools when working on electrical systems.
- Never Replace a Fuse with a Higher Amperage Fuse: Doing so can overload the circuit and cause a fire.
- Be Careful Around Airbag Systems: Airbag systems contain explosive charges and are extremely sensitive to electrical disturbances. If you suspect a problem with the airbag system, consult a qualified technician immediately. Incorrect handling of the airbag system can result in serious injury.
- Work in a Well-Lit Area: Ensure you have adequate lighting to clearly see the fuse box and wiring.
Understanding the fuse box diagram for your 2008 Nissan Altima is a valuable skill that can save you time and money on repairs. Remember to always prioritize safety and consult a qualified technician if you're unsure about any aspect of the electrical system.
Download the Fuse Box Diagram for 2008 Nissan Altima
[Download Link Here] Note: This is a placeholder. Actual file would go here.