Fuse Panel 2009 Nissan Murano Fuse Box Diagram
Alright, let's dive into the fuse panel diagram for a 2009 Nissan Murano. Whether you're dealing with a blown fuse, planning some electrical modifications, or just want to understand your vehicle's electrical system better, this diagram is your roadmap. It’s the key to navigating the sometimes-intimidating world of automotive electrics.
Purpose of the Fuse Panel Diagram
Why bother with this diagram? Simple: it's essential for accurate electrical troubleshooting and repair. Without it, you're essentially poking around in the dark. Specifically, the fuse box diagram helps you:
- Identify a blown fuse: Quickly locate the fuse responsible for a malfunctioning circuit.
- Replace a fuse correctly: Ensure you're using the right amperage (current rating) fuse.
- Understand circuit protection: Gain insights into how different components are protected.
- Plan electrical modifications: Identify suitable circuits for tapping into when adding aftermarket accessories.
- Prevent electrical damage: Avoid short circuits and potential fires by understanding circuit paths.
Key Specs and Main Parts of the Fuse Panel
The 2009 Nissan Murano typically has two main fuse boxes: one located in the engine compartment (often near the battery) and another inside the passenger compartment (usually under the dashboard on the driver's side). Let's break down the key elements:
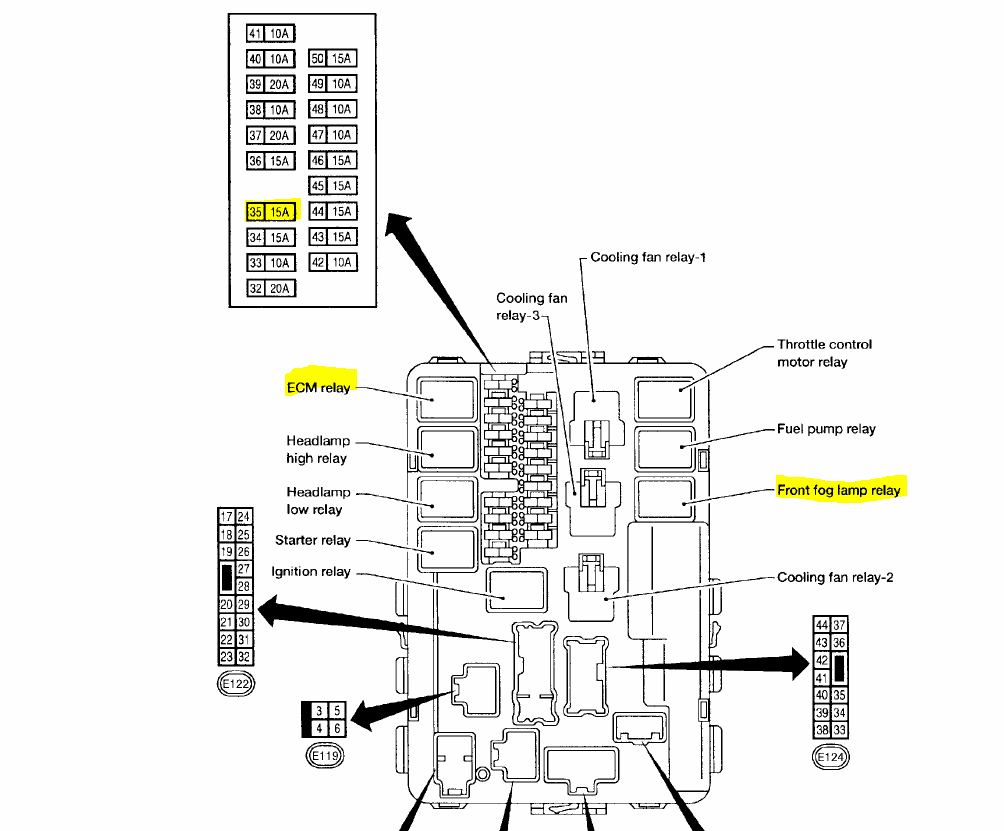
Engine Compartment Fuse Box
This fuse box houses fuses and relays that protect critical engine and powertrain components. Key components you’ll usually find here are:
- Main fuses: These protect the main circuits of the vehicle, handling higher amperage loads.
- Fuses for the engine control module (ECM): The ECM is the car's computer, and it's vital.
- Fuses for the fuel pump: Controls the fuel delivery system.
- Fuses for the cooling fan: Prevents the engine from overheating.
- Relays: Electrically operated switches that control higher-current circuits. Examples include the starter relay, fuel pump relay, and headlight relay.
Passenger Compartment Fuse Box
This fuse box protects circuits for interior components and accessories. Key components here include:
- Fuses for the headlights and taillights: Ensuring visibility.
- Fuses for the power windows and locks: Comfort and convenience features.
- Fuses for the radio and infotainment system: Entertainment and communication.
- Fuses for the air conditioning system: Climate control.
- Fuses for the interior lights: Cabin illumination.
- Fuses for the cigarette lighter/power outlets: Powering accessories.
Key Spec: Amperage Rating: Each fuse has an amperage rating (e.g., 5A, 10A, 15A, 20A, 25A, 30A). This indicates the maximum current the fuse can handle before it blows (interrupts the circuit). It's crucial to replace a blown fuse with one of the same amperage rating. Using a higher amperage fuse can overload the circuit and cause damage or even a fire.
Understanding Fuse Panel Diagram Symbols
Fuse panel diagrams use a standard set of symbols to represent different components and connections. Here's a breakdown:
- Lines: These represent wires and electrical connections. A thicker line generally indicates a higher-current wire. Dashed lines can sometimes indicate ground connections or shielded wires.
- Rectangles: These typically represent fuses. The amperage rating is usually printed on or near the rectangle.
- Squares: These often represent relays.
- Circles: These can represent various components, depending on the specific diagram. Consult the diagram's legend.
- Colors: Wire colors are often indicated on the diagram. Common colors include red (power), black (ground), blue, green, yellow, and white. Knowing the wire color helps you trace circuits and identify wiring issues.
- Icons: Many diagrams use icons to represent the components protected by each fuse. For example, a headlight icon represents the headlight circuit, a radio icon represents the radio circuit, and so on.
A critical component of the diagram is its legend. This is usually located on the diagram itself or in the vehicle's owner's manual. The legend explains the meaning of each symbol, icon, and abbreviation used in the diagram. Always refer to the legend before interpreting the diagram.
How the Fuse Panel Works
The fuse panel is essentially a distribution point for electrical power in your vehicle. It receives power from the battery and distributes it to various circuits through individual fuses. Each circuit is designed to power a specific component or group of components. The fuse acts as a sacrificial element, protecting the circuit from overcurrents. When the current exceeds the fuse's amperage rating, the fuse melts and breaks the circuit, preventing damage to the protected components. This is a simple series circuit – the fuse is in line with the device it is protecting.
The diagram shows how each fuse is connected to specific components, allowing you to trace the circuit path and identify potential problems. For example, if your headlights aren't working, you can use the diagram to locate the headlight fuse, check its condition, and then trace the wiring from the fuse to the headlights to identify any breaks or shorts.
Real-World Use: Basic Troubleshooting Tips
Here's how you can use the fuse panel diagram for basic troubleshooting:
- Identify the symptom: What's not working? (e.g., headlights, radio, power windows).
- Consult the diagram: Locate the fuse associated with the malfunctioning component.
- Inspect the fuse: Visually check the fuse for a broken filament. You can also use a multimeter to test for continuity (a complete circuit).
- Replace the fuse: If the fuse is blown, replace it with one of the same amperage rating.
- Test the circuit: After replacing the fuse, test the component to see if it's working. If the fuse blows again immediately, there's a short circuit in the wiring or the component itself.
- Further diagnostics: If the fuse keeps blowing, you'll need to perform more advanced diagnostics to locate the short circuit. This may involve using a multimeter to check for voltage drops and continuity in different parts of the circuit.
Example: Your cigarette lighter/power outlet isn't working. You consult the diagram, find the corresponding fuse (e.g., "CIGAR" or "POWER OUTLET"), and inspect it. If the fuse is blown, you replace it with a new one of the same amperage. If it works, great! If it blows again, there's likely a short circuit in the wiring or the outlet itself (perhaps something is jammed in it).
Safety Considerations
Working with automotive electrical systems can be dangerous. Here are some safety precautions:
- Disconnect the battery: Before working on any electrical component, disconnect the negative (-) battery terminal to prevent accidental shorts.
- Use the correct fuses: Never replace a fuse with one of a higher amperage rating. This can overload the circuit and cause a fire.
- Inspect wiring carefully: Look for damaged or frayed wires, which can cause short circuits.
- Avoid working in wet conditions: Water can conduct electricity and increase the risk of shock.
- Be aware of high-current components: Components like the starter motor and alternator draw significant current. Avoid touching the terminals of these components while the engine is running.
- Airbags: Some fuses relate to the airbag system. It is highly recommended to have any airbag related repairs done by a trained professional. Incorrect repair can cause serious injury or death.
Components such as the starter solenoid and alternator carry high currents. Exercise extreme caution when working around these components. Mishandling them can lead to electrical shocks and burns.
Finally, remember that this article provides a general overview. Always refer to the specific fuse panel diagram for your 2009 Nissan Murano, as there may be slight variations depending on the vehicle's trim level and options.
We have the fuse panel diagram file available for download. You can use it as a handy reference guide while working on your vehicle.