Fuse Panel Ford E350 Fuse Box Diagram
If you're the type of person who likes to get their hands dirty and tackle automotive repairs yourself, understanding your Ford E350's fuse panel and its accompanying fuse box diagram is absolutely crucial. Whether you're troubleshooting a blown fuse, adding aftermarket accessories, or simply trying to understand your van's electrical system better, this guide will break down everything you need to know. We have the diagram available for download, which will prove invaluable as you follow along.
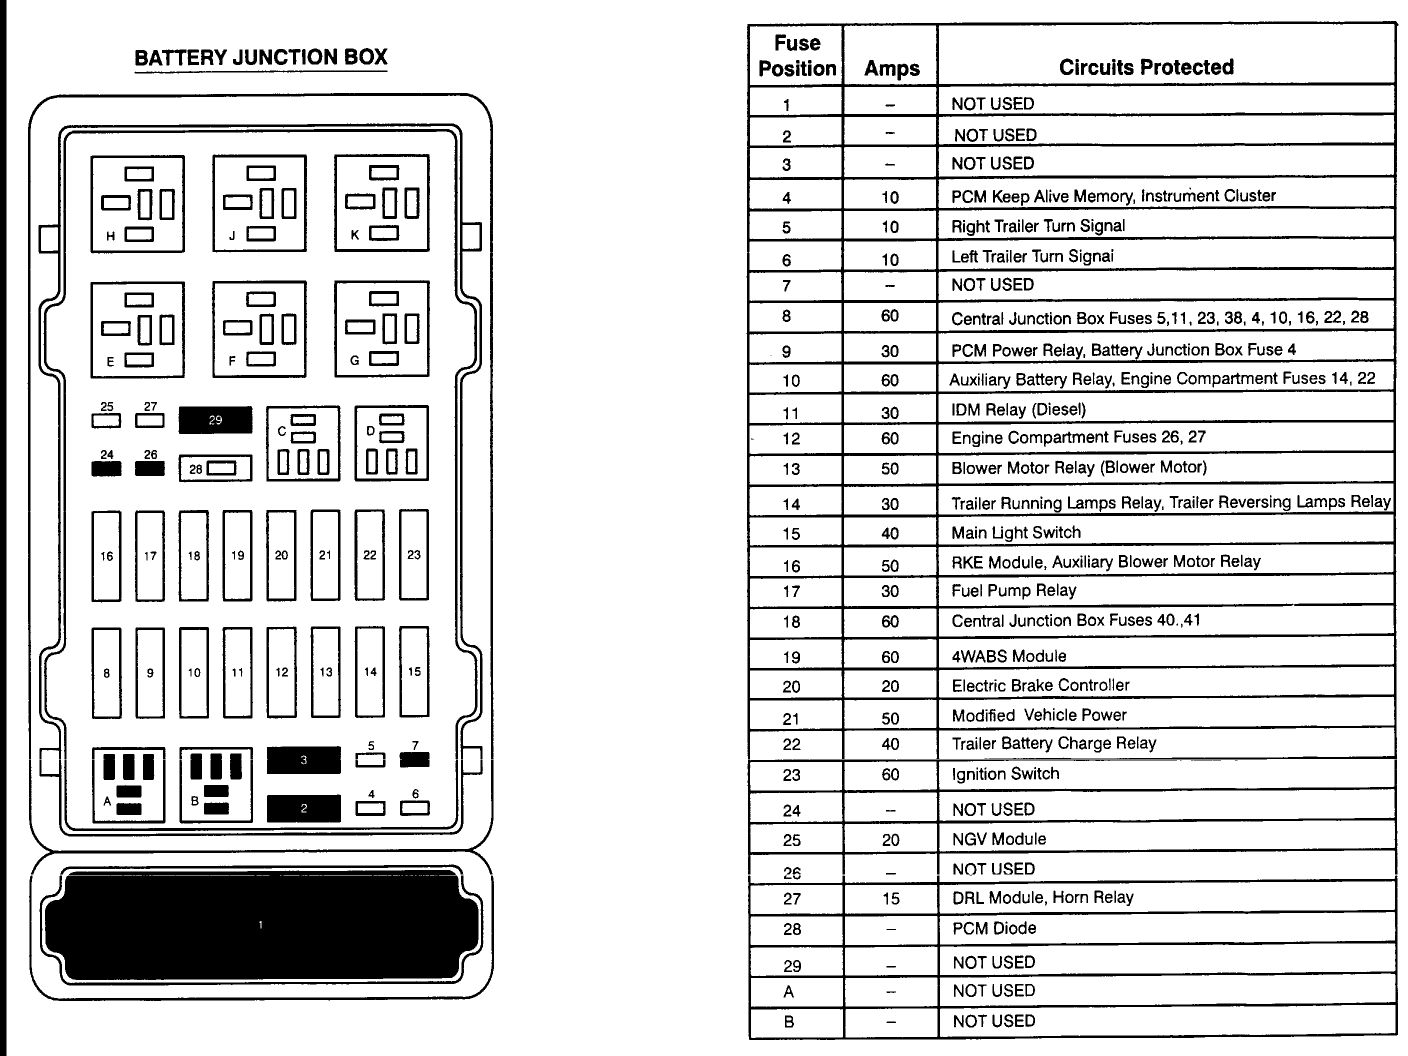
Purpose of the Fuse Box Diagram
The fuse box diagram is essentially a roadmap for your vehicle's electrical system. Its primary purposes include:
- Troubleshooting Electrical Problems: When something electrical malfunctions (e.g., a headlight stops working, the radio goes silent), the fuse box diagram helps you quickly locate the fuse associated with that circuit.
- Replacing Blown Fuses: Identifying the correct amperage fuse is essential to avoid damaging your electrical system. The diagram specifies the correct fuse rating for each circuit.
- Adding Aftermarket Accessories: If you're installing a new stereo, lights, or other electrical accessories, you'll need to know which circuits can handle the additional load. The diagram provides information about circuit capacity and available power sources.
- Understanding the Vehicle's Electrical System: Simply put, studying the fuse box diagram helps you understand how different electrical components are connected and protected.
Key Specs and Main Parts of the E350 Fuse Box
The Ford E350 typically has multiple fuse boxes, but the primary one is usually located under the dashboard, often on the driver's side. Some models may have a secondary fuse box under the hood near the battery.
Key Specs:
- Voltage: The E350 operates on a 12-volt DC (Direct Current) electrical system.
- Fuse Amperage Ratings: Fuses are rated in amps (A), indicating the amount of current they can handle before blowing. Common ratings include 5A, 7.5A, 10A, 15A, 20A, 25A, 30A, and higher. Using the wrong amperage fuse can lead to electrical fires or component damage.
- Fuse Types: Common fuse types found in the E350 include blade fuses (ATO/ATC) and mini blade fuses.
Main Parts:
- Fuse Box Housing: The physical container that holds the fuses and relays.
- Fuses: Overcurrent protection devices that interrupt the circuit when excessive current flows through them. They contain a thin wire filament that melts and breaks the circuit.
- Relays: Electrically operated switches that control high-current circuits using a low-current signal. They are used to power components like headlights, fuel pumps, and starter motors.
- Terminals: Metal connectors that provide electrical contact between the fuses, relays, and the vehicle's wiring harness.
Decoding the Fuse Box Diagram: Symbols and Markings
Understanding the symbols and markings on the fuse box diagram is essential for accurate interpretation. While the specific symbols can vary slightly depending on the year and model of your E350, some common conventions apply:
- Lines: Lines represent the electrical circuits. A thicker line might indicate a higher current-carrying capacity.
- Colors: Wiring colors are often indicated on the diagram using abbreviations (e.g., BLU for blue, RED for red, GRN for green). These colors correspond to the actual wire colors in your vehicle's wiring harness.
- Icons: Icons represent the electrical components protected by each fuse. Common icons include:
- Headlight: Represents the headlight circuit.
- Radio: Indicates the radio or audio system circuit.
- Windshield Wiper: Denotes the windshield wiper motor circuit.
- Cigar Lighter/Power Outlet: Indicates the circuit for the cigarette lighter or auxiliary power outlet.
- ECU/PCM: Represents the Engine Control Unit or Powertrain Control Module circuit.
- Fuse Number: Each fuse location is typically numbered on the diagram and on the fuse box itself. This allows for quick identification.
- Amperage Rating: The diagram specifies the amperage rating (e.g., 15A) for each fuse. Always use a fuse with the correct amperage rating.
- Relay Symbols: Relays are typically represented by a square or rectangle with internal symbols indicating the coil and switch contacts.
How the Fuse Box Works
The fuse box is the central distribution point for electrical power in your E350. It receives power from the battery and distributes it to various electrical circuits throughout the vehicle. Each circuit is protected by a fuse. When an electrical fault occurs (e.g., a short circuit), excessive current flows through the circuit. This excessive current causes the fuse's filament to melt, breaking the circuit and preventing damage to the wiring and components. Relays, on the other hand, act as electrically controlled switches. They allow a small current to control a larger current, enabling the vehicle's electrical system to efficiently power high-current devices.
Real-World Use: Basic Troubleshooting Tips
Here are some basic troubleshooting tips for using your E350 fuse box and diagram:
- Identify the Problem: Determine which electrical component is not working.
- Consult the Diagram: Use the fuse box diagram to locate the fuse associated with the malfunctioning component.
- Inspect the Fuse: Remove the fuse and visually inspect it. A blown fuse will typically have a broken filament. You can also use a multimeter set to continuity to test the fuse.
- Replace the Fuse: If the fuse is blown, replace it with a new fuse of the exact same amperage rating.
- Test the Component: After replacing the fuse, test the component to see if it's now working.
- If the Fuse Blows Again: If the new fuse blows immediately or shortly after replacement, there is likely a more serious electrical problem, such as a short circuit. Seek professional help from a qualified mechanic.
Safety Precautions
Working with electrical systems can be dangerous. Always take the following precautions:
- Disconnect the Battery: Before working on any electrical components, disconnect the negative terminal of the battery to prevent accidental short circuits.
- Use Insulated Tools: Use tools with insulated handles to protect yourself from electric shock.
- Never Replace a Fuse with a Higher Amperage Fuse: This can overload the circuit and cause a fire.
- Be Careful Around High-Voltage Components: Some components, such as the ignition system, operate at high voltages and can be dangerous. If you're not comfortable working with these components, seek professional help.
- Consult a Professional: If you're unsure about any aspect of the repair process, consult a qualified mechanic.
Certain components within the E350's electrical system pose a higher risk than others. These include:
- The Ignition System: Operates at very high voltages and should only be handled by experienced individuals.
- The Airbag System: Tampering with the airbag system can be extremely dangerous and can result in serious injury or death. It requires specialized knowledge and equipment.
We have the complete Ford E350 fuse box diagram available for download. This diagram will be a valuable resource as you troubleshoot electrical issues and perform maintenance on your vehicle. Remember to always prioritize safety and consult a professional if you're unsure about any aspect of the repair process. With the right tools and knowledge, you can confidently tackle many electrical repairs on your Ford E350.