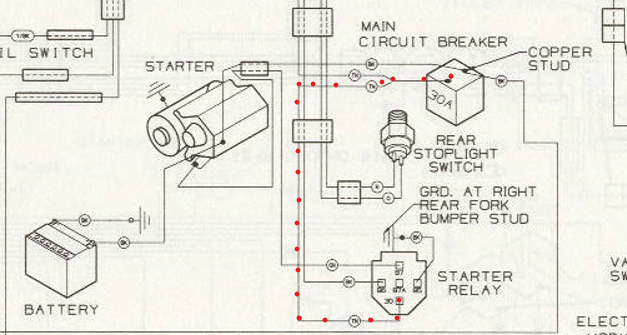
Harley Davidson Starter Relay Wiring Diagram
Understanding the Harley Davidson starter relay wiring diagram is crucial for any serious DIY mechanic or motorcycle enthusiast. Whether you're diagnosing a starting issue, customizing your bike's electrical system, or simply trying to deepen your understanding of its inner workings, this diagram is your roadmap. This article will break down the diagram, explain its components, and provide practical troubleshooting tips. And remember, we have a downloadable version of the diagram available for you to use!
Purpose of the Starter Relay Wiring Diagram
The starter relay wiring diagram serves as a visual representation of how the starting system components are connected and interact. It allows you to:
- Diagnose starting problems: By tracing the wiring and understanding the circuit flow, you can pinpoint faulty components like a bad relay, a broken wire, or a malfunctioning starter motor.
- Perform repairs: A clear diagram is essential when replacing or repairing any part of the starting system. It ensures you connect everything correctly, avoiding further damage.
- Customize your bike: If you're adding aftermarket accessories that interface with the starting system (e.g., a remote starter or an alarm system), you need to understand the existing wiring to integrate the new components safely.
- Deepen your understanding: Even if you don't plan on doing any immediate work, studying the diagram is a great way to learn about the principles of electrical circuits and how they apply to your Harley.
Key Specs and Main Parts
Before diving into the diagram, let's identify the key components of the starter relay circuit:
- Battery: The heart of the electrical system, providing the necessary power to crank the engine. Harleys typically use a 12-volt battery, often with a high Cold Cranking Amps (CCA) rating to ensure reliable starting even in cold weather.
- Ignition Switch: The switch that initiates the starting sequence. When turned to the "start" position, it sends a signal to the starter relay.
- Starter Relay: An electrically operated switch that allows a small current from the ignition switch to control a much larger current to the starter motor. This protects the ignition switch from being overloaded.
- Starter Motor: The electric motor that physically turns the engine over to initiate combustion. It requires a significant amount of current to operate.
- Solenoid (Often integrated with the Starter Motor): The solenoid is an electromagnet that engages the starter motor pinion gear with the engine's flywheel. It also acts as a heavy-duty switch, completing the circuit to the starter motor. On many Harley models, the solenoid is directly attached to the starter motor, forming a single unit.
- Fuses/Circuit Breakers: Protective devices that prevent damage to the electrical system in case of a short circuit or overload. The starter circuit typically has its own dedicated fuse or circuit breaker.
- Wiring Harness: The network of wires that connect all the components together. The gauge (thickness) of the wires is crucial, as thicker wires are needed to handle the high current flowing to the starter motor.
Understanding the Symbols
Wiring diagrams use standardized symbols to represent electrical components. Here are some common symbols you'll encounter in a Harley Davidson starter relay wiring diagram:
- Solid Lines: Represent wires. The thickness of the line doesn't usually indicate wire gauge, so refer to the wire color coding and diagram legend for that information.
- Dashed Lines: Often represent ground connections or less critical circuits.
- Circles: Can represent various components, such as lights or sensors. Check the legend for specific meanings.
- Rectangles: Commonly used for relays and switches. The diagram will show the internal contacts and how they are connected in different switch positions.
- Zigzag Lines: Represent resistors or coils, such as those found in the starter relay.
- Battery Symbol: A series of short and long parallel lines. The longer line indicates the positive (+) terminal, and the shorter line indicates the negative (-) terminal.
- Ground Symbol: Usually looks like a downward-pointing tree or a series of descending horizontal lines. Indicates a connection to the vehicle's frame, which serves as a common ground.
Color Coding: Harley Davidson, like most manufacturers, uses a standard color coding system for its wiring. The diagram will include a key that identifies what each color represents (e.g., Red = Battery Positive, Black = Ground, Yellow/Red = Starter Relay Signal). Pay close attention to these colors when tracing wires.
How It Works
Here's a simplified explanation of how the starter relay circuit operates:
- When you turn the ignition switch to the "start" position, a small current flows from the battery, through the ignition switch, and to the starter relay's coil.
- This small current energizes the starter relay's coil, creating an electromagnetic field.
- The electromagnetic field pulls the relay's internal contacts closed.
- Closing the relay contacts completes a high-current circuit directly from the battery to the starter motor's solenoid.
- The solenoid engages the starter motor pinion gear with the engine's flywheel and simultaneously closes another set of heavy-duty contacts, allowing the full current to flow to the starter motor.
- The starter motor spins, turning the engine over until it starts.
- Once the engine starts, you release the ignition switch, interrupting the current to the starter relay's coil. The relay contacts open, disconnecting the starter motor and preventing it from over-revving.
Real-World Use: Basic Troubleshooting Tips
Here are a few common starting problems and how the wiring diagram can help you diagnose them:
- No Crank, No Click: Use a multimeter to check for voltage at the starter relay's coil when the ignition switch is in the "start" position. If there's no voltage, the problem could be the ignition switch, the wiring between the switch and the relay, or a faulty safety switch (e.g., neutral switch).
- No Crank, Just a Click: This often indicates a weak battery, a loose or corroded connection in the starter circuit, or a faulty starter relay. Check the battery voltage under load (while trying to start the bike). If the voltage drops significantly, the battery is likely the problem. Inspect all connections for corrosion and tightness. Test the starter relay by bypassing it (carefully!) to see if the starter motor engages.
- Starter Motor Spins But Doesn't Engage: This suggests a problem with the starter solenoid. The solenoid may not be engaging the pinion gear with the flywheel. Check the wiring to the solenoid and the solenoid itself.
Using a Multimeter: A multimeter is an essential tool for troubleshooting electrical problems. Use it to check for voltage, continuity (a complete circuit), and resistance. When checking for continuity, make sure the circuit is de-energized (battery disconnected) to avoid damaging the meter or the motorcycle's electrical system.
Safety First!
Working with electrical systems can be dangerous. Here are some important safety precautions:
- Disconnect the Battery: Always disconnect the negative (-) battery terminal before working on the electrical system. This prevents accidental short circuits and electrical shocks.
- Wear Safety Glasses: Protect your eyes from sparks and debris.
- Use Insulated Tools: Use tools with insulated handles to prevent electric shock.
- Avoid Working in Wet Conditions: Water conducts electricity, increasing the risk of electric shock.
- Be Careful When Bypassing the Relay: Bypassing the starter relay directly connects the battery to the starter motor. This should only be done briefly for testing purposes, as it can overheat the starter motor and damage the wiring if done for too long.
- The Starter Solenoid carries a very high amperage current. Handle the wiring, connections and components of this circuit carefully.
Remember, a faulty starter system can leave you stranded. By understanding the wiring diagram and following safe practices, you can effectively diagnose and repair starting problems on your Harley Davidson. Good luck, and happy wrenching!
And as promised, we have the detailed starter relay wiring diagram file available for download. This will be an invaluable asset in your troubleshooting and repair endeavors.