Honda Civic 2008 Ex Coupe Rear Suspension Diagram
Alright, let's dive into the rear suspension of the 2008 Honda Civic EX Coupe. This isn't some mystical black box; it's a carefully engineered system, and understanding its intricacies can save you a lot of time, money, and frustration when it comes to repairs, modifications, or even just diagnosing that annoying clunk you've been hearing. This article, along with the diagram (which you can download – we've got the file ready for you!), will give you a solid foundation.
Purpose of Understanding the Diagram
Why bother understanding this diagram? Simple: knowledge is power. Whether you're tackling a full suspension overhaul, replacing a worn-out shock absorber, or just trying to figure out why your car handles like a boat in a storm, the diagram is your roadmap. It allows you to:
- Identify parts correctly: No more guessing what a "trailing arm" actually is.
- Understand the relationships between components: See how each part affects the others.
- Diagnose problems efficiently: Pinpoint the source of issues instead of throwing parts at the problem.
- Perform repairs safely: Know what you're dealing with before you start wrenching.
- Plan modifications intelligently: Understand the impact of aftermarket parts on the suspension geometry.
Essentially, it transforms you from a passive observer to an active participant in your car's well-being.
Key Specs and Main Parts
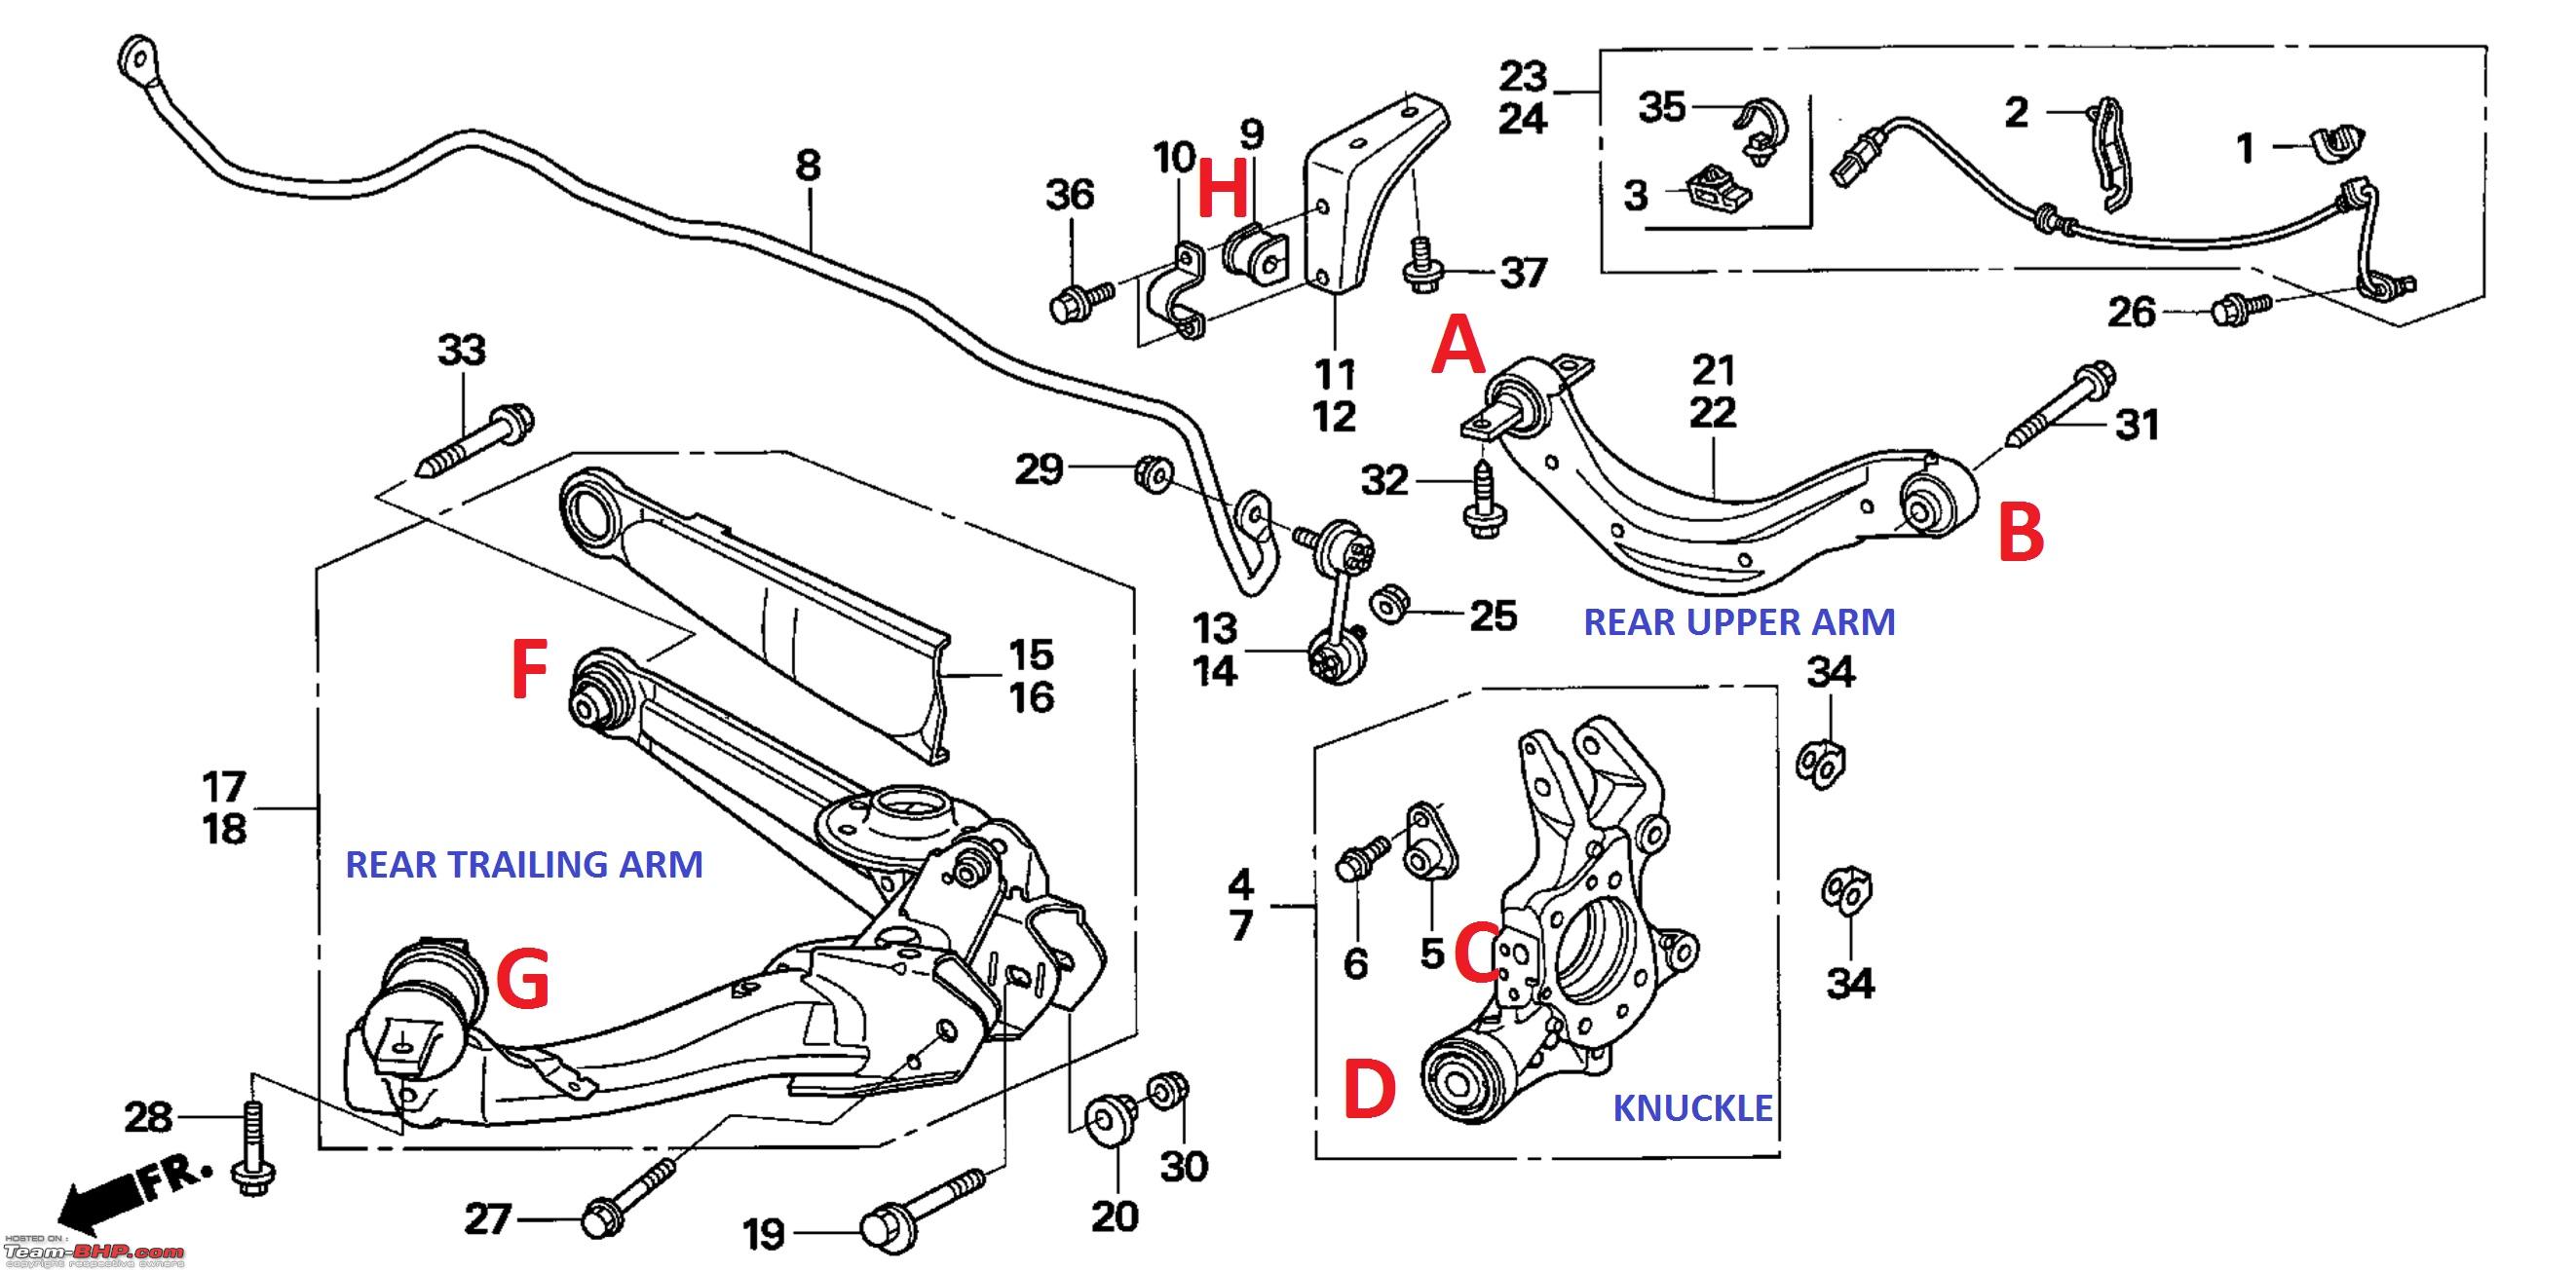
The 2008 Civic EX Coupe utilizes a double-wishbone independent rear suspension. This design provides excellent handling characteristics and ride comfort. Here's a breakdown of the major components:
- Upper Control Arm: Connects the wheel hub to the vehicle's frame (chassis). Controls the upper movement of the suspension. Often adjustable for camber.
- Lower Control Arm: Connects the wheel hub to the vehicle's frame (chassis). Handles most of the suspension load. May be a single arm or a multi-link configuration.
- Shock Absorber (Damper): Controls the compression and rebound of the suspension, preventing excessive bouncing and oscillations. Filled with hydraulic fluid.
- Coil Spring: Provides the primary support for the vehicle's weight and absorbs bumps in the road. Works in conjunction with the shock absorber.
- Wheel Hub/Bearing Assembly: Houses the wheel bearing, allowing the wheel to rotate freely. The brake rotor or drum is mounted to this assembly.
- Trailing Arm (Sometimes): Some double-wishbone designs use a trailing arm to help locate the hub and control fore-aft movement.
- Stabilizer Bar (Sway Bar): Connects the left and right sides of the suspension, reducing body roll during cornering. Links to the control arms via end links.
- Bushings: Rubber or polyurethane components that isolate vibrations and allow controlled movement between suspension parts. Critical for ride quality and handling.
- Knuckle (Upright): The structural component that connects the various suspension arms to the wheel hub and bearing. It also acts as the mounting point for the brake caliper.
Specific specs, such as spring rates, shock damping values, and control arm lengths, are crucial for performance and alignment. These are often documented in the service manual. The diagram will visually represent these components, making their location and function clear.
Symbols and Diagram Conventions
Understanding the symbols on the diagram is key to interpreting its information:
- Solid Lines: Typically represent rigid components, like control arms or the vehicle's frame.
- Dashed Lines: Often indicate hidden components or the path of motion.
- Circles/Dots: Represent pivot points or joints, like bushings or ball joints.
- Color Coding (if present): Colors may be used to differentiate between different types of components or systems. The key should be provided within the diagram legend.
- Arrows: Indicate the direction of force or movement. For example, an arrow on a shock absorber might indicate the direction of compression.
- Numbers/Labels: These correspond to parts lists, allowing you to identify specific components and their part numbers.
Remember that diagrams can vary slightly depending on the source. Always refer to the legend or accompanying documentation for clarification.
How It Works
The rear suspension's job is to keep the wheels in contact with the road surface while providing a comfortable ride. Here's a simplified explanation of how the 2008 Civic EX Coupe's double-wishbone system accomplishes this:
When the wheel encounters a bump, the coil spring compresses, absorbing the impact. The shock absorber then dampens the spring's oscillations, preventing the car from bouncing excessively. The upper and lower control arms allow the wheel to move up and down while maintaining its orientation relative to the road. The bushings at the pivot points provide compliance and reduce noise and vibration. The stabilizer bar links the two sides of the suspension, reducing body roll during cornering by transferring force from one side to the other.
The geometry of the control arms is carefully designed to optimize handling and stability. Factors like camber (the angle of the wheel relative to the vertical) and toe (the angle of the wheel relative to the direction of travel) are critical and are adjusted during wheel alignment.
Real-World Use – Basic Troubleshooting
Here are some common rear suspension problems and how the diagram can help you diagnose them:
- Clunking Noise: Could be worn-out bushings in the control arms, shock absorbers, or stabilizer bar links. The diagram helps you locate these components and visually inspect them for wear or damage.
- Bouncing or Floating Ride: Likely due to worn-out shock absorbers. The diagram shows the location of the shocks, making them easy to access for inspection.
- Uneven Tire Wear: Could be a sign of misaligned suspension. The diagram helps you understand the components that affect alignment (e.g., control arms, camber adjustment points).
- Excessive Body Roll: May indicate a problem with the stabilizer bar or its end links. The diagram clarifies the stabilizer bar's location and connections.
Before replacing any parts, always perform a thorough inspection to confirm the diagnosis. Use a pry bar to check for play in the bushings and ball joints. Look for signs of damage or leaks on the shock absorbers.
Safety Considerations
Working on the suspension can be dangerous if proper precautions are not taken. Always use jack stands to support the vehicle. Never rely solely on a jack. Particular attention is needed with the coil springs. These store tremendous energy, and if released uncontrolled, they can cause serious injury. Use a proper spring compressor tool to safely compress the spring before removing it from the vehicle. Incorrect use of a spring compressor is extremely dangerous. Be aware of brake lines and ABS sensors. Damage to these components can compromise your braking system. Disconnect the battery before working on any electrical components in the suspension, such as ABS sensors. Also, loosening or disconnecting suspension components can affect the vehicle's alignment. It's crucial to have the alignment checked and adjusted after any suspension work.
Finally, always refer to the vehicle's service manual for specific torque specifications and procedures. Over-tightening or under-tightening bolts can damage components or compromise safety.
With this information and the 2008 Honda Civic EX Coupe rear suspension diagram (which, remember, we have it ready for you to download!), you're well-equipped to tackle a variety of suspension-related tasks. Remember to take your time, be methodical, and prioritize safety.