Honda Civic Front Suspension Diagram
Whether you're tackling a suspension refresh, diagnosing a clunking noise, or just trying to understand your vehicle better, a Honda Civic front suspension diagram is an invaluable resource. This article will break down the diagram's components, explain its function, and offer practical advice for using it in real-world scenarios. We'll cover the key specs, common symbols, and even touch on some essential safety precautions. And don't worry, we've got a downloadable diagram ready for you at the end. Let's dive in!
Purpose of the Honda Civic Front Suspension Diagram
Why bother with a diagram? Well, a front suspension diagram serves several crucial purposes:
- Repair and Maintenance: It's a roadmap for disassembly and reassembly. Knowing where each bolt goes and how components interact is critical for successful repairs, such as replacing struts, ball joints, or control arms.
- Troubleshooting: Diagnosing suspension issues becomes much easier when you can visualize the entire system. The diagram helps you trace the source of noises, vibrations, or handling problems.
- Modification and Upgrades: Planning modifications like lowering springs, coilovers, or aftermarket sway bars requires a thorough understanding of the existing suspension geometry.
- General Understanding: Even if you don't plan on wrenching on your Civic, the diagram provides a deeper understanding of how your car handles and rides.
Key Specs and Main Parts
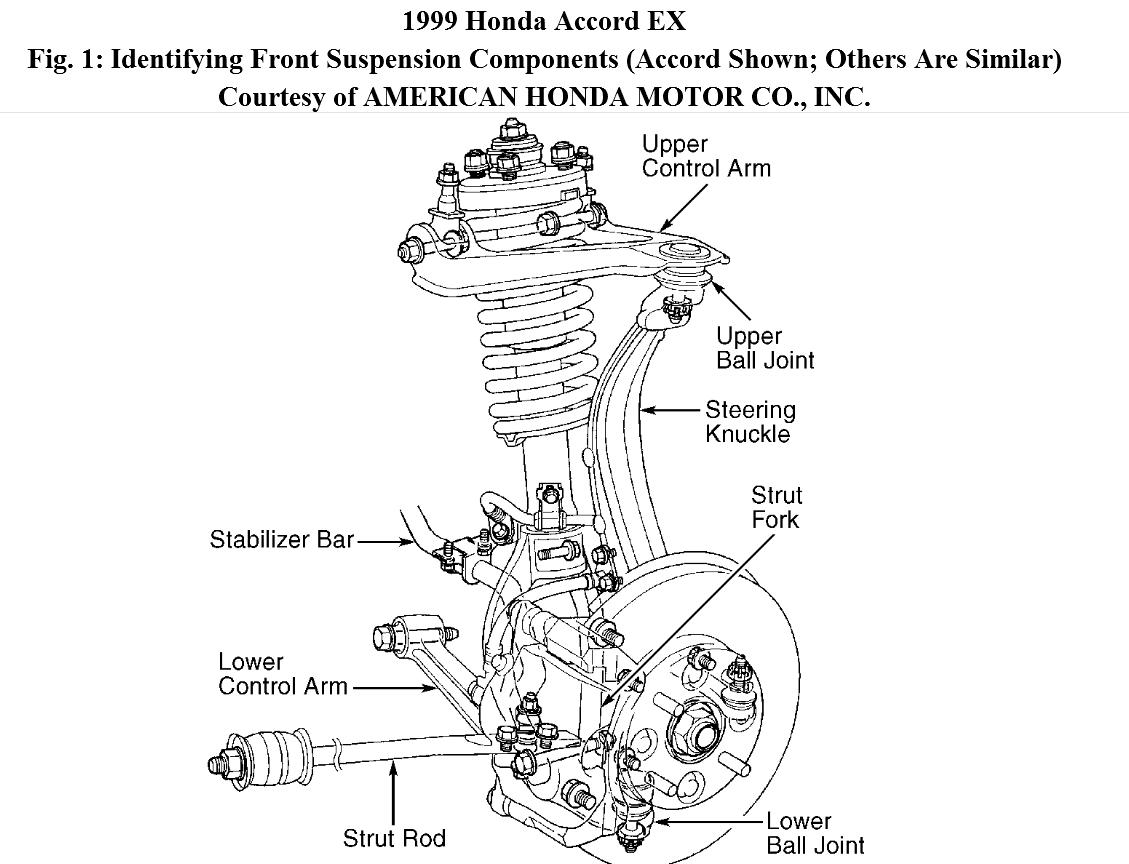
The Honda Civic, particularly popular generations (EG, EK, EP, FD, and more recent models), primarily use a MacPherson strut front suspension. Let's look at the major components you'll find on the diagram:
- MacPherson Strut: This is the heart of the system. It combines the spring and shock absorber into a single unit. The strut provides structural support, controls spring oscillations, and dampens road impacts. Key specs often include spring rate (measured in lbs/in or N/mm) and strut dampening characteristics.
- Lower Control Arm: This connects the wheel hub to the vehicle's frame. It allows the wheel to move up and down while maintaining its alignment. Specs might include material (steel or aluminum) and bushing type (rubber, polyurethane).
- Ball Joint: A spherical joint connecting the lower control arm to the wheel hub. It allows for steering and suspension movement. Key specs concern load rating and range of motion.
- Wheel Hub/Bearing Assembly: This assembly houses the wheel bearing, allowing the wheel to rotate freely. The hub attaches to the spindle.
- Tie Rod End: Connects the steering rack to the steering knuckle (part of the wheel hub assembly). It transmits steering input to the wheels. There are inner and outer tie rod ends.
- Sway Bar (Anti-Roll Bar): A torsion bar connecting the left and right sides of the suspension. It resists body roll during cornering. Specs include diameter and material.
- Sway Bar End Links: Connect the sway bar to the struts or control arms. They transmit the twisting force of the sway bar.
- Spindle/Knuckle: The upright that holds the wheel hub and bearings and connects to the strut and tie rod end.
Note: Specifications vary widely depending on the Civic model and year. Always consult your vehicle's repair manual for precise specs.
Understanding the Symbols
Diagrams use symbols to represent different components and connections. Here's a breakdown of common symbols you might encounter:
- Solid Lines: Represent physical connections, such as bolts, welds, or fasteners.
- Dashed Lines: Often indicate hidden components or internal parts, like fluid passages within the strut.
- Arrows: Show the direction of movement or force, such as suspension travel or steering input.
- Color Coding: Some diagrams use colors to distinguish different materials or systems. For example, blue might represent hydraulic fluid lines, while green could denote electrical wiring related to ABS sensors.
- Icons: Small symbols might represent specific components like bushings, grease fittings, or sensors. A key or legend will explain these.
Pay close attention to the legend or key that accompanies the diagram. This is crucial for accurate interpretation.
How It Works: A Simplified Explanation
The MacPherson strut suspension works by converting vertical wheel movement into controlled dampening. When the wheel encounters a bump, the strut compresses, absorbing the impact. The spring provides resistance, while the shock absorber dampens the oscillations of the spring, preventing the car from bouncing excessively. The lower control arm maintains the wheel's position and allows for suspension articulation. The sway bar links the left and right sides, reducing body roll during cornering.
Steering input, transmitted through the steering rack and tie rod ends, pivots the steering knuckle, turning the wheel. The ball joint allows the wheel hub to pivot while maintaining its connection to the lower control arm.
Real-World Use: Basic Troubleshooting Tips
Here are some common suspension problems and how the diagram can help you diagnose them:
- Clunking Noise: A clunking sound often indicates worn ball joints, tie rod ends, sway bar end links, or strut mounts. Use the diagram to locate these components and visually inspect them for play or damage.
- Squeaking Noise: Squeaking can be caused by dry bushings or worn ball joints. Use the diagram to identify potential friction points and lubricate them.
- Excessive Body Roll: This could be due to a broken or disconnected sway bar, worn sway bar bushings, or weak struts. The diagram will help you locate the sway bar and its connections.
- Uneven Tire Wear: Misalignment is a common cause of uneven tire wear. While the diagram won't diagnose misalignment directly, it will help you understand the adjustable components (tie rod ends) that control alignment.
- Bouncing or Floating Ride: Indicates worn struts or shocks. The diagram clearly shows their location and integration into the suspension system.
Always start with a visual inspection before attempting any repairs. Compare the components on your car to those depicted in the diagram to identify any discrepancies or damage.
Safety First: Risky Components
Working on a suspension system involves inherent risks. The following components store significant energy and can be dangerous if handled improperly:
- Struts/Coil Springs: These are under tremendous compression. Never disassemble a strut without a proper spring compressor. Improper disassembly can result in serious injury or death.
- Ball Joints and Tie Rod Ends: When disconnecting these components, the suspension can suddenly drop. Use appropriate supports to prevent uncontrolled movement.
Always wear safety glasses and gloves when working on any automotive system. Disconnect the negative battery terminal before starting any electrical work. If you are uncomfortable performing a particular task, seek the assistance of a qualified mechanic.
By understanding the Honda Civic front suspension diagram, you can confidently diagnose, repair, and maintain your vehicle's suspension system. Remember to prioritize safety and consult your vehicle's repair manual for specific instructions and torque specifications.
Ready to get started? We've got a detailed Honda Civic front suspension diagram ready for you to download. It covers various Civic generations to get you started! Download it [HERE - Placeholder for Diagram Link]. Good luck!