How Much Does It Cost To Replace A Wiring Harness
Alright, let's talk about replacing a wiring harness. It's a pretty involved job, but definitely achievable for a seasoned DIYer or a modder looking to really understand their car's electrical system. I'll break down the costs and considerations involved, and hopefully, give you a good idea of what you're getting into.
The Purpose of a Wiring Harness Replacement
Why would you even consider replacing a wiring harness? Well, there are a few reasons. First, significant damage. Think fire, flood, or rodent infestation. Second, extensive modification. If you're doing a serious engine swap or adding a ton of aftermarket electronics, the existing harness might not cut it. Third, age. Over time, wiring can become brittle, corroded, and the insulation can crack, leading to shorts and electrical gremlins. Diagnosing individual wire faults in an old harness can be a nightmare; sometimes, a complete replacement is the most efficient (and reliable) solution.
Key Specs and Main Parts of a Wiring Harness
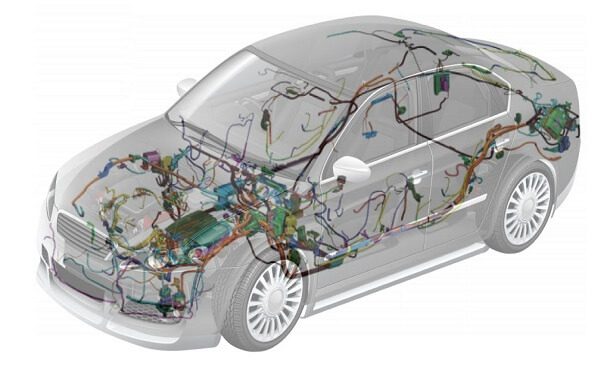
Before we dive into cost, let's cover the basics. A wiring harness, also known as a wiring loom, is essentially the central nervous system of your car's electrical system. It bundles together all the wires that transmit power and signals throughout the vehicle. Think of it like the arteries and veins in your body. A simplified wiring harness consists of:
- Wires: These are the conductors, typically copper, carrying electrical current. Gauge (thickness) is crucial; thicker wires handle higher amperage. Look for wires meeting SAE (Society of Automotive Engineers) standards.
- Connectors: These allow components to easily plug into the harness. They come in various sizes and shapes, often keyed to prevent incorrect connections. Weatherproof connectors are essential in engine compartments and undercarriage.
- Terminals: These are the metal contacts inside the connectors that make the electrical connection. Proper crimping of the terminals is critical for a reliable connection. A poor crimp can lead to high resistance and heat buildup.
- Protective Sheathing: This includes things like electrical tape, corrugated tubing (split loom), and heat shrink tubing. This sheathing protects the wires from abrasion, heat, and moisture.
- Grounding Straps: These connect the harness to the vehicle's chassis, providing a path for current to return to the battery. Proper grounding is essential for preventing electrical noise and ensuring proper operation of sensors and other components.
- Fuses and Relays: While not strictly part of the harness itself, fuse boxes and relay centers are integral to the wiring system and often attach directly to the main harness. Fuses protect circuits from overcurrent, while relays act as electrically controlled switches, allowing low-current circuits to control high-current devices (like headlights or starters).
The Cost Breakdown: Parts and Labor
Okay, let's get down to the brass tacks. Replacing a wiring harness can vary wildly in price depending on several factors:
- Vehicle Make and Model: This is the biggest factor. A harness for a classic VW Beetle will be vastly cheaper than one for a modern BMW with a complex CAN bus system.
- Complexity of the Harness: A basic engine harness will be less expensive than a full body harness that includes all the lights, sensors, and accessories.
- New vs. Used vs. Custom: You can buy a brand-new harness from the manufacturer or a reputable aftermarket supplier. You can also try to source a used harness from a salvage yard. Used can save money, but be wary of damage or corrosion. Custom harnesses are built to your exact specifications, ideal for modified vehicles, but significantly more expensive.
- Labor Costs (if you're not DIYing): This can be a major component of the overall cost. Harness replacement is labor-intensive, requiring careful removal of the old harness and meticulous installation of the new one. Expect to pay anywhere from $75 to $150 per hour for labor, depending on the shop and your location.
Here's a rough estimate of the cost breakdown:
- New OEM Harness: $500 - $3,000+ (depending on vehicle and complexity)
- Aftermarket Harness: $300 - $1,500+ (can be more affordable than OEM, but quality can vary)
- Used Harness: $100 - $500 (buyer beware!)
- Custom Harness: $1,000 - $5,000+ (for highly specialized applications)
- Labor: 10 - 40+ hours (depending on complexity), translating to $750 - $6,000+
Total Cost: So, you're looking at a range of roughly $850 (for a very simple DIY replacement with an aftermarket harness) to $9,000+ (for a complex harness replacement done by a professional mechanic on a high-end vehicle).
How It Works: The Replacement Process
The replacement process involves several key steps:
- Disconnect the Battery: This is absolutely crucial for safety. Disconnect the negative terminal first.
- Label Everything: Before disconnecting any wires, label everything. Take pictures, draw diagrams, use colored tape – anything to help you remember where each wire goes. This is the most important step!
- Carefully Remove the Old Harness: Disconnect all the connectors, unclip the harness from its mounting points, and gently pull it out. Be careful not to damage any surrounding components.
- Install the New Harness: Route the new harness in the same way as the old one, connecting all the connectors and securing it to the mounting points. Double-check all connections to ensure they are secure.
- Test the System: Reconnect the battery (positive terminal first). Test all the electrical components to ensure they are working correctly. Start with low-draw components and work your way up. Use a multimeter to verify voltage and continuity.
Real-World Use: Basic Troubleshooting Tips
After replacing the harness, you might encounter some issues. Here are a few common problems and troubleshooting tips:
- Component Not Working: Check the fuse for that component. If the fuse is blown, replace it. If it blows again immediately, there's likely a short circuit in that circuit. Double-check your wiring.
- Engine Doesn't Start: Check the starter relay and the connections to the starter motor. Ensure the engine is properly grounded.
- Warning Lights on the Dashboard: Use an OBD-II scanner to read the diagnostic trouble codes (DTCs). This will give you clues about the problem.
- Intermittent Problems: These are the hardest to diagnose. Check for loose connections, corroded terminals, and damaged wires. A multimeter can be your best friend here.
Safety: Risky Components
Working with electrical systems can be dangerous. Here are some components to be particularly careful around:
- Battery: Contains sulfuric acid and can produce explosive gases. Always disconnect the negative terminal first and wear safety glasses.
- Airbag System: Airbags are triggered by electrical impulses. If you're working near the airbag module or sensors, disconnect the battery and wait at least 10 minutes before proceeding.
- High-Voltage Systems (Hybrids and EVs): These systems contain extremely high voltages that can be lethal. Only qualified technicians should work on these systems.
- Fuel System Components: Disconnect the fuel pump relay before working on any fuel system components to prevent accidental fuel injection.
Always consult your vehicle's repair manual for specific instructions and safety precautions.
Additional Thoughts
Replacing a wiring harness is not a job to be taken lightly. It requires patience, attention to detail, and a good understanding of automotive electrical systems. If you're not comfortable with any of these things, it's best to leave it to a professional. However, with proper preparation and the right tools, it can be a rewarding and cost-effective way to repair or upgrade your vehicle.
Remember that accurate wiring diagrams are essential for this task. They show the layout of the circuits, the location of components, and the color coding of the wires. Having the right wiring diagram specific to your vehicle will significantly increase your chances of success.
We have the wiring diagram file for various car models, which you can refer to. If you need the wiring diagram file, please download it from here.