
Hyundai Elantra Serpentine Belt Diagram
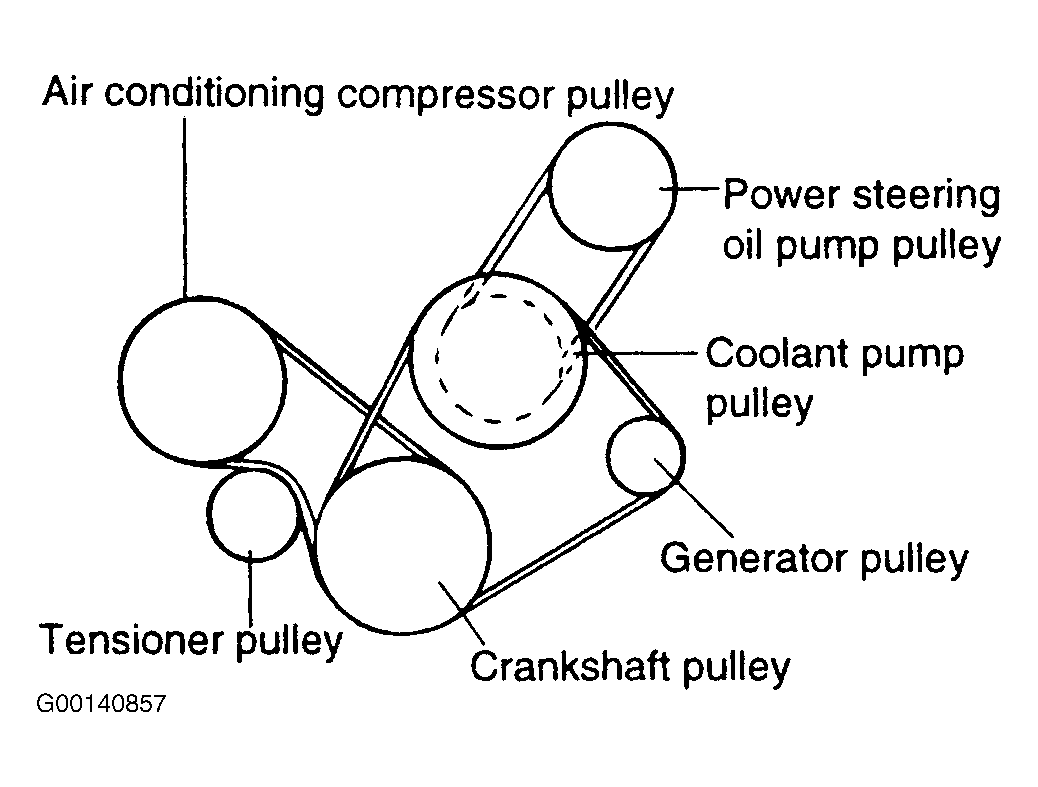
The serpentine belt in your Hyundai Elantra is a vital component, responsible for powering numerous accessories that make your driving experience comfortable and safe. Think of it as the unsung hero, silently working in the background to keep your alternator charging, your power steering assisting, and your air conditioning cooling. Understanding its routing and function is crucial for preventative maintenance, diagnosing issues, and performing repairs yourself. This article will serve as your comprehensive guide to the Hyundai Elantra serpentine belt diagram, equipping you with the knowledge to confidently tackle related tasks.
Purpose of the Serpentine Belt Diagram
The serpentine belt diagram is more than just a pretty picture; it's a crucial tool for several reasons:
- Replacement: If your belt is cracked, worn, or damaged, you'll need to replace it. The diagram shows you exactly how the new belt needs to be routed around the various pulleys. Incorrect routing can lead to component failure and potential engine damage.
- Troubleshooting: A squealing or chirping noise coming from the engine bay is often a sign of a loose or worn serpentine belt. The diagram helps you identify which components the belt drives, narrowing down potential sources of the noise.
- Inspection: Regular inspection of the serpentine belt is part of good preventative maintenance. The diagram lets you quickly verify that the belt is properly aligned and that all the components are in their correct positions.
- Component Replacement: If you're replacing an alternator, power steering pump, or air conditioning compressor, you'll need to remove the serpentine belt. The diagram ensures you can reinstall it correctly.
- Education: Understanding the serpentine belt system allows you to better understand your vehicle's operation and diagnose potential problems before they become major issues.
Key Specs and Main Parts
While specific dimensions and materials vary slightly depending on the Elantra's year and engine (e.g., 2.0L, 1.8L, etc.), the basic components remain the same.
- Serpentine Belt: A long, continuous belt made of reinforced rubber, designed to withstand high temperatures and constant flexing. Its length and number of ribs are critical and engine-specific. Always refer to your vehicle's specifications or a trusted parts supplier.
- Crankshaft Pulley: Connected directly to the crankshaft, this pulley drives the serpentine belt, transferring engine power to the accessories.
- Alternator Pulley: The alternator generates electricity to charge the battery and power electrical components. The serpentine belt turns the alternator pulley.
- Power Steering Pump Pulley: This pulley drives the power steering pump, providing hydraulic assistance to make steering easier.
- Air Conditioning (A/C) Compressor Pulley: This pulley drives the A/C compressor, which circulates refrigerant to cool the cabin.
- Tensioner Pulley: A spring-loaded pulley that maintains constant tension on the serpentine belt, preventing slippage and ensuring proper operation of the accessories. It's a critical component; a failing tensioner can cause belt failure.
- Idler Pulley: A smooth pulley that guides the serpentine belt around other components, often used to change the belt's direction of travel.
Belt Length and Rib Count are critical specifications. Incorrect length can prevent the belt from being properly tensioned, and the wrong rib count will cause misalignment and premature wear. Always double-check the part number against your vehicle's VIN.
Symbols in the Diagram
Serpentine belt diagrams utilize standard symbols to represent different components and belt routing:
- Solid Line: Represents the path of the serpentine belt itself.
- Arrowheads: Indicate the direction of belt travel around each pulley. Pay close attention to these!
- Circles: Represent pulleys. The size and labels indicate which component the pulley belongs to (e.g., ALT for alternator, P/S for power steering).
- Spring Symbol: Often depicted near the tensioner pulley to signify its spring-loaded mechanism.
- Component Labels: Abbreviations like "ALT," "P/S," "A/C," "CRANK," "TENSIONER," and "IDLER" are used to identify each component.
- Dashed Lines (less common): Sometimes used to indicate the *back* of the belt running against a smooth pulley, often the idler or tensioner.
Most diagrams are in black and white, but some may use color-coding. For example, a bold line might indicate the primary path of the belt, while a thinner line indicates a secondary or less critical path. Refer to the diagram's legend for specific color interpretations if available.
How It Works
The serpentine belt system works by transferring rotational power from the engine's crankshaft to various accessories. The crankshaft pulley, driven directly by the engine, turns the serpentine belt. The belt, in turn, wraps around the pulleys of the alternator, power steering pump, A/C compressor, and other components, causing them to rotate and perform their respective functions. The tensioner pulley maintains the necessary tension on the belt to prevent slippage and ensure efficient power transfer.
The tensioner is a critical element. It constantly adjusts to compensate for belt stretch and wear, ensuring the belt remains tight enough to drive the accessories without excessive slippage. A failing tensioner will often cause the belt to squeal, vibrate, or even come off completely.
Real-World Use: Basic Troubleshooting
Here are a few common issues and how the serpentine belt diagram can help:
- Squealing Noise: A squealing noise, especially when the engine is first started or under load, is often caused by a slipping serpentine belt. Use the diagram to check belt tension and alignment. Look for cracks, glazing, or wear on the belt. Also, inspect the tensioner pulley for proper operation. If it's wobbly or making noise, it likely needs replacement.
- Battery Light On: If the battery light illuminates on your dashboard, it could indicate a problem with the charging system. Use the diagram to verify that the serpentine belt is properly driving the alternator. A broken or slipping belt will prevent the alternator from charging the battery.
- Loss of Power Steering: If your steering suddenly becomes very difficult, it could be due to a broken or slipping serpentine belt preventing the power steering pump from operating. Consult the diagram to confirm the belt is correctly routed and tensioned around the power steering pump pulley.
- No Air Conditioning: A lack of cold air from your A/C system could be caused by a broken or slipping serpentine belt that's not driving the A/C compressor. Use the diagram to verify the belt's proper routing.
Pro Tip: Before replacing the serpentine belt, take a picture or video of the existing belt routing. This can be a lifesaver if you get confused during reinstallation.
Safety Considerations
Working on the serpentine belt system involves several safety risks:
- Hot Engine Components: The engine and its components, including the pulleys and belt, can become extremely hot. Always allow the engine to cool completely before working on the serpentine belt.
- Moving Parts: The serpentine belt system operates while the engine is running. Never put your hands or tools near the belt or pulleys while the engine is running. Even momentarily engaging the starter can cause serious injury.
- Spring-Loaded Tensioner: The tensioner pulley is under significant spring tension. Use the correct tool to release the tension safely before removing the belt. Improperly releasing the tensioner can cause the tool to slip, resulting in injury.
- Eye Protection: Always wear safety glasses when working on your vehicle to protect your eyes from debris.
- Battery Disconnect: It's always a good practice to disconnect the negative battery terminal before working on any electrical or mechanical components to prevent accidental shorts or shocks.
Important Note: If you're not comfortable working on your vehicle, it's always best to consult a qualified mechanic. The serpentine belt system is relatively simple, but mistakes can be costly and potentially dangerous.
We have a detailed Hyundai Elantra Serpentine Belt Diagram available for download. It's a high-resolution image that you can print out and keep in your garage for easy reference. This diagram will be invaluable for any work you do on your Elantra's serpentine belt system.