Hyundai Sonata 2.4 Serpentine Belt Diagram
The serpentine belt in your Hyundai Sonata with the 2.4L engine is a crucial component responsible for driving multiple engine accessories. Understanding its routing and how it interacts with various pulleys is essential for maintenance, troubleshooting, and even some performance modifications. This article will provide a detailed breakdown of the serpentine belt diagram for your Sonata, equipping you with the knowledge needed to tackle related repairs and upgrades with confidence.
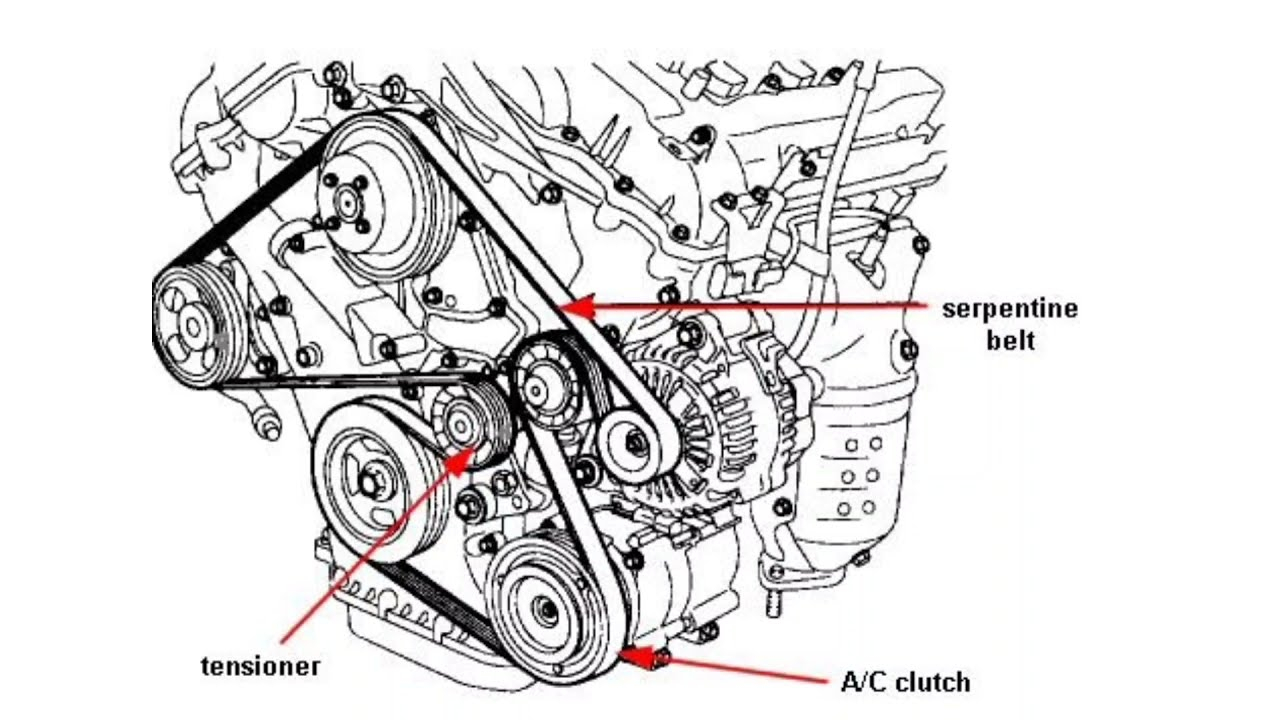
Purpose of the Serpentine Belt Diagram
The serpentine belt diagram is your roadmap to understanding the belt's path through the engine bay. It serves several vital purposes:
- Repair and Replacement: The most obvious use is for correctly re-installing a new serpentine belt after removing the old one for replacement. A misrouted belt can lead to significant engine damage.
- Troubleshooting: A diagram helps you identify which accessory is driven by the belt. If you have a failing alternator, for example, you can quickly identify if it's directly belt-driven and check the belt's condition and tension.
- Preventive Maintenance: Regular inspection of the belt, pulleys, and tensioner, guided by the diagram, can help prevent costly breakdowns.
- Learning Engine Layout: The diagram provides a visual representation of how the engine accessories are arranged and their relationship to each other. This can be invaluable for understanding the overall engine design.
- Performance Modifications: If you're considering upgrading accessories like the alternator or power steering pump, knowing the belt routing allows you to plan for belt length adjustments or pulley changes.
Key Specs and Main Parts (Hyundai Sonata 2.4L)
The specific serpentine belt diagram will vary slightly depending on the year of your Sonata's 2.4L engine (typically G4KC or G4KE engines). However, the fundamental components and layout remain largely consistent. The main parts you'll find illustrated in the diagram include:
- Crankshaft Pulley (Harmonic Balancer): This is the driving pulley, connected directly to the engine's crankshaft. It provides the rotational force to the belt.
- Alternator Pulley: Driven by the belt, the alternator generates electricity to power the car's electrical system and charge the battery.
- Power Steering Pump Pulley: Powers the hydraulic power steering system, making it easier to steer the vehicle.
- Air Conditioning Compressor Pulley: Engages when the air conditioning is turned on, compressing the refrigerant.
- Tensioner Pulley: Maintains the correct tension on the serpentine belt. This is often a spring-loaded mechanism. Proper tension is critical for belt longevity and accessory performance.
- Idler Pulley(s): Smooth, non-driven pulleys that guide the belt's path and prevent it from rubbing against other components.
- Serpentine Belt: The belt itself, made of reinforced rubber, transmits power from the crankshaft to the accessories. The proper belt length is essential; consult your owner's manual or a reputable parts store.
Understanding Symbols on the Diagram
Serpentine belt diagrams use specific symbols to represent different components and features. Here's a breakdown of common symbols:
- Solid Lines: Represent the path of the serpentine belt. The thickness of the line might indicate the belt's width, but this is not always the case.
- Circles or Ovals: Represent pulleys. Larger circles typically indicate larger pulleys like the crankshaft pulley.
- Arrows: Show the direction of rotation for each pulley. This is essential for understanding how the belt should be routed.
- Dotted Lines: May represent the back (smooth) side of the belt touching a pulley, as opposed to the grooved side. Always verify this information with a trusted source.
- Color Coding: Some diagrams use color coding to distinguish between different sections of the belt path or different types of pulleys. If colors are used, a legend will be provided.
- Icons/Labels: Each pulley will usually be labeled with its corresponding component (e.g., "ALT" for alternator, "P/S" for power steering).
How It Works: Power Transmission
The serpentine belt system works by transmitting rotational power from the engine's crankshaft to the various accessories. Here's a simplified explanation:
- The engine's crankshaft rotates the crankshaft pulley.
- The serpentine belt is wrapped around the crankshaft pulley.
- As the crankshaft pulley rotates, it drives the serpentine belt.
- The serpentine belt, in turn, rotates the pulleys attached to the alternator, power steering pump, air conditioning compressor, and other accessories.
- The tensioner pulley maintains the correct tension on the belt, ensuring that it doesn't slip or become too loose. This also prevents the belt from overheating and cracking prematurely. A properly functioning tensioner is critical to your serpentine belt system.
Real-World Use: Basic Troubleshooting
Here are some common problems and how the serpentine belt diagram can help:
- Squealing Noise: Often indicates a loose or worn belt. Use the diagram to check the belt's condition and the tensioner's operation. If the belt is glazed (shiny and hard), cracked, or frayed, it needs to be replaced.
- Accessory Failure: If the alternator, power steering pump, or AC compressor stops working, check the serpentine belt for damage or slippage. The diagram will show you which accessories are driven by the belt.
- Overheating: A slipping or broken serpentine belt can prevent the water pump from circulating coolant properly, leading to overheating. The diagram can confirm if the water pump is driven by the serpentine belt (though on some engines, the water pump may be driven by the timing belt).
- Battery Not Charging: A broken or slipping belt can prevent the alternator from charging the battery. Use the diagram to locate the alternator and check the belt's condition.
- Belt Keeps Breaking: This could be due to a misaligned pulley, a worn tensioner, or an incorrect belt length. The diagram helps you identify the pulleys and check their alignment. Also, ensure you are using the correct belt specified for your Sonata model year.
Safety Precautions
Working on the serpentine belt system can be dangerous. Here are some safety tips:
- Disconnect the Negative Battery Terminal: Before working on any electrical components, disconnect the negative battery terminal to prevent electrical shock.
- Work in a Well-Ventilated Area: If you are using cleaning solvents or lubricants, work in a well-ventilated area to avoid inhaling harmful fumes.
- Use Proper Tools: Use the correct tools for the job. This will help prevent damage to the components and reduce the risk of injury.
- Keep Fingers Clear: Be extremely careful when working near the serpentine belt while the engine is running. The belt and pulleys can cause serious injury.
- Hot Components: Be aware that some components, like the engine block and exhaust manifold, can be very hot. Allow them to cool down before working on them.
- Tensioner Springs: The tensioner pulley can have significant spring tension. Use the appropriate tools to relieve the tension safely when removing or installing the belt. Incorrectly handling the tensioner can cause injury.
A well-maintained serpentine belt system is crucial for the reliable operation of your Hyundai Sonata 2.4L. Understanding the diagram and the function of each component will empower you to perform preventative maintenance, diagnose problems, and make informed decisions about repairs and upgrades.
We have the serpentine belt diagram file for your Hyundai Sonata 2.4L. You can download it and refer to it whenever you need it.