
Hyundai Sonata Serpentine Belt Diagram
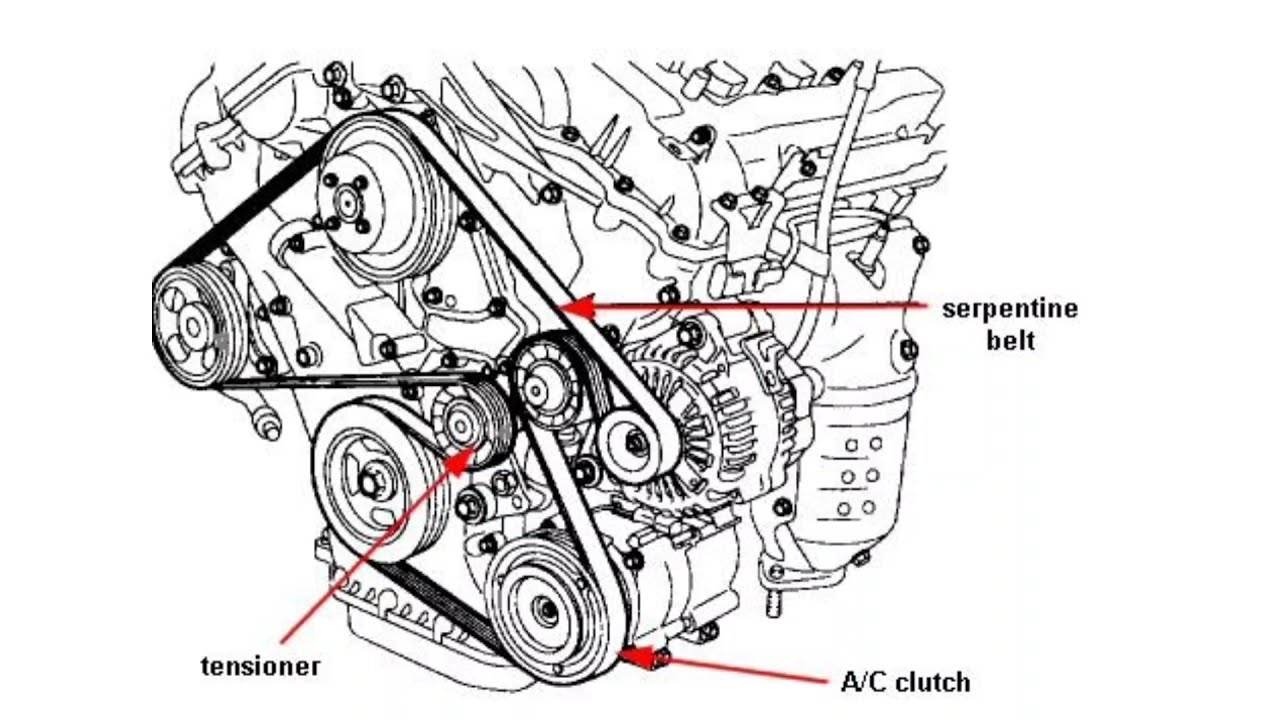
The serpentine belt in your Hyundai Sonata is a critical component responsible for powering several essential engine accessories. Understanding its routing, tension, and overall health is crucial for maintaining your vehicle's reliability. This article serves as a comprehensive guide to the Sonata's serpentine belt diagram, enabling you to perform basic maintenance, troubleshoot issues, and even tackle more complex repairs with confidence. We'll cover everything from the diagram's key specs and symbols to real-world troubleshooting tips. Moreover, we have the complete diagram file available for download at the end of this article.
Purpose of the Serpentine Belt Diagram
Why bother understanding the serpentine belt diagram? Well, several reasons. Firstly, it's indispensable for replacing a worn or damaged belt. Without a clear visual guide, re-routing the new belt correctly can be a frustrating and potentially damaging process. Secondly, the diagram is vital for diagnosing belt-related issues. Squealing noises, power steering failures, or air conditioning malfunctions can often be traced back to a worn, loose, or improperly routed belt. Finally, studying the diagram enhances your general understanding of your engine's layout and accessory drive system, which can prove invaluable for various maintenance and modification projects.
Key Specs and Main Parts
The serpentine belt system in your Sonata typically drives the following accessories:
- Alternator: Charges the battery and provides power to the vehicle's electrical system.
- Power Steering Pump: Provides hydraulic assistance for steering.
- Air Conditioning Compressor: Compresses refrigerant to cool the cabin.
- Water Pump: Circulates coolant to regulate engine temperature. (On some models, the water pump may be driven by the timing belt instead.)
- Idler Pulley(s): Smooth, unpowered pulleys that guide the belt and maintain proper tension.
- Tensioner Pulley: A spring-loaded pulley that automatically adjusts the belt tension as it stretches and wears. This is critical for proper system operation.
- Crankshaft Pulley (Harmonic Balancer): The main pulley driven directly by the engine's crankshaft, which then drives the serpentine belt.
While the specific arrangement and the number of idler pulleys can vary slightly depending on the Sonata's engine (e.g., 2.0L, 2.4L, or turbocharged variants) and model year, the fundamental principle remains the same. Understanding the location and function of each component is essential when interpreting the serpentine belt diagram.
Understanding Diagram Symbols
The serpentine belt diagram uses a standardized set of symbols to represent different components and their connections. Familiarizing yourself with these symbols will make it easier to understand the diagram and follow the belt routing.
- Solid Lines: Represent the serpentine belt itself. The thickness of the line doesn't usually indicate anything specific.
- Arrows: Indicate the direction of belt rotation around each pulley. Pay close attention to these arrows, as they are crucial for correct routing.
- Circles: Represent pulleys. The size of the circle doesn't necessarily correlate to the actual pulley size.
- Labels: Each pulley is typically labeled with an abbreviation indicating its function (e.g., ALT for Alternator, P/S for Power Steering, A/C for Air Conditioning, WP for Water Pump, TENS for Tensioner, IDL for Idler).
- Tensioner Symbol: The tensioner pulley is often depicted with a spring symbol or an arrow indicating the direction of its spring-loaded movement. This is a critical component to identify on the diagram.
Some diagrams may also use different colors to differentiate between the belt's path on the front and back sides of the pulleys, but this is less common. The key is to focus on the arrows indicating the direction of rotation.
How It Works
The serpentine belt system is a simple yet ingenious mechanism. The engine's crankshaft drives the crankshaft pulley, which in turn drives the serpentine belt. The belt wraps around the various accessory pulleys, transferring rotational force to them and enabling them to function. The tensioner pulley maintains constant tension on the belt, preventing slippage and ensuring efficient power transfer. Without proper tension, the belt can slip, causing reduced performance of the accessories and potentially damaging the belt itself.
The serpentine belt's path is carefully designed to maximize contact with each pulley, ensuring sufficient grip for optimal power transfer. The idler pulleys strategically guide the belt, preventing it from rubbing against other engine components and maintaining the correct alignment.
Real-World Use: Basic Troubleshooting Tips
Here are some common issues you might encounter with your Sonata's serpentine belt and how the diagram can help with troubleshooting:
- Squealing Noise: Often caused by a loose belt, a worn belt, or a misaligned pulley. Use the diagram to inspect the belt's routing and check the tensioner pulley for proper operation. A visual inspection of the belt can reveal cracks, glazing, or missing chunks.
- Loss of Power Steering/Air Conditioning: If either of these systems suddenly stops working, the belt may have broken or slipped off a pulley. Use the diagram to identify which pulley drives the affected accessory and inspect the belt's path to that pulley.
- Battery Not Charging: If the alternator isn't being driven properly due to a slipping or broken belt, the battery won't charge. Again, use the diagram to locate the alternator pulley and inspect the belt's condition and routing.
- Visual Inspection with Diagram: Before starting any work, visually inspect the belt and pulleys *with the engine OFF*. Compare what you see with the diagram. Are there any discrepancies? Is the belt routed correctly? Are any pulleys damaged or wobbling?
When troubleshooting, remember to always prioritize safety and disconnect the negative battery terminal before working on any electrical components. A multimeter can be used to check the alternator's output to confirm if it's the belt or the alternator itself that is the problem. This will require specialized knowledge and training.
Safety Considerations
Working on the serpentine belt system can be hazardous if proper precautions are not taken.
- Engine Off: Always work on the serpentine belt system with the engine completely off and the ignition key removed.
- Hot Engine: Avoid working on the system immediately after the engine has been running, as components can be extremely hot.
- Moving Parts: Never reach near the serpentine belt or pulleys while the engine is running. The belt can quickly grab clothing or fingers, causing serious injury.
- Tensioner Spring: The tensioner pulley spring is under considerable tension. When releasing the tensioner to remove the belt, use a suitable tool (typically a socket wrench or a specialized belt tensioner tool) to control its movement and prevent it from snapping back forcefully.
- Eye Protection: Always wear safety glasses to protect your eyes from debris.
The most risky component to manipulate is the tensioner pulley. Always ensure you have the correct tool and understand the release mechanism *before* attempting to release the tension. Incorrectly releasing the tensioner can lead to injury or damage to the tool or surrounding components.
Remember! If you're not comfortable working on the serpentine belt system, it's always best to consult a qualified mechanic.
We hope this guide has provided a comprehensive understanding of your Hyundai Sonata's serpentine belt diagram. Remember to always consult your vehicle's service manual for specific instructions and torque specifications. To further assist you, we have the complete serpentine belt diagram file available for download. Please reach out, and we can provide a secure link to the document.