
Ignition Honda Main Relay Wiring Diagram
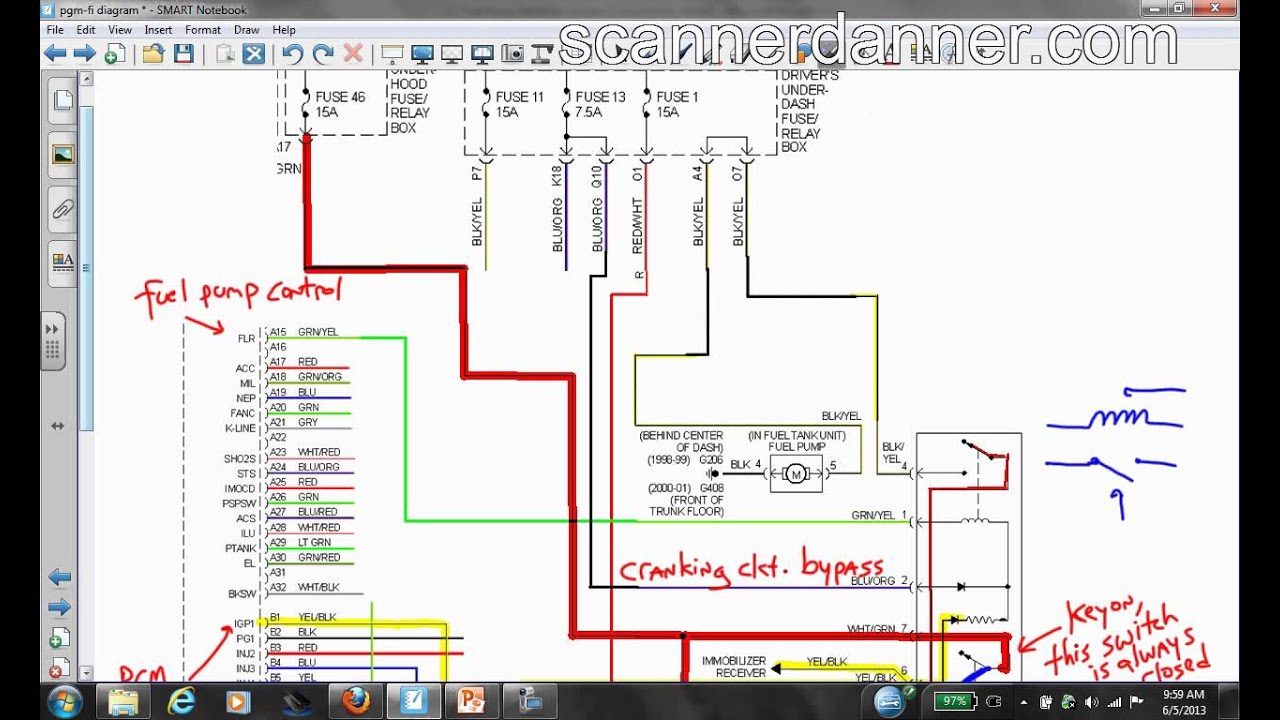
Let's talk about the Honda main relay wiring diagram. This isn't just some piece of paper; it's your roadmap to understanding, diagnosing, and potentially repairing fuel delivery issues in many Honda vehicles. Whether you're chasing down a no-start condition, planning an engine swap, or simply deepening your automotive knowledge, understanding this diagram is crucial.
Purpose
Why bother learning this? The main relay is a critical component responsible for supplying power to the fuel pump and the engine control unit (ECU) – the car's brain. If it fails, you’re often left stranded. This diagram helps you:
- Diagnose No-Start Issues: Pinpoint whether the relay is faulty, the wiring is damaged, or if the issue lies elsewhere.
- Perform Electrical Repairs: Accurately trace circuits and identify broken or shorted wires.
- Understand Vehicle Electrical Systems: Gain a deeper understanding of how the fuel and engine management systems interact.
- Perform Modifications: Safely and correctly modify or upgrade components related to fuel delivery.
Key Specs and Main Parts
Before diving into the diagram itself, let’s identify the main players:
The Main Relay:
This is the star of the show. In many Hondas, it's a dual relay – essentially two relays housed in a single unit. One relay controls power to the ECU, and the other controls power to the fuel pump. This dual design provides an extra layer of safety and ensures both systems receive power simultaneously. The relay is an electromechanical switch: a small current energizes a coil, which then pulls a set of contacts together to allow a larger current to flow.
ECU (Engine Control Unit):
The ECU controls various aspects of the engine, including fuel injection and ignition timing. It signals the main relay to energize the fuel pump circuit.
Fuel Pump:
Located in the fuel tank, the fuel pump delivers fuel to the engine. It receives power directly from the main relay.
Ignition Switch:
Turning the ignition switch sends power to various circuits, including the main relay's control circuit.
Battery:
The source of all electrical power in the vehicle. The main relay draws power directly from the battery for the fuel pump circuit.
Grounds:
Every electrical circuit needs a ground. Poor grounding is a common cause of electrical problems. The main relay, ECU, and fuel pump all require solid ground connections.
Symbols – Decoding the Diagram
A wiring diagram is a visual language. Here's a breakdown of common symbols:
- Lines: Represent wires. Thicker lines often indicate wires carrying higher current.
- Colors: Each wire has a specific color (e.g., BLK for black, RED for red, YEL for yellow). This is crucial for identification during troubleshooting. Using the correct color-coded wire is paramount.
- Circles: Represent connectors or junctions where multiple wires connect.
- Rectangles: Often represent components like relays, switches, or sensors.
- Ground Symbol: A series of descending lines, indicating a connection to the vehicle's chassis (ground).
- Relay Symbol: A coil (representing the electromagnet) and a switch (representing the contacts). You'll usually see both the normally open (NO) and normally closed (NC) contacts, although the main relay typically only uses the NO contact for the fuel pump.
- Fuse Symbol: A squiggly line inside a rectangle. Indicates a fuse for circuit protection.
How It Works
Let's break down the typical Honda main relay circuit:
- Ignition On: When you turn the ignition key to the "ON" position, power is sent to one side of the main relay's coil circuit.
- ECU Activation: The ECU checks for engine rotation (cranking signal). If the engine is turning, the ECU provides a ground to the other side of the main relay's coil circuit.
- Relay Energized: With power and ground, the main relay's coil is energized, creating an electromagnetic field.
- Contacts Close: This electromagnetic field pulls the relay's contacts closed, completing the circuit to the fuel pump.
- Fuel Pump Activation: Power now flows from the battery, through the main relay, to the fuel pump, causing it to run and deliver fuel to the engine.
- ECU Control: The ECU continues to provide a ground to the main relay as long as the engine is running. If the engine stalls, the ECU removes the ground, de-energizing the relay and shutting off the fuel pump.
Some Hondas, especially older models, may have a slightly different configuration, but the fundamental principle remains the same.
Real-World Use – Basic Troubleshooting Tips
Okay, your Honda won't start. How can this knowledge help?
- Check Fuses: Always start with the basics. Locate the fuel pump fuse and the main relay fuse in the fuse box. Replace any blown fuses. A blown fuse indicates a possible short circuit.
- Listen for the Fuel Pump: Turn the ignition to the "ON" position (without starting the engine). You should hear a brief buzzing sound from the fuel pump (located in or near the fuel tank) as it primes the fuel system. If you don't hear it, the fuel pump may not be receiving power.
- Check Relay Operation: Locate the main relay. You can sometimes feel a "click" when it activates. If not, you can try swapping it with a known-good relay (if available) to see if that resolves the issue.
- Test for Voltage: Use a multimeter to check for voltage at the fuel pump connector when the ignition is in the "ON" position. If there's no voltage, trace the wiring back to the main relay and then to the battery and ignition switch, consulting your wiring diagram.
- Inspect Wiring and Connectors: Look for damaged, corroded, or loose wires and connectors. Pay particular attention to ground connections. Clean and tighten any suspect connections.
Remember, always disconnect the negative battery terminal before working on any electrical components.
Safety – Highlight Risky Components
Working with electrical systems and fuel systems can be dangerous. Here are some key safety considerations:
- Fuel Leaks: Gasoline is highly flammable. Be extremely careful when working around the fuel pump or fuel lines. Avoid sparks or open flames. Have a fire extinguisher readily available.
- Electrical Shock: Disconnect the negative battery terminal before working on any electrical components. Even with the battery disconnected, capacitors in the ECU can store a charge. Avoid touching exposed wires or connectors.
- Airbag System: The airbag system is also electrically activated. Consult your vehicle's service manual for proper procedures to disable the airbag system before working on any electrical components near the airbags or sensors.
- High-Current Circuits: The fuel pump circuit carries a relatively high current. Be sure to use properly rated wiring and connectors when making any modifications.
- Battery Safety: Batteries contain acid and can produce explosive gases. Wear eye protection and avoid sparks when working with the battery.
If you're not comfortable working with electrical or fuel systems, it's best to consult a qualified mechanic.
Understanding the main relay wiring diagram is a valuable skill for any DIY mechanic. It empowers you to diagnose and repair fuel delivery issues, saving you time and money. But always prioritize safety and consult a professional if you're unsure about any procedure.
We have the Honda Main Relay Wiring Diagram file. You can download it here. Please remember to use it responsibly and safely.