Ignition Switch Wiring Diagram Chevy
Let's dive into the fascinating world of Chevy ignition switch wiring diagrams! Understanding this diagram is crucial for a variety of reasons. Whether you're tackling a no-start issue, upgrading your electrical system, adding aftermarket accessories, or simply want to understand the intricate workings of your classic or modern Chevy, this knowledge will prove invaluable. This isn't just about fixing a problem; it's about empowering yourself with the ability to diagnose and resolve electrical gremlins that can plague any vehicle.
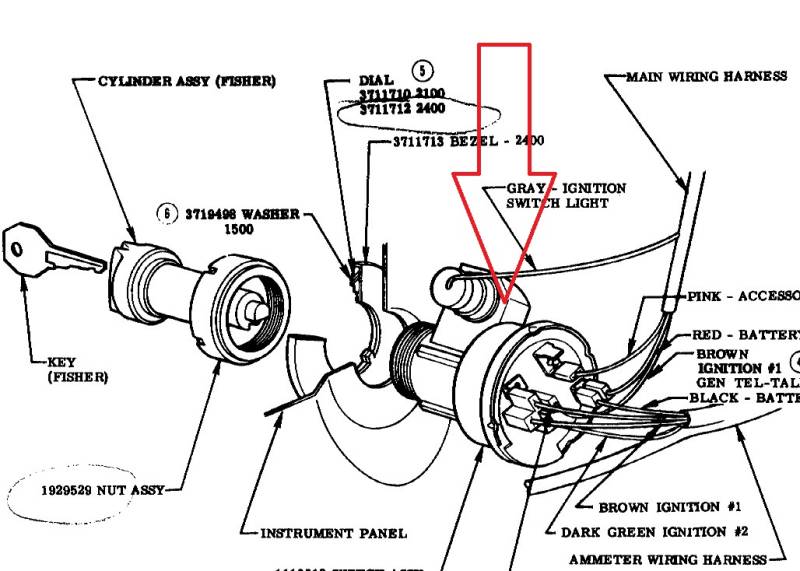
Purpose and Importance
The ignition switch wiring diagram is essentially a roadmap of the electrical connections within your Chevy's ignition system. It's not just a bunch of lines and symbols; it's a critical tool that allows you to trace circuits, identify faulty components, and ensure proper voltage flow. Without it, you're essentially troubleshooting blindfolded, relying on guesswork which can lead to further damage and wasted time. Consider it your car's electrical Rosetta Stone!
Here’s why having and understanding the diagram is important:
- Troubleshooting No-Start Issues: The most common reason for needing this diagram. A faulty ignition switch or related wiring can prevent the engine from starting.
- Wiring Up Aftermarket Accessories: Adding things like remote start systems, alarms, or even custom lighting often requires tapping into the ignition circuit. This diagram helps you do it safely and correctly.
- Component Replacement: Replacing a worn-out or damaged ignition switch is significantly easier and safer with the wiring diagram at your disposal.
- Educational Purposes: For those eager to learn more about automotive electrical systems, the ignition switch diagram serves as an excellent learning resource.
- Preventing Electrical Fires: Incorrect wiring can lead to short circuits and potentially dangerous electrical fires. The diagram ensures proper connections.
Key Specs and Main Parts
Before we dive into the diagram itself, let's identify the key components involved. The ignition switch wiring diagram will typically include these elements:
- Ignition Switch: The heart of the system. It's a multi-position switch that controls power to various circuits depending on the key position. The typical positions are:
- Lock: Steering wheel locked, key can be removed.
- Off: Engine off, but some accessories may still work.
- Accessory (ACC): Allows operation of accessories like the radio without the engine running.
- Run (ON): Powers the engine control unit (ECU), fuel pump, and other critical systems.
- Start: Activates the starter motor to crank the engine.
- Battery: Provides the main power source for the entire electrical system.
- Starter Motor: Cranks the engine to initiate combustion.
- Solenoid: A small electromagnet that engages the starter motor.
- Fuses and Relays: Protect the circuits from overloads and control high-current devices. Fuses are sacrificial devices designed to break the circuit when current exceeds a certain level. Relays are electrically operated switches that allow a low-current circuit to control a high-current circuit.
- Wiring Harness: A bundle of wires that connect the various components. Each wire is typically color-coded for easy identification.
- ECU (Engine Control Unit): The brain of the engine, controlling various functions based on sensor inputs. (Sometimes indirectly connected).
Different Chevy models, especially across generations (think a 1967 Camaro vs. a 2023 Silverado), will have vastly different wiring schematics. Even within the same model year, differences may exist based on trim levels and options. Therefore, *always* use the correct diagram specific to your vehicle’s year, make, model, and engine. A VIN decoder can be helpful in confirming the exact specifications.
Symbols – Understanding the Language
The wiring diagram is a symbolic representation of the electrical system. Understanding these symbols is crucial for interpreting the diagram correctly:
- Lines: Represent wires connecting different components. Thicker lines might indicate heavier gauge wiring.
- Colors: Each wire is assigned a specific color code (e.g., red for power, black for ground). These colors are usually indicated next to the lines representing the wires. A key explaining the color codes is usually included on the diagram itself.
- Circles: Can represent various components, such as lamps, switches, or relays.
- Rectangles: Often represent devices like fuses, relays, or connectors.
- Zigzag Lines: Typically represent resistors.
- Ground Symbol: Indicates a connection to the vehicle's chassis, providing a return path for the current. It looks like a downward-pointing triangle or a series of horizontal lines decreasing in length.
- Connectors: Represented by shapes indicating where wires connect.
- Fuse Symbols: A fuse symbol will look like a wavy line inside a rectangle.
- Relay Symbols: Show the coil and the switch contacts of the relay.
Pay close attention to the nomenclature used on the diagram. Abbreviations like "IGN" for ignition, "BAT" for battery, "GND" for ground, and "ACC" for accessory are common. Make sure you understand what each abbreviation represents.
How It Works – A Simplified Explanation
The ignition switch acts as a central control point, directing power from the battery to various systems depending on its position. When you insert the key and turn it to the "Run" position, the switch connects the battery to the ignition system, ECU, fuel pump, and other essential components. This allows the engine to run.
Turning the key to the "Start" position activates the starter motor, which cranks the engine until it starts. Once the engine is running, you release the key, and the switch returns to the "Run" position.
The wiring diagram illustrates the path of electricity from the battery, through the ignition switch, and to each of these components. By tracing these paths, you can identify potential points of failure.
Real-World Use – Basic Troubleshooting Tips
Here are some common scenarios where you might need to use the ignition switch wiring diagram and some basic troubleshooting tips:
- No Crank, No Start: Use a multimeter to check for voltage at the starter solenoid when the key is in the "Start" position. If there's no voltage, trace the wiring back through the ignition switch to identify the break in the circuit. Check fuses along the way!
- Engine Cranks But Doesn't Start: The problem might not be with the ignition switch itself, but with a component it powers, such as the fuel pump or ignition coil. Use the diagram to trace the power supply to these components.
- Accessory Not Working: If an accessory like the radio doesn't work in the "Accessory" position, check the wiring and fuses related to the accessory circuit.
- Fuse Keeps Blowing: A blown fuse indicates a short circuit. Use the diagram to identify the components powered by that fuse and check for damaged wiring or faulty components. A multimeter can be used to test for continuity to ground.
Important Tools: A multimeter, test light, wire stripper, crimping tool, and a good set of screwdrivers are essential for electrical troubleshooting.
Safety – Proceed with Caution
Working with automotive electrical systems can be dangerous. Here are some crucial safety precautions:
- Disconnect the Battery: Always disconnect the negative battery cable before working on any electrical components. This prevents accidental short circuits and potential shocks.
- Identify Circuits: Before cutting or splicing any wires, use the wiring diagram to identify the circuit and its function.
- Use Proper Tools: Use insulated tools to prevent shocks.
- Never Bypass Fuses: Fuses are designed to protect the circuit from overloads. Bypassing a fuse can lead to a fire.
- Be Aware of Airbags: Some wiring harnesses may be located near airbag modules. Handle these components with extreme care. Accidental deployment of an airbag can cause serious injury.
- Fuel Lines: Be cautious of fuel lines when working around the ignition system, especially on older vehicles.
Always double-check your work before reconnecting the battery.
Get Your Diagram!
Remember, this explanation is a general guide. The specific ignition switch wiring diagram for your Chevy will vary depending on the year, make, and model. We have a wide range of Chevy wiring diagrams available. Contact us with your vehicle information, and we will provide you with the correct diagram to download and use.
By understanding the ignition switch wiring diagram, you'll be well-equipped to tackle a wide range of electrical issues on your Chevy, saving you time, money, and frustration. Happy wrenching!