Independent Front Suspension Diagram
Let's dive into the world of independent front suspension (IFS) diagrams. Whether you're tackling a repair, planning a modification, or simply want to understand your vehicle better, a good IFS diagram is an invaluable tool. Think of it as a roadmap to your car's handling and ride comfort. We'll break down the key components, decipher the symbols, and even touch on some troubleshooting tips. Plus, we have a detailed IFS diagram file available for you to download (link provided at the end).
Purpose: Why Understand IFS Diagrams?
Why bother with an IFS diagram? Well, for starters, it's your secret weapon when diagnosing suspension issues. Is your car pulling to one side? Experiencing excessive body roll? The diagram can help you pinpoint the potential culprit. More specifically, understanding the diagram can help you:
- Troubleshooting: Locate components quickly when diagnosing issues.
- Repair and Replacement: Identify parts that need replacing and understand their assembly.
- Modification Planning: Design suspension upgrades with a clear understanding of existing geometry.
- General Understanding: Gain a deeper knowledge of how your vehicle's suspension works.
Key Specs and Main Parts of IFS
Before we dissect the diagram itself, let's familiarize ourselves with the key components typically found in an independent front suspension system. Keep in mind that specific designs vary (double wishbone, MacPherson strut, etc.), but the core principles remain the same.
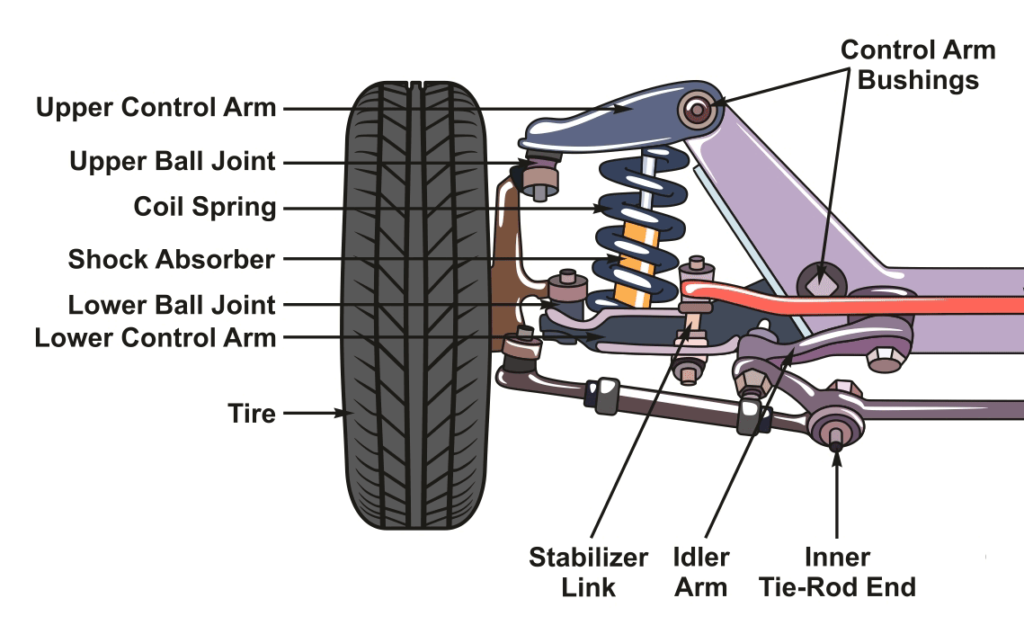
Control Arms (Wishbones):
These are pivoting levers that connect the wheel hub to the vehicle's chassis. They control wheel movement in the vertical plane. You'll typically find two control arms per wheel (upper and lower) in a double wishbone setup. Control arms are crucial for maintaining proper wheel alignment and controlling suspension geometry throughout its travel.
Strut (MacPherson Strut Design):
A combined shock absorber and coil spring unit. This design is compact and relatively inexpensive, making it a common choice. The strut provides damping and supports the vehicle's weight.
Shock Absorber (Damper):
Controls the rate at which the suspension compresses and rebounds, preventing excessive bouncing and improving ride quality. These may be separate from the spring (as in a double wishbone setup) or integrated into a strut.
Coil Spring:
Provides the necessary spring force to support the vehicle's weight and absorb bumps. Its spring rate determines the stiffness of the suspension.
Steering Knuckle (Spindle):
Connects the wheel hub to the suspension system and allows for steering. It's a critical component that bears the weight of the vehicle and allows the wheel to pivot.
Wheel Hub and Bearings:
The wheel hub houses the wheel bearings, which allow the wheel to rotate freely. Maintaining proper bearing lubrication is essential for smooth and safe operation.
Tie Rods (Inner and Outer):
Connect the steering rack to the steering knuckle, transmitting steering inputs to the wheels. They are adjustable to allow for wheel alignment adjustments.
Sway Bar (Anti-Roll Bar):
Connects the left and right sides of the suspension, reducing body roll during cornering. It resists twisting forces, helping to keep the vehicle level.
Bushings:
Made of rubber or polyurethane, bushings provide a compliant connection between suspension components, absorbing vibrations and reducing noise. They wear out over time and can affect handling.
Ball Joints:
Allow for pivoting movement between suspension components, such as the control arms and steering knuckle. They are subject to wear and tear and require periodic inspection.
Decoding the Diagram: Symbols, Lines, and Colors
An IFS diagram isn't just a pretty picture; it's a technical document with specific symbols and conventions. Let's look at common elements you'll encounter:
Solid Lines:
Typically represent physical components or connections.
Dashed Lines:
Often indicate hidden components, movement paths, or related systems (like brake lines).
Arrows:
Show the direction of movement or force. For example, arrows might indicate the direction of spring compression or the travel path of a control arm.
Circles and Squares:
May represent specific components like bolts, bushings, or sensors. The diagram's legend (if provided) will explain the specific meaning of each symbol.
Color Coding:
Some diagrams use color to differentiate between systems (e.g., steering components in one color, suspension in another). Again, refer to the legend for clarification.
Understanding these conventions makes it easier to trace connections and visualize the interaction between different parts of the suspension.
How It Works: The IFS in Action
Now, let's put it all together and see how the IFS works. When the wheel encounters a bump, the following happens:
- Compression: The wheel moves upward, compressing the coil spring or strut. The shock absorber dampens this movement, preventing excessive bouncing.
- Control Arm Movement: The control arms pivot, allowing the wheel to move vertically while maintaining proper alignment. The ball joints allow for this pivoting motion.
- Sway Bar Resistance: If the other wheel remains relatively stable, the sway bar resists the upward movement of the first wheel, reducing body roll.
- Steering Knuckle Pivoting: The steering knuckle allows the wheel to pivot for steering, independent of the suspension movement.
- Return to Equilibrium: Once the bump is passed, the spring pushes the wheel back down, and the shock absorber controls the rebound motion.
The beauty of IFS is that each wheel can react independently to road irregularities, providing a smoother and more controlled ride compared to a solid axle suspension.
Real-World Use: Basic Troubleshooting Tips
Okay, time to get practical. Here are a few common suspension issues and how the IFS diagram can help:
Clunking Noise:
Possible causes: worn ball joints, loose control arm bushings, damaged sway bar links. The diagram helps you locate these components for inspection.
Pulling to One Side:
Possible causes: Misaligned wheels, damaged control arm, worn tie rod ends. Use the diagram to understand the alignment geometry and identify potentially bent or damaged parts.
Excessive Body Roll:
Possible causes: Worn sway bar bushings, broken sway bar, weak shock absorbers. The diagram highlights the sway bar's role in controlling body roll.
Uneven Tire Wear:
Possible causes: Misalignment, worn ball joints, bent control arms. The diagram helps visualize how suspension components affect wheel alignment and tire contact.
Important: Always start with a visual inspection. Look for obvious signs of damage, wear, or looseness before diving into complex troubleshooting procedures. Many problems can be spotted with a trained eye and a good IFS diagram.
Safety First: Risky Components
Suspension work can be dangerous. Be aware of these potential hazards:
Compressed Springs:
Coil springs store a tremendous amount of energy. Never disassemble a strut or coil spring without proper spring compressors. Improper handling can result in serious injury or death.
Jacking and Support:
Always use jack stands to support the vehicle securely before working underneath it. Never rely solely on a jack.
Torque Specifications:
Follow manufacturer's torque specifications when tightening suspension components. Over- or under-tightening can lead to component failure and safety issues.
Brake Lines and ABS Sensors:
Be careful not to damage brake lines or ABS sensors when working on the suspension. Damage to these components can compromise braking performance.
When in doubt, consult a qualified mechanic. Suspension components are critical to your vehicle's safety and handling. It's better to be safe than sorry.
We hope this guide has given you a solid understanding of independent front suspension diagrams. With a little practice, you'll be able to navigate these diagrams with confidence and tackle suspension-related tasks more effectively.
You can download our detailed IFS diagram file here. Good luck, and stay safe!