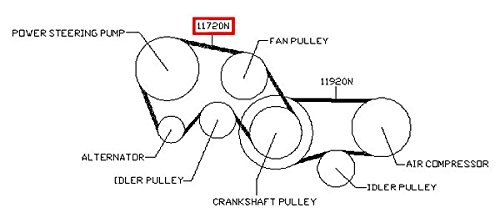
Infiniti G35 Serpentine Belt Diagram
Alright, let's dive into the serpentine belt diagram for your Infiniti G35. Whether you're tackling a squeaky belt, planning some engine work, or just want to understand your G35's engine bay a little better, knowing how to read and interpret this diagram is crucial. Consider this your comprehensive guide to demystifying that wiggly belt and the components it powers.
Purpose of the Serpentine Belt Diagram
The serpentine belt diagram is, at its core, a visual roadmap for the belt's path around the various pulleys on the front of your engine. Its main purpose is multifaceted:
- Installation and Replacement: The most common use. When replacing a worn or broken serpentine belt, the diagram ensures you route the new belt correctly. A misrouted belt can lead to severe engine damage.
- Troubleshooting: Identifying which component might be causing a squealing noise or a loss of function (e.g., power steering, air conditioning).
- Diagnosis: Understanding the relationship between different engine accessories and their potential impact on each other. For example, a failing A/C compressor might put undue stress on the belt, causing premature wear or breakage.
- Preventative Maintenance: Part of a regular inspection to ensure the belt is correctly aligned and in good condition.
Key Specs and Main Parts (Infiniti G35 VQ35DE)
Before we get into the diagram itself, let's identify the key components involved in the serpentine belt system of a typical G35 with the VQ35DE engine. These components are consistent across most G35 models, but always verify against your specific year and trim.
- Crankshaft Pulley (Harmonic Balancer): This is the drive pulley, directly connected to the crankshaft. It's the *source* of power for the entire system. Its rotational motion, driven by engine combustion, gets transferred to the serpentine belt.
- Alternator Pulley: The alternator converts mechanical energy from the belt into electrical energy to charge the battery and power the vehicle's electrical system.
- Power Steering Pump Pulley: The power steering pump provides hydraulic assistance to make steering easier. The belt drives the pump, which circulates power steering fluid.
- Air Conditioning (A/C) Compressor Pulley: This engages when you turn on the A/C. The belt drives the compressor, which circulates refrigerant to cool the cabin.
- Water Pump Pulley: The water pump circulates coolant throughout the engine to prevent overheating. Maintaining proper coolant flow is critical for engine health.
- Idler Pulley(s): These smooth, non-driven pulleys guide the belt and maintain proper tension. They often have bearings that can fail, leading to noise and potential belt damage.
- Tensioner Pulley: This spring-loaded pulley maintains the correct tension on the serpentine belt. It's crucial for optimal belt performance and preventing slippage. A failing tensioner can cause belt squeal and premature wear.
The belt itself is usually a multi-ribbed belt, sometimes referred to as a ribbed V-belt, designed to provide a larger contact area with the pulleys and transmit more power efficiently. The OEM (Original Equipment Manufacturer) belt specification for the G35 will vary slightly by year, but it is usually a specific length and number of ribs (e.g., 7PK1870). Consult your owner's manual or a parts catalog for the correct part number for your vehicle.
Symbols in the Serpentine Belt Diagram
Understanding the symbols used in the diagram is essential for accurate interpretation:
- Solid Lines: Represent the portion of the serpentine belt that makes direct contact with the pulley's grooved surface and *transmits power*.
- Dashed Lines: Typically, represent the *backside* of the belt running against a smooth pulley surface, usually an idler pulley or the tensioner pulley. They indicate the path of the belt but don't imply power transfer on that side.
- Arrows: Indicate the direction of rotation for each pulley. This is crucial for understanding how the belt is driven.
- Component Labels: Each pulley will be labeled with its corresponding component (e.g., "ALT" for Alternator, "P/S" for Power Steering, "A/C" for Air Conditioning, "W/P" for Water Pump, "CRANK" or "HARMONIC" for Crankshaft).
- Tensioner Indicator: Some diagrams may include a specific symbol to indicate the tensioner pulley's location and function.
- Routing Path Numbers: More complex diagrams might include numbered steps to guide you through the belt installation process.
- Color Coding (Less Common): Some advanced diagrams use color coding to highlight specific aspects of the belt routing (e.g., different sections of the belt, potential interference points). However, this is not typical for basic serpentine belt diagrams.
How It Works: The Serpentine Belt System
The serpentine belt system is a marvel of efficiency. The engine's rotational force, generated by the crankshaft, is transferred to the crankshaft pulley. The belt, wrapped around this pulley, then transmits this rotational force to all the other pulleys in the system. Because the belt "snakes" around all these components, it’s referred to as a serpentine belt.
The tensioner pulley is a vital part. It keeps the belt tight against the pulleys. Without the correct tension, the belt would slip, leading to reduced power output from the accessories. The spring-loaded tensioner arm automatically adjusts to compensate for belt stretch over time, maintaining optimal tension.
It’s important to note that the direction the belt travels around each pulley dictates the direction of rotation of that pulley. Understanding this is key to troubleshooting issues. For example, if the water pump pulley isn’t rotating in the correct direction, the engine will overheat.
Real-World Use and Basic Troubleshooting
Here are some practical tips for using the serpentine belt diagram to troubleshoot common issues:
- Squealing Belt: The most common symptom. This usually indicates a loose belt, a worn belt, or a failing pulley bearing. Check the tensioner pulley. Is it moving smoothly? Is the belt properly aligned within the pulley grooves? Also, inspect the belt for cracks, glazing, or missing ribs. A quick fix in a pinch can be belt dressing, but it is not a permanent solution and often masks a more serious problem.
- Loss of Power Steering: If your power steering suddenly stops working, inspect the belt to see if it's broken or slipping on the power steering pump pulley.
- No A/C: Similar to power steering, a broken or slipping belt can prevent the A/C compressor from functioning.
- Overheating: If the water pump isn't being driven, the engine will overheat quickly. Check the belt routing and tension.
- Charging Problems: A faulty alternator won't charge the battery. If the belt isn't properly driving the alternator, the battery will drain.
- Visual Inspection: Regularly inspect the belt for wear and tear, cracks, fraying, or missing chunks. A damaged belt should be replaced immediately.
When troubleshooting, always compare the actual belt routing with the diagram. Make sure the belt is properly seated in all the pulley grooves and that the tensioner is functioning correctly.
Safety Considerations
Working on the serpentine belt system can be dangerous if you're not careful. Here are some critical safety precautions:
- Disconnect the Battery: Always disconnect the negative battery terminal before working on any electrical components or the serpentine belt system.
- Engine OFF: Never work on the belt system while the engine is running. This is extremely dangerous and can lead to serious injury.
- Hot Components: Be careful of hot engine components, especially after the engine has been running. Allow the engine to cool down before starting work.
- Moving Parts: Keep your hands, clothing, and tools away from moving parts, especially the crankshaft pulley, when the engine is running (during diagnostic testing, for example).
- Eye Protection: Wear safety glasses to protect your eyes from debris.
- Belt Tensioner Tool: Use the correct belt tensioner tool to release the tension on the belt safely. Never attempt to force the tensioner with improvised tools. The spring is under high tension, and improper handling can lead to injury.
The crankshaft pulley and the tensioner pulley are particularly risky components. The crankshaft pulley is directly connected to the engine and rotates at high speeds. The tensioner pulley spring stores a significant amount of potential energy and can snap back violently if not handled correctly.
I hope this breakdown of the G35 serpentine belt diagram helps you tackle your next project with confidence. Remember to always consult your vehicle's service manual for specific instructions and torque specifications. And as always, if you're not comfortable performing a particular task, it's best to seek the assistance of a qualified mechanic.
We have a downloadable version of the serpentine belt diagram specifically for the Infiniti G35. Feel free to use it for your reference.