Infiniti G37 Serpentine Belt Diagram
Alright, let's dive into the serpentine belt diagram for your Infiniti G37. This seemingly simple component plays a *critical* role in keeping your engine's accessories running smoothly. Understanding its layout is essential for proper maintenance, troubleshooting, and even some performance modifications. Think of this guide as your reference point when tackling anything related to the serpentine belt system on your G37.
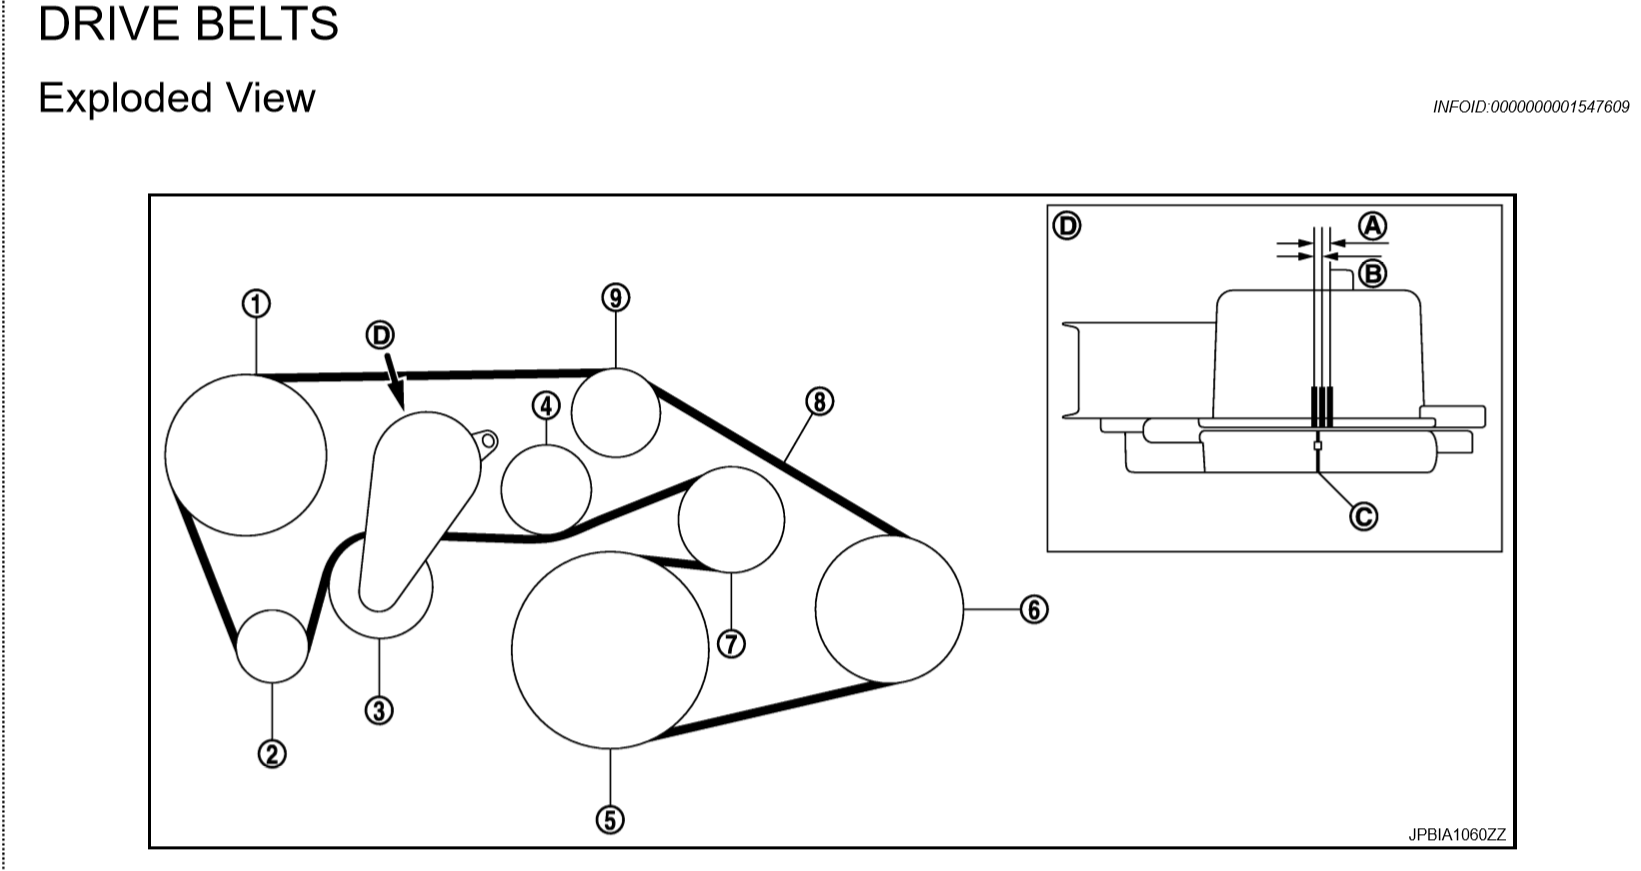
Purpose: Why This Diagram Matters
Why bother understanding the serpentine belt diagram? Several reasons:
- Maintenance and Replacement: The most obvious reason. Knowing the belt routing is crucial when replacing a worn or broken belt. Incorrect routing can lead to accessory failure, overheating, and even engine damage.
- Troubleshooting: A squealing belt, a non-functioning power steering, or a dead alternator? The diagram helps you pinpoint the potential cause by showing you which accessories are driven by the belt.
- Performance Modifications: Installing underdrive pulleys (which alter the belt's path and speed) requires a thorough understanding of the existing belt routing to ensure proper fitment and accessory functionality.
- Preventative Maintenance: Visual inspection becomes far more effective when you know what you're looking at. You can spot potential problems (cracks, wear, misalignment) *before* they become major headaches.
- Documentation: Having a clear, accurate diagram on hand is simply good practice for any DIY mechanic.
Key Specs and Main Parts
The Infiniti G37 utilizes a single, long serpentine belt to drive multiple engine accessories. Here's a breakdown of the key components and specs you'll encounter:
Main Components:
- Crankshaft Pulley (Harmonic Balancer): Located at the bottom of the engine, it's the driving force behind the belt. Connected directly to the engine's crankshaft.
- Alternator Pulley: Powers the electrical system and charges the battery.
- Power Steering Pump Pulley: Provides hydraulic assistance for steering.
- Air Conditioning Compressor Pulley: Drives the AC compressor, providing cooled air.
- Idler Pulleys: Smooth, non-driven pulleys that guide the belt along its path and provide necessary tension adjustment. These help maintain proper belt wrap around other pulleys.
- Tensioner Pulley: A spring-loaded pulley that automatically maintains the correct tension on the serpentine belt. This is *critical* for proper accessory operation and belt longevity.
Key Specs:
These specs will vary slightly depending on the exact year and model of your G37 (sedan, coupe, etc.). Always double-check your specific vehicle's information.
- Belt Length: This is a critical specification. Using the wrong length belt can cause damage. Typically measured in inches or millimeters. Refer to your vehicle's repair manual or parts catalog.
- Belt Width: Another important measurement. Again, consult your vehicle's specific information.
- Belt Type: Usually a multi-ribbed, EPDM rubber belt for high heat resistance and durability.
- Tension: Measured using a belt tension gauge. Proper tension is essential for optimal performance and belt life. A loose belt will slip (causing noise and reduced accessory performance), while an overtight belt will put excessive strain on the pulleys and bearings.
Symbols and Diagram Interpretation
Understanding the symbols on a serpentine belt diagram is key to correctly interpreting the layout.
- Solid Lines: Represent the *outer* surface of the serpentine belt. This is the side that makes contact with the pulley grooves.
- Dashed Lines: Usually indicate the *inner* (back) surface of the belt. Often used for routing around idler pulleys.
- Arrows: Indicate the direction of belt travel around each pulley. This is crucial for ensuring correct routing.
- Pulley Symbols:
- Simple Circle: Typically represents an idler pulley.
- Circle with Inner Detail: Usually indicates a driven accessory pulley (alternator, power steering, AC compressor). The internal detail can sometimes hint at the accessory type.
- Crankshaft Pulley: Often represented with a more elaborate design, sometimes including a representation of the crankshaft itself.
- Labels: Each pulley should be labeled with its function (e.g., "ALT" for alternator, "P/S" for power steering).
- Tensioner Location: Diagrams clearly mark the location of the tensioner pulley, often with an arrow indicating the direction to rotate it to release tension.
Example: A solid line running from the crankshaft pulley to the alternator pulley, with an arrow indicating clockwise rotation, tells you that the belt travels from the crank to the alternator, driving it in a clockwise direction.
How It Works
The serpentine belt system is elegantly simple in principle. The engine's rotational force, generated in the cylinders and transferred to the crankshaft, is harnessed to drive various accessories. The crankshaft pulley, being directly connected to the crankshaft, spins the serpentine belt. This belt, in turn, wraps around and drives the pulleys of the alternator, power steering pump, AC compressor, and sometimes other accessories. The tensioner pulley maintains the correct belt tension, ensuring adequate grip and preventing slippage. Idler pulleys guide the belt along the optimal path, maximizing contact and minimizing stress.
The key to the system's effectiveness is the *friction* between the belt and the pulleys. The multi-ribbed design of the belt increases the surface area in contact with the pulley grooves, maximizing friction and minimizing slippage. The tensioner pulley provides the necessary force to maintain this friction, even under varying engine speeds and accessory loads.
Real-World Use and Basic Troubleshooting
Here are a few common scenarios where your understanding of the serpentine belt diagram can be invaluable:
- Squealing Belt: A squealing belt is often a sign of slippage. Check the belt tension. If the tension is correct, inspect the belt for wear, cracks, or glazing. Also, inspect the pulleys for damage or contamination (oil, coolant). The diagram can help you identify which pulley might be the source of the problem. A misaligned pulley can also cause a squeal.
- Accessory Failure: If your alternator stops charging, your power steering fails, or your AC stops cooling, the first step is to inspect the serpentine belt and its associated pulleys. Is the belt broken? Is it properly routed? Is the pulley spinning freely? The diagram will confirm correct routing.
- Belt Replacement: Before removing the old belt, take a picture or carefully sketch the routing. This is your backup in case you lose the diagram. When installing the new belt, double-check the routing against the diagram. Use the tensioner to relieve tension and install the belt.
- Visual Inspection: Regularly inspect the belt for signs of wear (cracks, fraying, missing ribs). Also, check the pulleys for damage or misalignment. Early detection can prevent a roadside breakdown.
Safety Considerations
Working on the serpentine belt system can be risky if proper precautions aren't taken.
- Engine Off: Always work on the serpentine belt system with the engine *completely off* and the key removed from the ignition.
- Battery Disconnection: Disconnect the negative battery terminal to prevent accidental electrical shocks.
- Moving Parts: The serpentine belt and pulleys are moving parts that can cause serious injury. Keep your hands, clothing, and tools clear of the belt while the engine is running (which you shouldn't be doing during maintenance!).
- Tensioner Spring: The tensioner pulley is spring-loaded and can snap back with considerable force. Use the correct tool to relieve tension safely.
- Hot Engine: The engine and surrounding components can be very hot after the engine has been running. Allow sufficient time for cooling before working on the system.
Warning: The alternator, in particular, is connected directly to the electrical system and can deliver a dangerous shock even with the engine off if the battery is connected. Always disconnect the negative battery cable before working on or near the alternator.
By following these guidelines, you can safely and effectively maintain and troubleshoot the serpentine belt system on your Infiniti G37.
We have a high-resolution, printable PDF diagram of the Infiniti G37 serpentine belt routing. This diagram includes all the necessary details, including pulley labels and belt routing paths. Contact us to download the diagram. It's an invaluable tool for any G37 owner.