Interior Parts Of A Car Diagram
For the intermediate car owner, the DIY mechanic, or the dedicated modder, understanding the interior workings of a car is more than just a curiosity – it's a necessity. While we often focus on the engine and drivetrain, the interior is a complex ecosystem of components, wiring, and systems that demand attention. A comprehensive interior parts diagram is your roadmap to navigating this intricate space, and we're here to help you decipher it.
Purpose: Why You Need This Diagram
Why bother with an interior parts diagram? There are several compelling reasons:
- Troubleshooting Electrical Issues: Interior lighting problems, malfunctioning power windows, faulty seat heaters – these are common issues that a diagram can help you diagnose. By tracing wiring routes and identifying connectors, you can pinpoint the source of the problem.
- Planning Modifications: Thinking of adding aftermarket speakers, installing a new head unit, or upgrading your seats? The diagram reveals the existing wiring and mounting points, allowing you to plan your modifications strategically and avoid damaging existing systems.
- Performing Repairs: Replacing a broken trim piece, fixing a sagging headliner, or repairing damaged upholstery requires a clear understanding of how components are assembled. The diagram acts as a visual guide, ensuring you disassemble and reassemble parts correctly.
- Deepening Your Understanding: Even if you're not planning any immediate repairs or modifications, studying the diagram will significantly enhance your understanding of how your car's interior functions. This knowledge empowers you to identify potential problems early and make informed decisions about maintenance.
- Component Location: Locating specific components like the Body Control Module (BCM), fuse boxes, or airbag sensors is critical for repairs and diagnostics. A parts diagram shows precise component location.
Key Specs and Main Parts
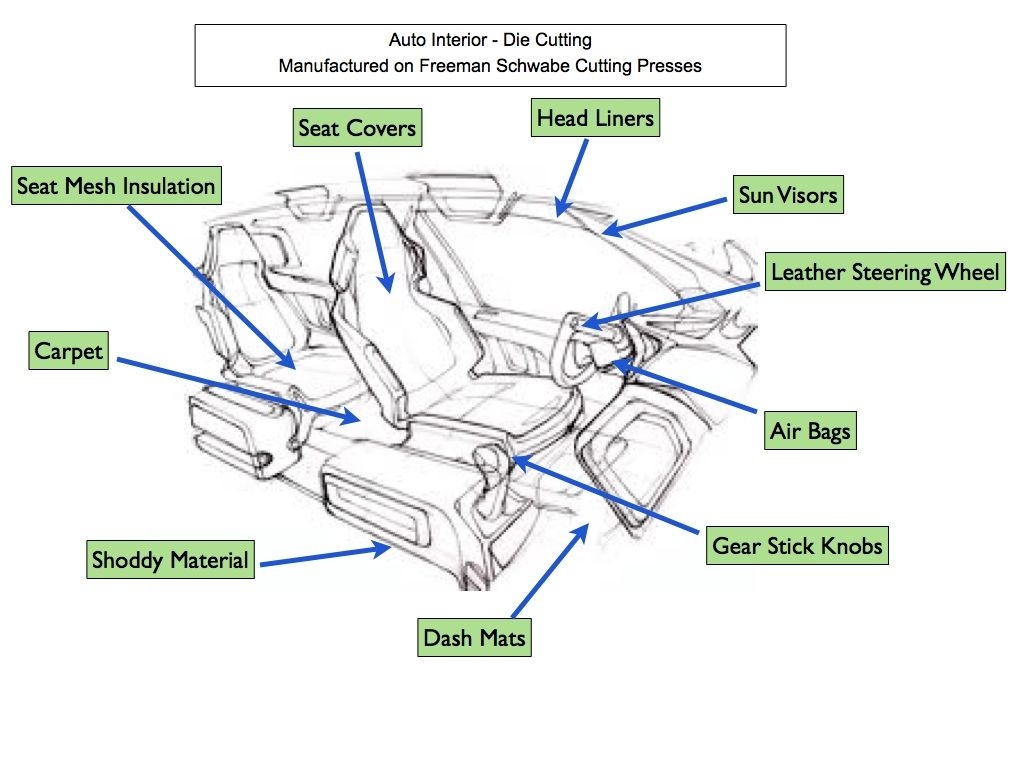
An interior parts diagram typically includes several key sections, each detailing a specific area of the cabin. Here's a breakdown of the main parts you'll encounter:
Dashboard and Instrument Panel
This section details the construction of the dashboard, including the instrument cluster, center console, glove compartment, and associated trim pieces. Key components include:
- Instrument Cluster: Displays vital information such as speed, RPM, fuel level, and warning lights.
- HVAC Controls: Regulates the heating, ventilation, and air conditioning systems.
- Audio System: Consists of the head unit, speakers, and amplifier (if equipped).
- Air Vents: Direct airflow from the HVAC system into the cabin.
- Dashboard Trim: Decorative panels that cover the underlying structure.
Seats and Upholstery
This section focuses on the seats, headrests, and interior trim. Key components include:
- Seat Frames: The structural support for the seats.
- Seat Cushions: Provide comfort and support.
- Upholstery: The fabric or leather covering the seats.
- Seat Adjustment Mechanisms: Allow you to adjust the seat position.
- Headrests: Provide support for the head and neck.
- Door Panels: Interior panels covering the doors, often housing window controls and speakers.
Interior Trim and Panels
This covers all the remaining interior panels, including the headliner, door panels, pillar trim, and floor coverings. Key components include:
- Headliner: The fabric or material covering the ceiling of the car.
- Pillar Trim: The panels covering the pillars that support the roof.
- Floor Carpeting: The carpeting covering the floor of the car.
- Kick Panels: Panels covering the area around the footwells.
Electrical Components
This section maps out the wiring harnesses, connectors, and electrical components within the interior. Key components include:
- Wiring Harnesses: Bundles of wires that connect different electrical components.
- Connectors: Devices used to join wires together.
- Fuse Boxes: Housings for fuses that protect electrical circuits.
- Body Control Module (BCM): A computer that controls various electrical functions.
- Airbag Control Module (ACM): Controls the airbags and seatbelt pretensioners.
Symbols: Decoding the Diagram
Interior parts diagrams use a variety of symbols to represent different components and connections. Understanding these symbols is crucial for interpreting the diagram correctly.
- Solid Lines: Typically represent physical connections, such as wires or mechanical linkages.
- Dashed Lines: Often indicate hidden components or connections behind panels.
- Colors: Wires are often color-coded to indicate their function (e.g., red for power, black for ground). The diagram should include a color key.
- Icons: Standardized icons represent specific components, such as fuses, relays, switches, and sensors. These icons may vary slightly depending on the manufacturer. Refer to the diagram's legend or key to understand the specific icons used.
- Numbers and Letters: These markings usually identify specific parts or components within the diagram. They may correspond to part numbers or reference points.
- Arrows: Often indicate the direction of airflow or the movement of a mechanical component.
Pay close attention to the diagram's legend or key, which provides a comprehensive explanation of all the symbols used. If you're unsure about a particular symbol, consult the legend before proceeding.
How It Works: Understanding the System
The interior of a car is a complex system where various components interact to provide comfort, convenience, and safety. Understanding how these systems work is essential for effective troubleshooting and repair. For example:
- Power Windows: When you press the window switch, it sends a signal to the power window motor, which drives a gear mechanism to raise or lower the window.
- Central Locking System: Pressing the central locking button sends a signal to the door lock actuators, which lock or unlock all the doors simultaneously.
- Airbag System: Sensors detect a collision and send a signal to the airbag control module, which deploys the airbags and seatbelt pretensioners.
- Interior Lighting: Switches and sensors trigger various lights for visibility and safety, often controlled by the BCM.
By tracing the flow of electricity and understanding the mechanical linkages, you can gain a deeper understanding of how these systems operate and how they are interconnected.
Real-World Use: Basic Troubleshooting Tips
Here are a few practical troubleshooting tips that leverage your understanding of the interior parts diagram:
- Power Window Failure: If one window fails, check the fuse first. If the fuse is good, use the diagram to trace the wiring from the switch to the motor. Check for loose connections or damaged wires.
- Interior Light Malfunction: If an interior light isn't working, check the bulb first. If the bulb is good, use the diagram to locate the switch and wiring. Test the switch for continuity and check for voltage at the light socket.
- Audio System Problems: If your audio system isn't working, start by checking the fuse. If the fuse is good, use the diagram to trace the wiring from the head unit to the speakers. Check for loose connections or damaged wires. Also, check the ground connections.
- Loose Trim: Use the diagram to identify the correct clips or fasteners required to reattach the trim piece.
Safety: Handling Risky Components
Working on the interior of a car can involve handling potentially dangerous components. Always disconnect the battery before working on any electrical system. Pay particular attention to the following:
- Airbag System: Airbags can deploy unexpectedly, causing serious injury. Never attempt to repair or modify the airbag system yourself unless you are a trained professional. Disconnect the battery and wait at least 15 minutes before working near any airbag components. Refer to the manufacturer's instructions for proper handling procedures.
- Electrical System: Short circuits can cause fires or electrical shocks. Always disconnect the battery before working on the electrical system. Use a multimeter to test for voltage and continuity before touching any wires.
- Sharp Edges: Be careful when handling trim pieces, as they may have sharp edges. Wear gloves to protect your hands.
When in doubt, consult a qualified mechanic. Your safety is paramount.
Now that you're equipped with this knowledge, you can start exploring the interior of your car with newfound confidence. Remember to always prioritize safety and take your time to understand the diagram thoroughly. Understanding the interior parts diagram is key for troubleshooting and modification. We have the full, high-resolution interior parts diagram readily available for download. This comprehensive resource will be invaluable as you delve into the intricate world inside your car.