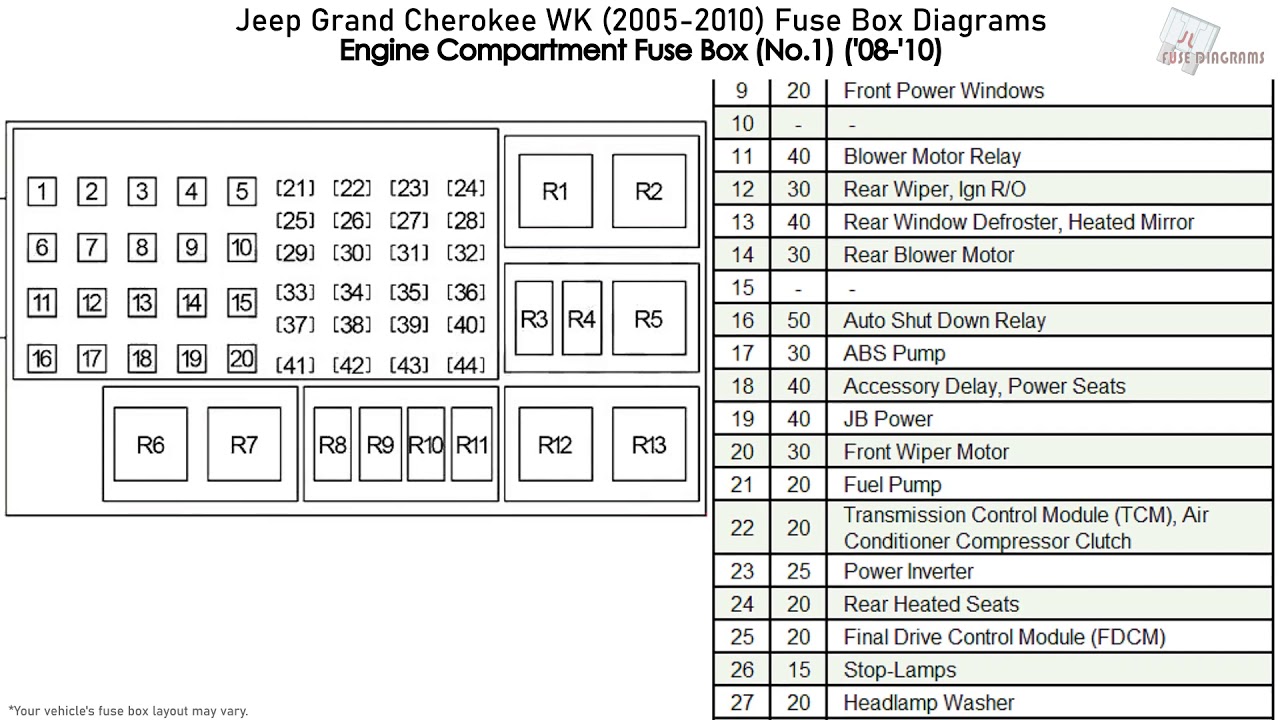
Jeep Grand Cherokee Fuse Box Diagram
Welcome, fellow gearheads! Let's dive deep into the often-overlooked but utterly critical heart of your Jeep Grand Cherokee's electrical system: the fuse box. Whether you're tackling a seemingly simple blown fuse or undertaking a more ambitious modification project, understanding the fuse box diagram is absolutely essential. We're not just talking about swapping out a burnt fuse; we're talking about understanding how your vehicle's electrical architecture functions.
Purpose: Why Master the Fuse Box Diagram?
Think of your Grand Cherokee's fuse box as the central nervous system of its electrical components. The fuse box diagram serves as the roadmap. It's more than just a pretty picture; it's the key to:
- Troubleshooting Electrical Issues: When your headlights fail, your radio goes silent, or your power windows refuse to budge, the fuse box is usually the first place to look. The diagram helps you pinpoint the exact fuse responsible for the malfunctioning component, saving you time and frustration.
- Performing Basic Repairs: Replacing a blown fuse is often a straightforward fix. But without a diagram, you're essentially groping in the dark, risking further damage or even electrical shock.
- Safely Adding Aftermarket Accessories: Want to install that awesome new LED light bar or a high-powered amplifier? Knowing which fuses and circuits you can tap into without overloading the system is crucial. The diagram prevents you from causing electrical fires or frying sensitive electronics.
- Understanding Your Vehicle's Electrical System: Beyond repairs and modifications, studying the fuse box diagram provides a deeper understanding of how all the electrical components in your Grand Cherokee are interconnected. It empowers you to diagnose problems more effectively and appreciate the engineering that goes into modern vehicles.
Key Specs and Main Parts
The Jeep Grand Cherokee, depending on the model year (we're generalizing here, but most late models follow a similar pattern), typically has multiple fuse boxes. Knowing where they are and what they control is paramount.
- Under-Hood Fuse Box (Power Distribution Center or PDC): This is the main fuse box, usually located in the engine compartment, often near the battery. It houses fuses and relays for high-current components like the starter motor, alternator, headlights, and fuel pump.
- Interior Fuse Box: Often located under the dashboard, on the driver's side or passenger's side, this fuse box contains fuses for lower-current accessories like the radio, power windows, interior lights, and climate control.
- Rear Fuse Box (some models): Certain Grand Cherokee models, particularly those with more advanced features or rear entertainment systems, may have a third fuse box in the cargo area. This typically controls rear window functions, auxiliary power outlets, and any rear-mounted electronics.
Key Components within the Fuse Boxes:
- Fuses: These are the sacrificial lambs of the electrical system. A fuse is a safety device containing a thin wire designed to melt and break the circuit if the current exceeds a predetermined level, protecting more expensive components from damage. Fuses are rated in amperes (amps or A), indicating the maximum current they can handle.
- Relays: Relays are electromechanical switches that allow a low-current circuit to control a high-current circuit. They're used to switch on components like headlights, fuel pumps, and air conditioning compressors, which require significant power.
- Circuit Breakers: Some circuits use circuit breakers instead of fuses. Circuit breakers perform a similar function but can be reset manually after tripping, rather than needing replacement.
- Terminal Blocks: These are connection points for wiring harnesses, allowing multiple wires to be connected to a single point.
Decoding the Fuse Box Diagram: Symbols, Lines, and Colors
Fuse box diagrams may seem cryptic at first, but they're actually quite logical once you understand the basic conventions. Here's a breakdown:
- Lines: Solid lines represent electrical connections between components. Dashed lines may indicate a ground connection or a less direct connection.
- Symbols:
- Fuse Symbol: Typically a rectangle with a squiggly line inside, often labeled with the amperage rating.
- Relay Symbol: Usually a square or rectangle with terminals labeled with numbers indicating the coil and contact terminals.
- Ground Symbol: Three horizontal lines stacked on top of each other, indicating a connection to the vehicle's chassis ground.
- Colors: Wire colors are sometimes indicated on the diagram, often using abbreviations (e.g., BLU for blue, RED for red, GRN for green). Following the wire colors can help you trace circuits and identify potential wiring problems.
- Labels: Each fuse and relay is typically labeled with a description of the component it protects or controls (e.g., "HEAD LPS," "FUEL PUMP," "RADIO").
How It Works: The Electrical Circuit
To fully understand the fuse box, you need to grasp the basics of an electrical circuit. A circuit is a closed loop that allows electricity to flow from a power source (the battery), through a component (e.g., a headlight), and back to the power source. The fuse is placed in the circuit to protect it from overcurrent.
When the current flowing through the circuit exceeds the fuse's amperage rating, the fuse's internal wire melts, breaking the circuit and stopping the flow of electricity. This prevents the excessive current from damaging the component or causing a fire.
Relays act as remotely controlled switches. A small current flows through the relay's coil, creating an electromagnetic field that pulls a contact closed, completing a separate, high-current circuit. This allows a small switch on the dashboard to control a powerful component like the headlights without having to run heavy-gauge wires all the way to the dashboard.
Real-World Use: Basic Troubleshooting Tips
Here's how you can use the fuse box diagram to troubleshoot common electrical problems:
- Identify the Problem: Determine which component is malfunctioning.
- Consult the Diagram: Locate the fuse associated with the malfunctioning component in the appropriate fuse box diagram. Remember that the diagram should match your specific model year.
- Inspect the Fuse: Visually inspect the fuse. A blown fuse will typically have a broken filament or a darkened appearance. You can also use a multimeter to check the fuse's continuity.
- Replace the Fuse: If the fuse is blown, replace it with a new fuse of the same amperage rating. Never use a fuse with a higher amperage rating, as this could bypass the circuit's protection and lead to damage or fire.
- Test the Circuit: After replacing the fuse, test the component to see if it now functions correctly.
- Investigate Further: If the fuse blows again immediately, there's likely a short circuit or other problem in the wiring or component. Further diagnosis is required.
Safety First: Risky Components
Working with electrical systems can be dangerous. Be especially cautious when dealing with the following components:
- Battery: Disconnect the negative battery terminal before working on any electrical components to prevent accidental short circuits.
- High-Current Circuits: Circuits controlling the starter motor, alternator, and fuel pump carry high currents and can deliver a dangerous shock. Avoid touching exposed terminals or wires in these circuits.
- Airbag System: The airbag system is highly sensitive and can be triggered accidentally if mishandled. Disconnect the battery and follow the manufacturer's instructions carefully before working near airbag components.
Always consult a qualified mechanic if you are unsure about any aspect of electrical repair. Incorrect diagnosis or repair can lead to serious injury or damage to your vehicle.
Remember that replacing a fuse with a higher amperage fuse is a dangerous practice that can result in a fire or component failure. Never bypass a fuse or use a piece of wire in its place.
We have a detailed fuse box diagram file available for download, specific to your Jeep Grand Cherokee model year. Contact us and we will send you the document.