Jeep Radio Wiring Harness Color Code
Understanding the Jeep radio wiring harness color code is absolutely essential for anyone looking to upgrade their sound system, perform repairs, or even just diagnose electrical issues related to their Jeep's audio system. Without this knowledge, you're essentially working blind, potentially damaging your vehicle's sensitive electronics or creating a serious safety hazard. This article serves as your comprehensive guide to navigating the often-intimidating world of Jeep radio wiring.
Purpose and Importance
Why bother learning about this? Several reasons jump to mind:
- Upgrading your head unit: The most common reason. If you're swapping out the factory radio for an aftermarket unit, you'll need to know which wire does what to connect the new radio properly.
- Repairing damaged wiring: Whether from age, rodent damage, or accidental cuts, broken wires happen. Identifying the color codes allows you to splice them back together correctly.
- Adding aftermarket accessories: Installing amplifiers, subwoofers, or other audio enhancements requires tapping into the existing wiring. Knowing the function of each wire prevents misconnections and potential damage.
- Troubleshooting audio issues: If you're experiencing problems like no sound, distorted audio, or intermittent signal loss, understanding the wiring can help you pinpoint the source of the problem.
- General electrical understanding: Learning about automotive wiring harnesses provides a valuable foundation for understanding other electrical systems in your vehicle.
Key Specs and Main Parts of a Jeep Radio Wiring Harness
Let's break down the anatomy of a typical Jeep radio wiring harness:
- Power Wires: These supply the necessary voltage to operate the radio. The main ones are:
- +12V Constant (Battery): Always hot, providing power even when the ignition is off. Often yellow. This is used for memory retention in the radio.
- +12V Switched (Ignition): Only hot when the ignition is turned on. Often red. This powers the radio on and off with the ignition.
- Ground: Completes the circuit. Usually black or brown.
- Speaker Wires: These carry the audio signal to the speakers. Each speaker has two wires – a positive (+) and a negative (-). The colors vary, but generally they come in twisted pairs, making it easier to identify the + and – for each speaker.
- Illumination Wire: Dims the radio's display when the headlights are turned on. Often orange.
- Antenna Wire: Connects to the radio antenna. Typically a coaxial cable with a specific connector.
- Remote Turn-On (Amplifier): A +12V signal that activates aftermarket amplifiers when the radio is turned on. Often blue or blue with a white stripe.
- Factory Amplifier Wires (If Equipped): If your Jeep has a factory amplifier, there will be additional wires to control and connect to it. These are more complex and vehicle specific.
- CAN Bus Wires (Newer Models): Some newer Jeeps use a CAN (Controller Area Network) bus for communication between the radio and other vehicle systems. These are typically twisted pair wires, often green and white, or orange and green.
Understanding the Wiring Diagram: Symbols and Color Codes
A wiring diagram is a visual representation of the electrical connections in your Jeep. Learning to interpret it is crucial. Here's a breakdown:
- Lines: Represent wires. Thicker lines might indicate wires with higher current carrying capacity.
- Colors: Each color corresponds to a specific wire function. We'll delve into the common Jeep color codes shortly.
- Symbols: Represent electrical components like fuses, switches, resistors, and connectors. Understanding common electrical symbols is essential.
- Abbreviations: Abbreviations are used to shorten words. Examples include: GND (Ground), BAT (Battery), IGN (Ignition).
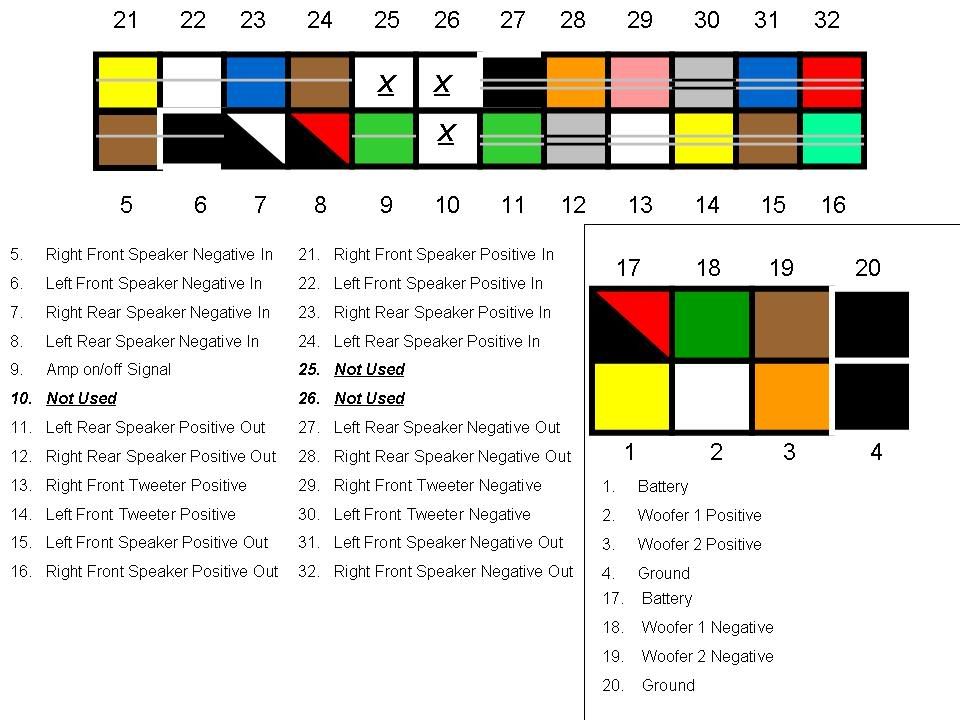
Common Jeep Radio Wiring Color Codes (General Guide - Verify with your specific model):
Important: While there are common standards, wire colors can vary slightly depending on the year, model, and trim level of your Jeep. Always consult the specific wiring diagram for your vehicle before making any connections.
- Yellow: +12V Constant (Battery)
- Red: +12V Switched (Ignition)
- Black: Ground
- Orange: Illumination
- Blue: Power Antenna or Amplifier Remote Turn-On
- White: Front Left Speaker (+)
- White/Black Stripe: Front Left Speaker (-)
- Gray: Front Right Speaker (+)
- Gray/Black Stripe: Front Right Speaker (-)
- Green: Rear Left Speaker (+)
- Green/Black Stripe: Rear Left Speaker (-)
- Purple: Rear Right Speaker (+)
- Purple/Black Stripe: Rear Right Speaker (-)
How It Works: From Battery to Speaker
The radio wiring harness acts as a conduit, delivering power and audio signals to the radio and speakers. Here's a simplified overview:
- Power Supply: The +12V Constant wire provides continuous power to the radio for memory functions (station presets, clock settings, etc.). The +12V Switched wire activates the radio when the ignition is turned on.
- Ground: The ground wire completes the electrical circuit, allowing current to flow.
- Audio Processing: The radio receives audio signals from various sources (antenna, CD player, Bluetooth, etc.) and processes them.
- Amplification: The radio amplifies the audio signal. If an external amplifier is present, the radio sends a remote turn-on signal to activate it.
- Speaker Output: The amplified audio signal is sent to the speakers via the speaker wires. Each speaker receives both a positive and negative signal to create sound waves.
Real-World Use: Basic Troubleshooting Tips
Knowing the wiring diagram and color codes can be invaluable for troubleshooting audio problems. Here are a few scenarios:
- No Power to Radio: Check the fuses related to the radio. Use a multimeter to verify that the +12V Constant and +12V Switched wires are receiving power. Also, check the ground connection.
- No Sound from Speakers: Ensure the speaker wires are properly connected to the radio and the speakers. Use a multimeter to check for continuity in the speaker wires. If you have an amplifier, make sure it's receiving power and the remote turn-on signal.
- Distorted Audio: Check for loose speaker connections or damaged speaker cones. If using an aftermarket amplifier, make sure it's properly configured and not clipping the signal.
- Intermittent Signal Loss: Check the antenna connection and the antenna wire for damage.
Safety First: Handling Risky Components
Working with automotive electrical systems can be dangerous. Always take the following precautions:
- Disconnect the Battery: Before working on any electrical components, disconnect the negative terminal of the battery. This prevents accidental short circuits and electrical shocks.
- Use Proper Tools: Use insulated tools designed for automotive electrical work. This will help prevent shorts and shocks.
- Don't Cut Corners: Always use proper wiring connectors and splicing techniques. Avoid using cheap or unreliable methods that can lead to loose connections and electrical problems.
- Be Careful with Airbags: Airbags are sensitive to electrical changes. Avoid disturbing any wiring related to the airbag system. If you're unsure, consult a qualified technician.
- Fuses are Your Friend: Never bypass a fuse. Fuses protect your vehicle's electrical system from overloads. If a fuse keeps blowing, there's a problem that needs to be addressed.
- Consult a Professional: If you're not comfortable working with electrical systems, or if you encounter a problem you can't solve, consult a qualified automotive electrician.
Understanding the Jeep radio wiring harness color code empowers you to confidently tackle audio upgrades, repairs, and troubleshooting. Remember to always verify the specific wiring diagram for your vehicle and prioritize safety. Happy listening!
We have a detailed, model-specific Jeep radio wiring diagram available for download. This diagram includes specific color codes, connector pinouts, and other valuable information. Contact us for access to this valuable resource.