
Jeep Wrangler Suspension Parts Diagram
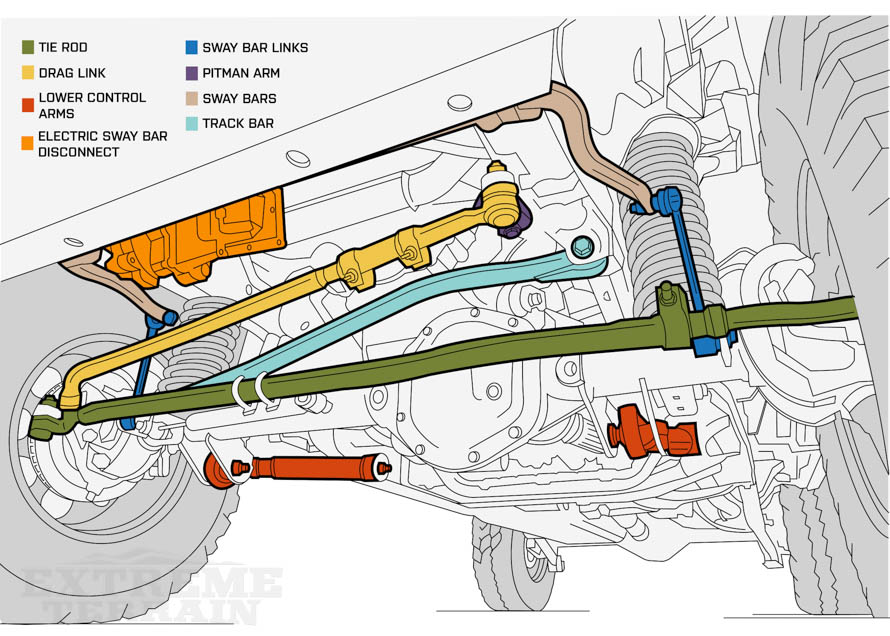
Understanding the suspension system of your Jeep Wrangler is crucial for maintaining its iconic off-road capability, diagnosing issues, and performing necessary repairs or modifications. A Jeep Wrangler suspension parts diagram is your roadmap to this complex system. It's more than just a picture; it's a comprehensive guide that unlocks a deeper understanding of how your Wrangler's suspension works and how to keep it performing optimally. We have the complete diagram file that you can download to use along with this guide.
Purpose of a Jeep Wrangler Suspension Parts Diagram
Why bother with a diagram? Here are a few key reasons:
- Repairs and Maintenance: Identifying the correct parts for replacement during maintenance or repairs is crucial. The diagram provides a visual reference, eliminating guesswork and ensuring you order the right components.
- Troubleshooting: When experiencing issues like excessive bouncing, uneven tire wear, or clunking noises, the diagram helps you pinpoint potential problem areas within the suspension system.
- Modifications and Upgrades: Planning to lift your Wrangler, install new shocks, or upgrade the control arms? The diagram is essential for understanding the existing system and how aftermarket parts will integrate.
- Learning and Understanding: Even if you're not actively working on your suspension, studying the diagram helps you understand the intricacies of how your Wrangler handles various terrains.
Key Specs and Main Suspension Parts
The Wrangler's suspension system is a coil-spring design, known for its articulation and durability. Let's break down the core components:
- Coil Springs: These helical springs absorb shocks and maintain ride height. Different spring rates are available, impacting ride quality and load-carrying capacity.
- Shock Absorbers (Shocks): Dampen spring oscillations, preventing excessive bouncing and maintaining tire contact with the road. Types include hydraulic, gas-charged, and remote reservoir shocks.
- Solid Axles: Front and rear solid axles provide strength and durability for off-road use. They connect the wheels and transmit power from the differential.
- Control Arms (Upper and Lower): These arms connect the axles to the frame, controlling axle movement and preventing wheel hop. They're crucial for maintaining proper suspension geometry.
- Track Bar (Panhard Rod): Locates the axle laterally (side-to-side), preventing it from shifting under the vehicle.
- Sway Bar (Anti-Roll Bar): Connects the wheels on each axle, reducing body roll during cornering. Disconnecting sway bar links allows for increased articulation off-road.
- Sway Bar Links: Connect the sway bar to the axle. These are often points of wear and tear, especially on off-road vehicles.
- Bump Stops: Limit suspension travel, preventing damage to the shocks, springs, and other components.
- Steering Linkage: Includes tie rod ends, drag link, and steering stabilizer. This connects the steering box to the wheels allowing the driver to control the direction of the vehicle.
Symbols: Understanding the Diagram's Language
Suspension diagrams use a specific set of symbols and conventions to represent the various components and their relationships. Here's a breakdown of common elements:
- Lines: Solid lines typically represent physical connections between parts (e.g., control arms bolted to the frame). Dashed lines may indicate hidden or implied connections.
- Colors: Color-coding can differentiate between components or highlight specific systems (e.g., steering components in one color, suspension components in another).
- Icons: Specific icons represent different parts. For example, a coiled symbol represents a coil spring, while a cylinder represents a shock absorber.
- Numbers and Labels: Each part is typically labeled with a number or abbreviation, cross-referenced to a parts list or key on the diagram.
- Arrows: Arrows can indicate the direction of movement or force.
Pay close attention to the legend or key accompanying the diagram, as it will explain the specific symbols and conventions used in that particular illustration.
How It Works: The Wrangler Suspension in Action
The Wrangler's suspension system works in concert to provide a blend of on-road comfort and off-road capability. Here's a simplified explanation:
- Bump Absorption: When a wheel encounters a bump, the coil spring compresses, absorbing the initial impact.
- Damping: The shock absorber controls the spring's oscillation, preventing it from bouncing excessively. The shock's valving restricts the flow of hydraulic fluid (or gas), dissipating energy as heat.
- Axle Control: Control arms maintain the axle's position relative to the frame, preventing unwanted movement and ensuring proper wheel alignment. The track bar prevents lateral movement of the axle.
- Body Roll Reduction: The sway bar resists body roll during cornering, improving handling and stability on paved roads. Disconnecting the sway bar links allows for greater axle articulation off-road, enabling the wheels to maintain contact with the terrain.
The overall system is designed to allow the wheels to move independently, maximizing traction and articulation on uneven surfaces while providing a relatively comfortable ride on paved roads.
Real-World Use: Basic Troubleshooting Tips
Using the suspension diagram can aid in diagnosing common Wrangler suspension problems. Here are a few examples:
- Clunking Noises: Could indicate worn sway bar links, loose control arm bolts, or a failing track bar. Check the diagram to locate these components and inspect them for damage or wear.
- Excessive Bouncing: Suggests worn shock absorbers. The diagram helps you identify the shocks and their mounting points.
- Uneven Tire Wear: May indicate misaligned suspension components, such as worn ball joints, tie rod ends, or bent control arms. Use the diagram to locate these parts and inspect them for damage.
- Steering Wander: Could point to worn tie rod ends, a failing steering stabilizer, or loose track bar. The diagram shows how these components work together.
Remember to always perform a thorough visual inspection before attempting any repairs. Compare the components on your Wrangler to the diagram to ensure everything is in its proper place and condition.
Safety Considerations
Working on suspension systems involves significant risks. Here are crucial safety precautions:
- Spring Compression: Coil springs store tremendous energy and can cause serious injury if released unexpectedly. Use a proper spring compressor tool to safely remove and install coil springs.
- Jacking and Support: Never work under a vehicle supported only by a jack. Use jack stands rated for the weight of your vehicle to provide secure support.
- Torque Specifications: Tighten all fasteners to the manufacturer's specified torque values. Over-tightening can damage components, while under-tightening can lead to failures.
- Wheel Alignment: After any suspension modifications or repairs, have your vehicle's wheel alignment checked and adjusted by a qualified technician.
- Brake Lines: Be extremely careful when working near brake lines. Damaging a brake line can result in complete brake failure.
Always wear safety glasses and gloves when working on your vehicle. If you're not comfortable performing a specific task, seek the help of a qualified mechanic.
By understanding the layout and function of your Jeep Wrangler's suspension system, you'll be better equipped to maintain its performance, diagnose problems, and make informed decisions about modifications. Remember to consult the detailed suspension diagram we have available for download for a complete visual guide. Good luck!