Labeled Jeep Wrangler Undercarriage Diagram
Working on your Jeep Wrangler's undercarriage can be intimidating, even for experienced DIYers. The maze of components lurking beneath your ride controls everything from steering and suspension to exhaust and driveline. A detailed, labeled undercarriage diagram is your secret weapon, transforming a daunting task into a manageable project. We've compiled a comprehensive diagram for your reference, and you can download it directly from us. But before you do, let's dive into how to understand and effectively use it.
Purpose: Why You Need This Diagram
A detailed undercarriage diagram serves several crucial purposes:
- Repair Identification: Quickly pinpoint the location of a damaged or failing component. No more guessing!
- Parts Ordering: Identify the exact part number for replacement. Accurate parts ordering saves time and avoids costly returns.
- Modification Planning: Visualize how new components (lift kits, skid plates, rock sliders) will integrate with existing systems.
- Educational Tool: Deepen your understanding of your Jeep's mechanical systems. Learn how everything works together.
- Troubleshooting: Trace connections and relationships between parts to diagnose issues more effectively.
In essence, the diagram is a map to the intricate landscape of your Jeep's underbelly. It empowers you to work with confidence and efficiency.
Key Specs and Main Parts (JK Model Example)
While undercarriage layouts share similarities across Wrangler generations (TJ, JK, JL, etc.), there are significant differences. This example focuses on the JK model (2007-2018), but the principles apply to other models as well. Consult your specific model year's diagram for accurate information.
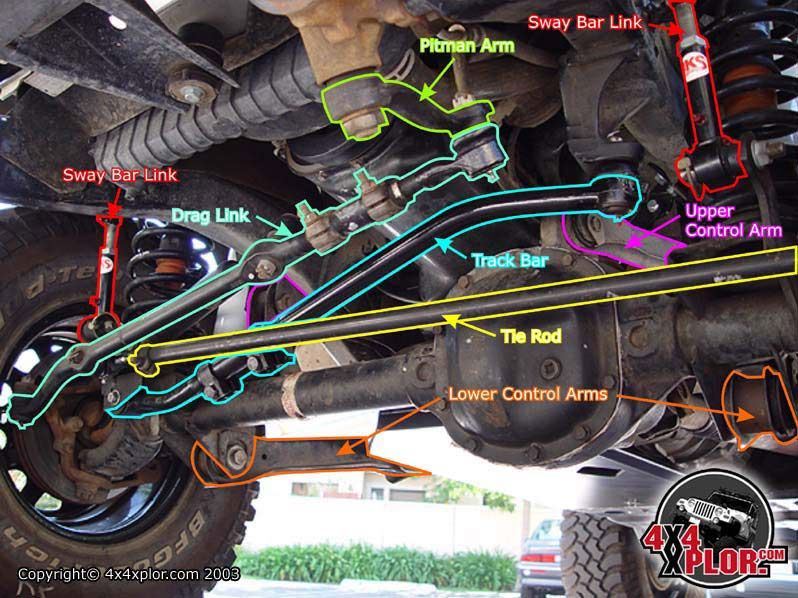
Front Suspension & Steering:
- Axle Housing: The central beam that supports the front differential and wheel hubs.
- Differential: Contains the gears that transfer power from the driveshaft to the wheels.
- Coil Springs: Absorb shocks and maintain ride height.
- Shocks (Dampers): Control spring oscillation, preventing a bouncy ride.
- Control Arms (Upper & Lower): Connect the axle to the frame, controlling axle movement.
- Track Bar (Panhard Rod): Prevents lateral movement of the axle.
- Steering Knuckles: Connect the wheels to the suspension system.
- Tie Rod: Connects the steering knuckle to the steering linkage.
- Drag Link: Connects the pitman arm to the steering knuckle.
- Sway Bar (Anti-Roll Bar): Reduces body roll during cornering.
- Sway Bar Links: Connect the sway bar to the axle.
Drivetrain & Exhaust:
- Transmission: Transfers power from the engine to the transfer case.
- Transfer Case: Distributes power to either the rear axle only (2WD) or both axles (4WD).
- Front Driveshaft: Connects the transfer case to the front differential.
- Rear Driveshaft: Connects the transfer case to the rear differential.
- Exhaust Manifold: Collects exhaust gases from the engine cylinders.
- Catalytic Converter: Reduces harmful emissions.
- Muffler: Reduces exhaust noise.
- Tailpipe: Directs exhaust gases away from the vehicle.
Rear Suspension:
- Axle Housing: Similar to the front axle, but typically without steering components.
- Differential: Contains the gears that transfer power from the driveshaft to the wheels.
- Coil Springs (or Leaf Springs on older models): Absorb shocks and maintain ride height.
- Shocks (Dampers): Control spring oscillation.
- Control Arms (Upper & Lower - JK): Connect the axle to the frame, controlling axle movement. (Leaf springs serve this function on older TJs).
- Track Bar (Panhard Rod - JK): Prevents lateral movement of the axle.
Other Important Components:
- Fuel Tank: Stores fuel for the engine.
- Brake Lines: Carry brake fluid to the calipers.
- Parking Brake Cables: Actuate the parking brake.
- Skid Plates: Protect vulnerable components from rocks and debris.
Symbols: Decoding the Diagram
Understanding the symbols used in the diagram is essential for accurate interpretation. Look for a legend or key, typically located at the edge of the diagram. Here are some common symbols:
- Solid Lines: Usually represent rigid components like control arms, axles, or frame rails. Thicker lines may indicate larger or more structurally significant parts.
- Dashed Lines: Often indicate flexible components like hoses, wires, or brake lines. They can also represent hidden components.
- Arrows: Indicate the direction of movement or flow (e.g., exhaust flow, driveshaft rotation).
- Circles/Dots: Represent connection points, such as bolts, fasteners, or mounting points.
- Colors: While not standardized, colors are often used to differentiate systems. For example, brake lines might be colored red or blue. Wiring harnesses may use various colors to distinguish circuits.
- Icons: Small icons may represent specific components like the differential, shock absorbers, or catalytic converter.
Important Note: Always refer to the diagram's legend for specific symbol definitions. Don't assume a symbol's meaning based on previous experience with other diagrams.
How It Works: System Interrelationships
The undercarriage diagram isn't just a collection of isolated parts; it illustrates how these components interact to form functional systems. For instance, tracing the steering linkage from the steering wheel to the front wheels reveals the sequence of components involved in turning the vehicle. Similarly, following the exhaust system from the engine to the tailpipe shows how exhaust gases are managed and treated.
By understanding these interrelationships, you can diagnose problems more effectively. A worn control arm bushing, for example, can affect steering stability and tire wear. The diagram helps you visualize this connection and identify the root cause of the issue.
Real-World Use: Basic Troubleshooting
Here are some practical troubleshooting scenarios where the undercarriage diagram proves invaluable:
- Identifying a Leaking Seal: Notice oil dripping from your front axle? Use the diagram to pinpoint the location of the leak. Is it the pinion seal, axle seal, or differential cover gasket? The diagram clarifies the location of each.
- Diagnosing Suspension Noise: Hearing clunking sounds when going over bumps? The diagram helps you inspect suspension components like ball joints, control arm bushings, and sway bar links for wear or damage.
- Locating a Damaged Exhaust Component: Smelling exhaust fumes? The diagram guides you in inspecting the exhaust system for cracks, leaks, or loose connections.
When troubleshooting, always start with a visual inspection. Compare the actual components to the diagram. Note any discrepancies, damage, or missing parts. This visual comparison, combined with your knowledge of the system's operation, will lead you to a diagnosis.
Safety: Identifying Risky Components
Working under a vehicle can be dangerous. The undercarriage diagram can help you identify components that require extra caution:
- Brake System: Brake lines contain pressurized brake fluid. Loosening fittings without proper procedures can result in fluid loss and a loss of braking ability. Always use the correct tools and procedures when working on the brake system.
- Fuel System: Fuel lines contain flammable fuel. Avoid sparks or open flames when working near the fuel system. Relieve fuel pressure before disconnecting any fuel lines.
- Suspension System: Suspension components are under spring tension. Improperly disassembling suspension components can result in serious injury. Use spring compressors and follow proper procedures.
- Exhaust System: Exhaust components can be extremely hot. Allow the exhaust system to cool completely before working on it.
- Driveshaft: Ensure the vehicle is properly supported and the parking brake is engaged when working near the driveshaft. Uncontrolled rotation of the driveshaft can cause injury.
Always wear safety glasses and gloves when working under your vehicle. Use jack stands to support the vehicle securely. Never work under a vehicle supported only by a jack.
Get Your Diagram!
Armed with this knowledge, you're well-equipped to tackle your Jeep Wrangler undercarriage projects with confidence. Remember, a detailed, labeled diagram is your essential guide. We have the file ready for you to download and use. It will make your next repair, modification, or learning experience much smoother and safer. Don't hesitate to reference it whenever you're working beneath your trusty Jeep!