Lawn Mower 3 Pole Starter Solenoid Wiring Diagram
So, you're diving into the electrical system of your lawn mower, specifically the starter solenoid? Smart move. Understanding the 3-pole starter solenoid wiring diagram isn't just about fixing things; it's about gaining a deeper understanding of how your mower's engine roars to life. Whether you're troubleshooting a no-start condition, replacing a faulty solenoid, or simply expanding your DIY knowledge, this guide will give you the insights you need. We'll break down the diagram step-by-step, explaining the components, their functions, and how they all work together.
Why This Diagram Matters
Let's be real: lawn mowers get used and abused. Weather, vibration, and just plain old age can wreak havoc on their electrical systems. The starter solenoid is a key player in the starting process. A faulty solenoid means a dead mower. Having a clear understanding of the 3-pole solenoid wiring diagram allows you to:
- Diagnose Starting Issues: Pinpoint the exact cause of a no-start condition, whether it's the solenoid itself, a faulty switch, or a wiring problem.
- Replace a Faulty Solenoid: Confidently install a new solenoid without guesswork, ensuring proper connections and preventing damage.
- Perform Basic Maintenance: Identify potential problems before they become major headaches.
- Modify/Upgrade your System: Perhaps you want to add a remote start, or just use a different switch. Understanding the wiring is necessary for modifying the system.
Key Specs and Main Parts
Before we jump into the diagram itself, let's define the key components and their roles:
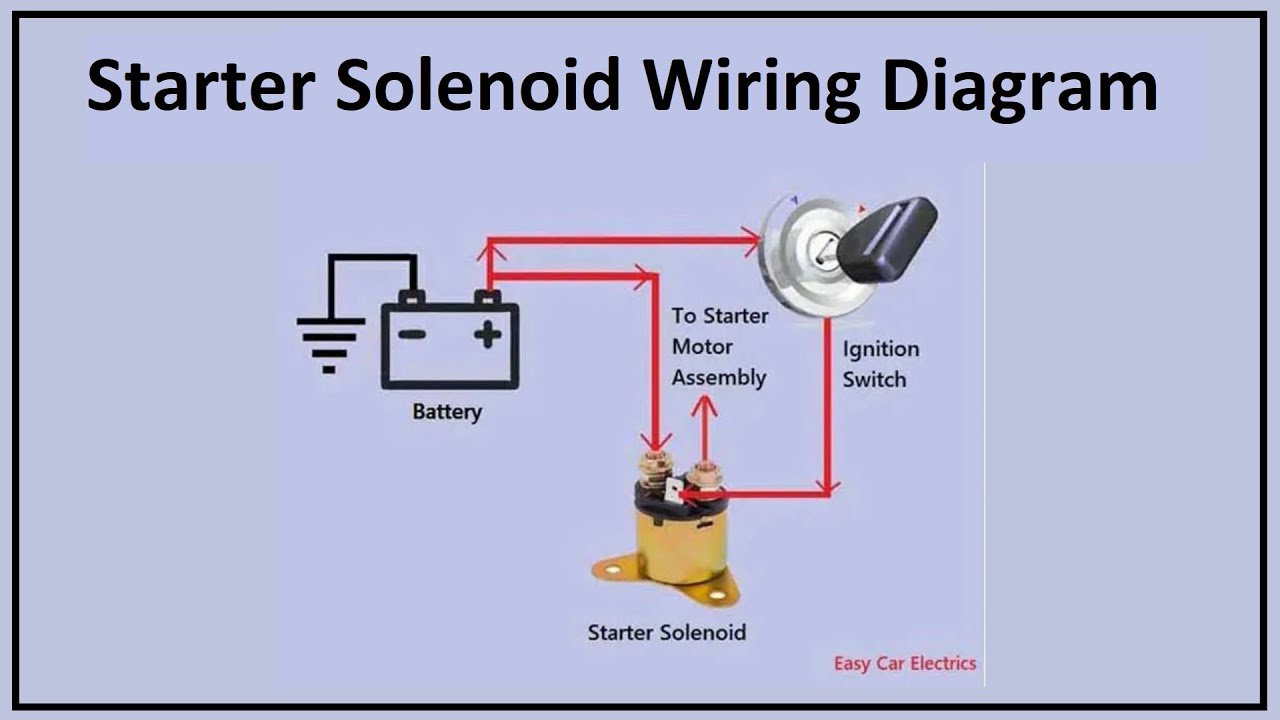
- Battery: The heart of the electrical system, providing the necessary power to crank the engine. Typically a 12-volt DC battery.
- Ignition Switch: The key-operated switch that initiates the starting sequence. It sends a signal to the solenoid when turned to the "start" position.
- 3-Pole Starter Solenoid: An electromagnetic switch that connects the battery directly to the starter motor when activated. "3-pole" refers to the three main connection points: battery, starter motor, and signal from the ignition switch. It essentially acts as a high-current relay.
- Starter Motor: The powerful electric motor that turns the engine's crankshaft, initiating the combustion process.
- Ground (Chassis): Provides the return path for the electrical current, completing the circuit. Typically, the negative terminal of the battery is grounded to the mower's frame.
- Fuses/Circuit Breakers: These are safety devices designed to protect the electrical system from overloads and short circuits.
Decoding the Wiring Diagram
A wiring diagram isn't just a bunch of lines and symbols; it's a roadmap of the electrical system. Understanding the conventions is crucial for proper interpretation.
Lines:
- Solid Lines: Represent wires. Thicker lines generally indicate wires that carry higher current.
- Dashed Lines: May represent a ground connection, or a connection that is optional or not always present.
Colors:
Wire colors are used to distinguish different circuits. Common colors include:
- Red: Typically used for positive (+) battery connections and power feeds.
- Black: Almost always used for ground (-) connections.
- Yellow/Green: Sometimes used for starting signal wires. Consult the specific diagram for your mower.
Symbols:
Symbols represent the different electrical components. Here are some common ones:
- Battery: Represented by a series of alternating long and short parallel lines. The longer line indicates the positive (+) terminal.
- Ignition Switch: Depicted as a switch with multiple positions (off, on, start).
- Starter Solenoid: Usually shown as a coil with lines leading to the battery and starter motor terminals.
- Starter Motor: Represented by a circle with an "M" inside.
- Ground: Depicted as a series of downward-pointing triangles or a horizontal line with short vertical lines extending downwards.
- Fuse/Circuit Breaker: Shown as a wavy line inside a rectangle or a stylized "C".
How It Works: The Starting Sequence
Now, let's trace the path of electricity when you turn the key to start your mower:
- Key Turn: When you turn the ignition switch to the "start" position, it completes a circuit, sending a small electrical current to the small terminal (often labeled "S" or "start") on the starter solenoid.
- Solenoid Activation: This small current energizes the solenoid's internal coil. The coil then creates a strong magnetic field.
- Contact Closure: The magnetic field pulls a metal plunger (or contact) inside the solenoid, bridging the two large terminals. One large terminal is connected directly to the positive (+) terminal of the battery. The other large terminal is connected to the starter motor.
- Power to the Starter: With the contacts closed, the full battery voltage is now delivered directly to the starter motor.
- Engine Cranking: The starter motor spins, turning the engine's crankshaft and initiating the combustion process.
- Key Release: When you release the key, it returns to the "on" position, cutting off the signal to the solenoid. The magnetic field collapses, the contacts open, and the starter motor stops spinning.
In essence, the solenoid acts as a heavy-duty switch controlled by a low-current signal from the ignition switch. This is necessary because the starter motor requires a very high current that the ignition switch alone cannot handle.
Real-World Use: Basic Troubleshooting Tips
Okay, mower's dead. Let's get it running! Here are some basic troubleshooting steps, using the wiring diagram as your guide:
- No Click, No Crank: If you turn the key and hear nothing at all (no click from the solenoid), check the following:
- Battery Voltage: Is the battery fully charged? Use a multimeter to check the voltage. It should be around 12.6 volts for a fully charged 12-volt battery.
- Ignition Switch: Use a multimeter to check if the ignition switch is sending a signal to the solenoid when turned to the "start" position.
- Solenoid Signal Wire: Check the wire connecting the ignition switch to the solenoid for breaks or loose connections.
- Ground Connections: Ensure all ground connections are clean and secure. Corrosion can prevent proper grounding.
- Fuses: Check the fuses (if any) in the starting circuit.
- Click, But No Crank: If you hear a clicking sound from the solenoid, but the starter motor doesn't turn, it usually indicates:
- Weak Battery: Even if the battery shows voltage, it might not have enough current to crank the engine. Try jump-starting the mower.
- Faulty Solenoid: The solenoid contacts may be worn or corroded, preventing proper current flow. You can test the solenoid by bypassing it (carefully!) - see safety warnings below.
- Faulty Starter Motor: The starter motor itself may be bad.
Safety First!
Working with electrical systems can be dangerous. Take these precautions:
- Disconnect the Battery: Always disconnect the negative (-) battery cable before working on the electrical system. This prevents accidental shorts and electric shock.
- High Current Components: The battery, solenoid, and starter motor are high-current components. Never short-circuit these components together directly. This can cause sparks, fires, and serious injury.
- Bypassing the Solenoid (Advanced - Use with Caution): If you suspect a faulty solenoid, you can carefully bypass it by using a screwdriver to bridge the two large terminals (with the battery disconnected initially, then briefly reconnected for the test). If the starter motor spins when you do this, the solenoid is likely the problem. Be extremely careful not to touch any metal parts of the mower while doing this, and wear eye protection. This is only for experienced users who fully understand the risks. A screwdriver can weld itself to the terminals, and the uncontrolled starting of the engine could have drastic consequences.
- Use Proper Tools: Use insulated tools designed for electrical work.
- Consult a Professional: If you are not comfortable working on the electrical system, consult a qualified mechanic.
With a solid understanding of the 3-pole starter solenoid wiring diagram, you're well-equipped to troubleshoot starting problems, replace components, and keep your lawn mower running smoothly. Take your time, follow the diagram carefully, and prioritize safety. You've got this!
To help you even further, we have a detailed, downloadable wiring diagram that you can use as a reference. This diagram is a generalized version and may need slight variations depending on the lawn mower model, but it provides a strong foundation for understanding the starter solenoid wiring.