Llc1 2 Channel Line Output Converter Wiring Diagram
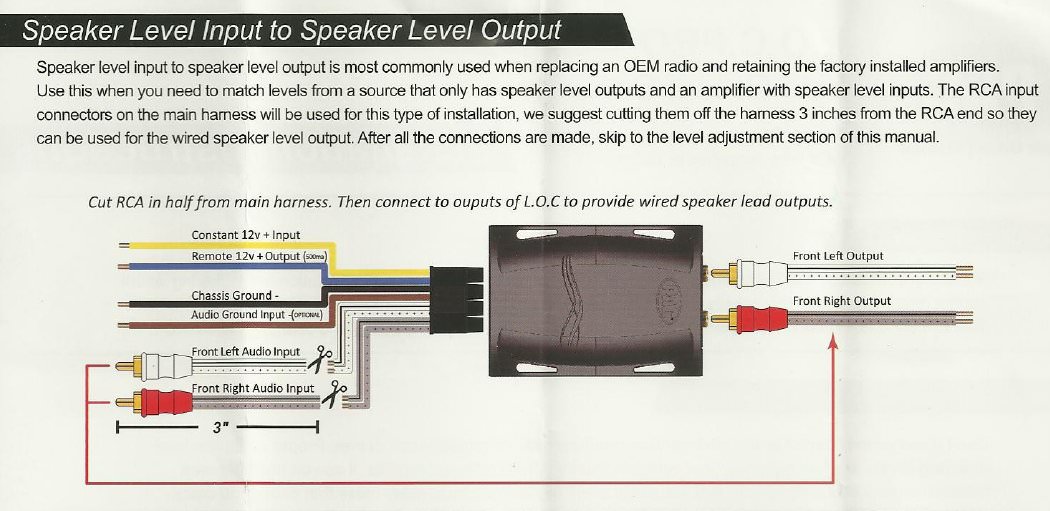
Alright, let's dive into the world of LLC1 2-channel Line Output Converters (LOCs). You're here because you're looking to upgrade your car audio system, maybe add a subwoofer or a better amplifier, and you've realized your factory head unit doesn't have the RCA outputs you need. That's where the LOC comes in. This article will provide a detailed understanding of an LLC1 2-channel line output converter wiring diagram, so you can confidently tackle your next car audio project. We'll cover everything from its purpose to troubleshooting tips.
Purpose of an LLC1 2-Channel LOC Wiring Diagram
The primary purpose of an LLC1 2-channel LOC wiring diagram is to guide you through the correct connection of the converter to your car's existing speaker wires and your aftermarket amplifier. Why is this necessary? Modern car head units are often deeply integrated into the vehicle's computer system. Directly replacing them can be complex, expensive, or even impossible without losing features. The LOC offers a convenient workaround. It takes the high-level (amplified) speaker output from your factory head unit and converts it into a low-level (pre-amplified) RCA signal that your aftermarket amplifier can use. A clear wiring diagram ensures you connect the wires correctly, preventing damage to your equipment and ensuring optimal audio performance.
Understanding the wiring diagram is essential for:
- Installation: Properly connecting the LOC to your factory speaker wires and amplifier.
- Troubleshooting: Identifying and resolving issues like poor sound quality, distortion, or a non-functioning subwoofer.
- Repair: Fixing broken or damaged wiring connections.
- Learning: Gaining a better understanding of car audio system integration.
Key Specs and Main Parts
Before we jump into the wiring diagram, let's define the key components and their specifications. A typical LLC1 2-channel LOC consists of the following:
- High-Level Input Wires: These are the wires that connect to your factory speaker wires. There are typically four: Left Positive (+), Left Negative (-), Right Positive (+), and Right Negative (-). These accept the amplified output from the head unit, typically in the range of 4-8 ohms impedance.
- Low-Level Output RCA Jacks: These are the RCA outputs that connect to your aftermarket amplifier. They provide a low-level signal, typically around 0.2V to 2V.
- Ground Wire: This is essential for grounding the LOC to the vehicle's chassis. A solid, reliable ground connection is crucial for minimizing noise and ensuring proper operation.
- Remote Turn-On Wire (Optional): Some LOCs have a remote turn-on wire. This wire sends a +12V signal to your amplifier when the LOC detects a signal from the factory speakers, turning the amplifier on. This eliminates the need to find an accessory power source. If the LOC doesn't have one, you'll need to tap into an accessory wire.
- Adjustment Knobs (Gain): Many LOCs have potentiometers (variable resistors) that allow you to adjust the gain, which is the strength of the output signal. These knobs are crucial for matching the output of the LOC to the input sensitivity of your amplifier.
Symbols in the Wiring Diagram
Understanding the symbols in the wiring diagram is crucial for accurate wiring. Here's a breakdown of common symbols:
- Solid Lines: Represent wires. Thicker lines may indicate power wires.
- Dashed Lines: May represent ground connections or signal paths.
- "+" Symbol: Indicates a positive (+) connection.
- "-" Symbol: Indicates a negative (-) or ground connection.
- RCA Connector Symbol: Depicts the RCA jacks (typically red and white for right and left channels).
- Color Codes: Wires are usually color-coded. Common color codes include:
- Red: +12V Power (although not usually directly wired in an LOC)
- Black: Ground
- White: Left Channel (+)
- White with Black Stripe: Left Channel (-)
- Gray: Right Channel (+)
- Gray with Black Stripe: Right Channel (-)
- Speaker Symbol: Represents a speaker. This helps identify which speaker wires to tap into.
How It Works
The LLC1 2-channel LOC works by using a simple resistive network to reduce the voltage of the high-level speaker signal. The input impedance of the LOC is significantly higher than the impedance of the factory speakers, so it draws very little current from the head unit's amplifier. This prevents the head unit from detecting an open circuit (which could trigger error codes or shut down the audio output). The reduced voltage signal is then passed to the RCA outputs, providing a low-level signal suitable for an aftermarket amplifier.
The gain adjustment knobs allow you to fine-tune the output voltage to match the input sensitivity of your amplifier. This is important for achieving optimal signal-to-noise ratio and preventing clipping (distortion). If the gain is set too high, the amplifier will be overdriven, resulting in distortion. If the gain is set too low, the amplifier will not produce enough power.
Real-World Use and Basic Troubleshooting
Let's look at some common problems and how to troubleshoot them using the wiring diagram:
- No Sound:
- Check the ground connection: A poor ground is the most common cause of no sound. Ensure the ground wire is securely connected to a clean, bare metal surface on the vehicle's chassis. Use a multimeter to verify continuity between the LOC's ground wire and the vehicle's chassis.
- Verify the input connections: Double-check that the high-level input wires are connected to the correct speaker wires. Refer to your vehicle's wiring diagram to identify the correct wires.
- Check the RCA connections: Ensure the RCA cables are securely connected to the LOC and the amplifier.
- Verify power to the amplifier: Make sure the amplifier is receiving power and that the remote turn-on wire is properly connected (if applicable).
- Distortion:
- Adjust the gain: Reduce the gain on the LOC. Clipping (distortion) occurs when the signal level is too high.
- Check the speaker wires: Ensure the speaker wires are not shorted to ground or to each other.
- Verify the input signal: Make sure the signal from the factory head unit is not already distorted.
- Noise (e.g., engine whine):
- Improve the ground connection: A poor ground is a common cause of noise. Try grounding the LOC to a different location on the vehicle's chassis.
- Use shielded RCA cables: Shielded RCA cables can help reduce noise interference.
- Route RCA cables away from power wires: Running RCA cables close to power wires can introduce noise. Keep them separated.
- Ground Loop Isolator: In extreme cases, a ground loop isolator may be necessary.
Safety
Working with car electrical systems involves inherent risks. Here are some safety precautions to keep in mind:
- Disconnect the Negative Battery Terminal: Before starting any wiring work, always disconnect the negative battery terminal to prevent short circuits and electrical shocks.
- Use Proper Tools: Use insulated tools designed for automotive electrical work.
- Avoid Cutting Factory Wiring: If possible, use T-taps or other non-destructive methods to connect to the factory speaker wires. Cutting and splicing can damage the wires and void your warranty.
- Secure Wiring: Use zip ties or electrical tape to secure all wiring connections and prevent them from rubbing against sharp edges.
- Fuses: Ensure that the amplifier is properly fused to protect it from overcurrent.
Caution: The amplifier can get very hot. Do not touch it immediately after use. Let it cool down completely before handling it.
By understanding the wiring diagram, the components, and the troubleshooting steps, you can confidently install and maintain your LLC1 2-channel LOC. Remember to always prioritize safety and take your time. Good luck with your car audio upgrade!
We have a detailed, printable version of a typical LLC1 2-channel line output converter wiring diagram available for download. It includes clear labeling and color coding. Contact us for access to the file. This diagram will serve as a valuable reference during your installation process.