Marks 3.7 V6 Jeep Liberty Timing Chain Diagram
So, you're tackling a timing chain job on your 3.7L V6 Jeep Liberty? Excellent! This engine, while generally robust, is sensitive to timing, and getting it wrong can lead to catastrophic engine damage. That's why understanding the timing chain diagram is absolutely crucial. This article will walk you through everything you need to know, acting as your trusted guide through the process.
Purpose of the 3.7L V6 Jeep Liberty Timing Chain Diagram
Why bother with the diagram? Several reasons. The most obvious is during a timing chain replacement. Over time, the chain stretches, tensioners wear out, and guides break. A replacement requires meticulous alignment to ensure the valves open and close at the precise moment relative to the piston position. The diagram shows you exactly how to achieve this. But it's not just for replacements. You might need it for:
- Diagnosing timing-related issues: If you're experiencing misfires, rough idling, or a loss of power, incorrect timing could be the culprit.
- Engine rebuilds: If you're completely disassembling and reassembling the engine, the timing chain is a critical component.
- Educational purposes: Simply understanding how the engine works is a valuable skill.
Key Specs and Main Parts
The 3.7L V6 is an overhead valve (OHV) engine, meaning the camshaft is located within the engine block, and pushrods actuate the valves in the cylinder head. This design influences the timing chain layout. Here are the major components involved:
- Crankshaft Sprocket: This sprocket is mounted on the crankshaft and drives the timing chain.
- Camshaft Sprocket: This sprocket is mounted on the camshaft and is driven by the timing chain. It controls the opening and closing of the valves. There are actually 2 camshaft sprockets, one for each cylinder head.
- Timing Chain: The chain itself connects the crankshaft and camshaft(s), synchronizing their rotation. The 3.7L uses a single timing chain to drive both camshafts.
- Tensioner: This device maintains proper tension on the timing chain, preventing slack and ensuring accurate timing. The 3.7L uses a hydraulic tensioner, meaning it uses oil pressure to maintain tension.
- Guides/Rails: These guide the timing chain and prevent it from rubbing against other engine components. They are typically made of plastic or composite materials.
- Idler Sprocket (Sometimes): Some variations of the 3.7L engine may have an idler sprocket to further guide the chain and optimize its path.
Key Specs to Note:
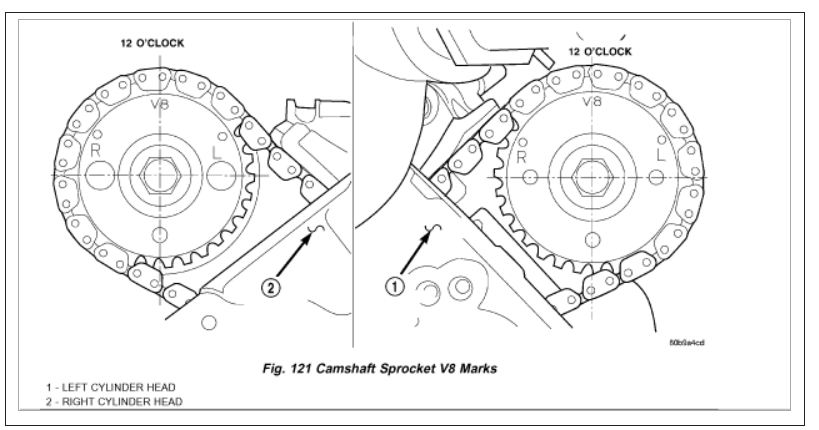
- Timing Marks: These are critical! The diagram will clearly show the alignment marks on the crankshaft and camshaft sprockets. These marks must be aligned correctly during installation.
- Chain Length: While not something you typically measure, knowing the chain length is useful when comparing parts.
- Tensioner Extension: The amount the tensioner extends provides a visual indication of chain wear. If the tensioner is extended excessively, it's a sign that the chain is stretched and needs replacement.
Symbols in the Timing Chain Diagram
Understanding the symbols in the diagram is vital. Here's a breakdown:
- Solid Lines: Represent physical components like the timing chain, sprockets, and guides.
- Dashed Lines: Often indicate hidden components or the path of oil flow to the tensioner.
- Circles/Dots: Represent bolt holes or points of attachment.
- Arrows: Show the direction of rotation of the crankshaft and camshaft(s).
- Timing Marks: These are usually depicted as small circles, triangles, or lines on the sprockets. They are absolutely crucial for proper timing. The diagram will specify how these marks align with corresponding marks on the engine block or cylinder head.
- Colors: While not always present, some diagrams use colors to differentiate components. For example, the timing chain might be represented in a specific color to make it easier to identify.
The most important symbol is, of course, the timing mark. Pay very close attention to its shape, location, and how it aligns with the corresponding mark on the engine. Getting this wrong is the most common mistake and can lead to severe engine damage.
How It Works
The timing chain's job is to synchronize the rotation of the crankshaft and camshaft(s). The crankshaft, connected to the pistons, provides the engine's power. The camshaft(s) control the opening and closing of the intake and exhaust valves. The timing chain ensures that the valves open and close at the correct time relative to the piston's position.
Here's a simplified explanation:
- The crankshaft rotates, driven by the combustion process in the cylinders.
- The crankshaft sprocket, mounted on the crankshaft, rotates along with it.
- The timing chain connects the crankshaft sprocket to the camshaft sprocket(s).
- As the crankshaft sprocket rotates, it drives the timing chain, which in turn rotates the camshaft sprocket(s).
- The camshaft lobes, rotating with the camshaft, push on the valve lifters (or tappets), which then actuate the pushrods.
- The pushrods then actuate the rocker arms, which in turn open and close the valves.
The timing is the specific relationship between the crankshaft and camshaft(s). The diagram ensures that the valves open and close at the precisely designated moments. If the timing is off, the engine will not run correctly, and you may experience misfires, reduced power, or even engine damage.
Real-World Use - Basic Troubleshooting
Here are a few troubleshooting scenarios where the timing chain diagram is invaluable:
- Misfires: If you have persistent misfires, especially after replacing the timing chain, double-check the timing marks. A slight misalignment can cause significant performance issues.
- Rough Idling: Incorrect timing can also lead to a rough idle. Use a timing light (if applicable – some systems rely purely on sensor data) and compare the readings to the specifications outlined in the diagram.
- Check Engine Light (CEL) with Timing Codes: Diagnostic trouble codes (DTCs) related to camshaft or crankshaft position sensors often indicate timing problems. The diagram helps you verify the sensor locations and connections. Common codes include P0016, P0017, P0018, and P0019.
- Rattling Noises: A rattling noise from the front of the engine could indicate a worn timing chain, a faulty tensioner, or broken guides. The diagram helps you identify the location of these components.
Pro Tip: Before disassembling anything, take detailed pictures of the timing mark alignment. This serves as a reference point during reassembly.
Safety Considerations
Working on the timing chain involves several potential hazards:
- Rotating Engine Components: Never work on the timing chain while the engine is running. Disconnect the battery to prevent accidental starts.
- Sharp Edges: The timing chain and sprockets can have sharp edges. Wear gloves to protect your hands.
- Spring Tension: The timing chain tensioner contains a spring that can release suddenly. Use caution when removing or installing the tensioner. Follow the manufacturer's instructions carefully.
- Oil: You'll be working around engine oil. Wear appropriate clothing and dispose of used oil properly.
- Cylinder Heads Removal: Improperly torquing cylinder heads back onto the engine can cause serious damage. Always follow manufacturer's torque specifications and use a reliable torque wrench.
- Valve Train: When the timing chain is disconnected, the camshafts can rotate freely. This can cause the valves to contact the pistons if not handled carefully.
Important Note: If you are not comfortable working on the timing chain, it is best to take your vehicle to a qualified mechanic. Incorrect timing can cause severe engine damage.
We understand how vital it is to have the timing chain diagram. That is why we are providing you with the link below to download the file.