Mercedes Benz Serpentine Belt Diagram
Understanding Your Mercedes-Benz Serpentine Belt Diagram: A DIY Mechanic's Guide
For the experienced DIYer tackling repairs or maintenance on their Mercedes-Benz, the serpentine belt system is a critical area. A thorough understanding of the serpentine belt diagram is indispensable. This article will delve into the intricacies of these diagrams, covering their purpose, key components, symbology, operational principles, troubleshooting tips, and essential safety precautions. Consider this your go-to guide for navigating the world of Mercedes-Benz serpentine belts.
Purpose of the Serpentine Belt Diagram
Why is a serpentine belt diagram so important? It's the roadmap for your engine's accessory drive system. Here's why you need it:
- Repair and Replacement: Accurately routing the serpentine belt is crucial. Incorrect routing can lead to component damage, belt slippage, and ultimately, system failure. The diagram provides the definitive routing path.
- Diagnosis: A diagram helps you identify each component within the system (e.g., alternator, power steering pump, A/C compressor) and quickly trace the belt's path to pinpoint potential issues. For instance, a squealing noise could originate from a misaligned pulley, a worn-out tensioner, or a failing accessory. The diagram allows you to systematically examine these possibilities.
- Learning and Understanding: For those eager to expand their automotive knowledge, studying the diagram provides insight into how the engine's accessories are powered and interconnected.
- Modification and Upgrades: If you're considering modifications such as installing an aftermarket supercharger or upgraded accessories, knowing the belt routing and component layout is vital for planning and execution.
Key Specs and Main Parts
The serpentine belt system is relatively straightforward, but understanding its components is key. Here's a breakdown:
- Serpentine Belt: This single, continuous belt is responsible for driving multiple engine accessories. Its length and rib count are specific to your Mercedes-Benz model and engine configuration. Using the wrong belt can result in improper tension and performance issues.
- Crankshaft Pulley (Harmonic Balancer): Connected directly to the engine's crankshaft, this pulley is the driving force of the serpentine belt system. Its diameter affects the speed at which the accessories are driven.
- Alternator Pulley: The alternator generates electrical power for the vehicle. The serpentine belt spins this pulley, converting mechanical energy into electrical energy.
- Power Steering Pump Pulley: Provides hydraulic pressure to assist steering.
- Air Conditioning (A/C) Compressor Pulley: Compresses refrigerant to cool the cabin.
- Idler Pulleys: Smooth, unpowered pulleys that guide the belt around the system and maintain proper tension.
- Tensioner Pulley: This spring-loaded pulley maintains consistent tension on the serpentine belt. A failing tensioner can lead to belt slippage, noise, and premature belt wear. There are two main types, spring loaded and hydraulic, which can be model specific.
Key Specs: Belt length (measured in millimeters or inches) and the number of ribs are the most crucial specifications. Refer to your vehicle's repair manual or an online parts catalog for the correct specifications for your Mercedes-Benz model and engine.
Decoding the Diagram: Symbols and Conventions
Mercedes-Benz serpentine belt diagrams, like all technical diagrams, use specific symbols and conventions to convey information effectively. Understanding these symbols is crucial for accurate interpretation.
- Solid Lines: Typically represent the serpentine belt itself. The thickness of the line may indicate the belt's width or importance.
- Dashed Lines: Might represent the alignment of pulleys or indicate areas where the belt runs behind other components.
- Arrows: Indicate the direction of belt travel. Pay close attention to the arrows to ensure you route the belt in the correct direction.
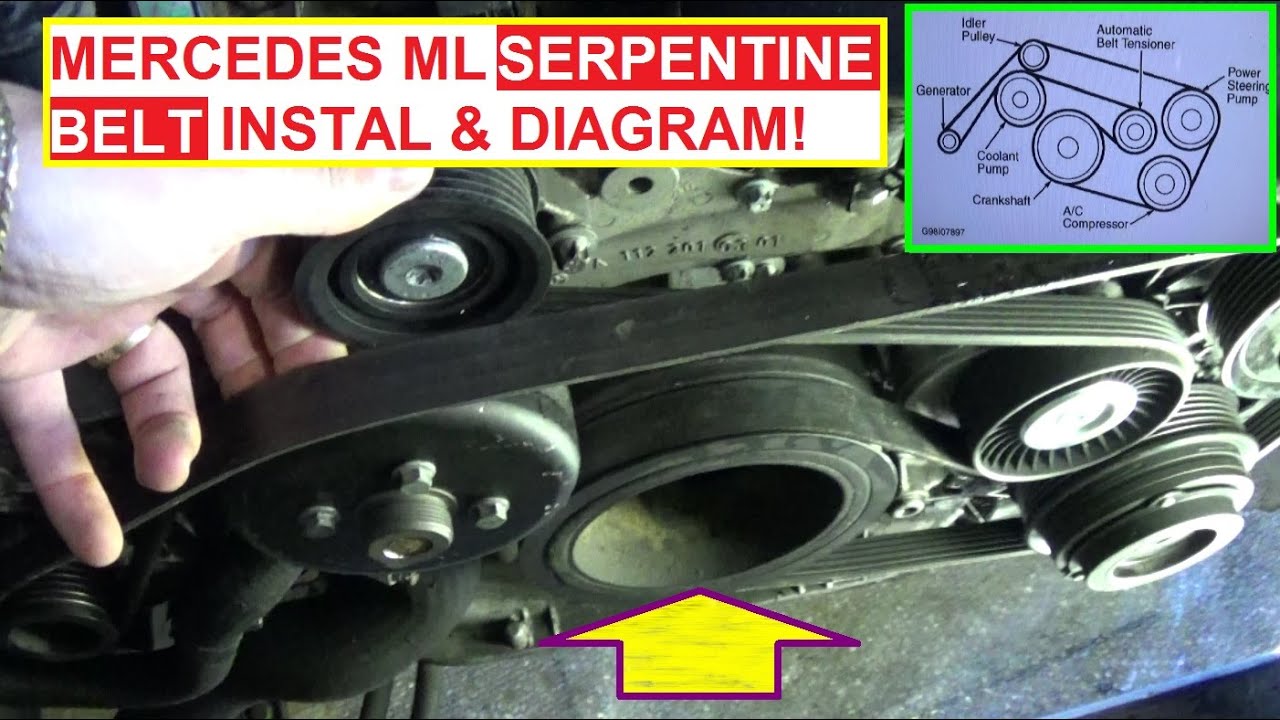
- Pulley Symbols: Pulleys are usually represented by circles. The circle may be solid or have a central dot. Some diagrams might label the pulley with abbreviations (e.g., ALT for alternator, P/S for power steering, A/C for air conditioning, CRK for Crank).
- Tensioner Symbol: The tensioner pulley often has a symbol indicating its spring-loaded mechanism. This might be a small spring icon or a note indicating "spring tension."
- Routing Path Numbers: Some diagrams number the pulleys along the belt path to simplify the routing process.
While color is not typically used to distinguish components, some diagrams may use different colors to highlight specific sections or areas of interest.
How the Serpentine Belt System Works
The system's operation is based on a simple principle: rotational motion transfer. The engine's crankshaft drives the crankshaft pulley, which in turn drives the serpentine belt. The belt wraps around the various accessory pulleys, transferring the rotational force to each accessory. The tensioner pulley maintains adequate belt tension to prevent slippage and ensure efficient power transfer. It is this careful balance that keeps all of the ancillaries running at correct RPMs.
A properly functioning tensioner is critical. It ensures that the belt maintains sufficient contact with the pulleys, even as the belt stretches over time or experiences changes in engine speed. If the tensioner fails, the belt can slip, leading to reduced performance of the accessories (e.g., weak A/C, poor power steering) and potentially causing damage to the accessories or the belt itself.
Real-World Use: Basic Troubleshooting
Here are some common serpentine belt system issues and how to troubleshoot them using the diagram:
- Squealing Noise: This is often caused by a slipping belt. Check the belt for wear, cracks, or glazing. Inspect the tensioner for proper operation. Using the diagram, verify that the belt is routed correctly. Also check pulley alignment, if a pulley is out of alignment with the others, the belt can squeal.
- Belt Wear or Damage: Examine the belt for cracks, fraying, or missing ribs. These signs indicate that the belt needs replacement. Use the diagram to ensure that the new belt is routed correctly.
- Accessory Malfunction: If an accessory (e.g., A/C compressor, power steering pump) is not functioning correctly, use the diagram to verify that the belt is properly driving its pulley. If the belt is slipping or the pulley is not turning, the accessory may not be receiving adequate power.
- Tensioner Issues: A noisy or vibrating tensioner indicates a potential problem. The diagram can help you locate the tensioner and inspect it for wear, damage, or improper movement.
When diagnosing problems, always refer to the serpentine belt diagram for your specific Mercedes-Benz model. Small variations in routing or component placement can significantly impact performance.
Safety First: Working on the Serpentine Belt System
Working on the serpentine belt system involves potential hazards. Take these precautions:
- Disconnect the Battery: Before working on any electrical components (especially the alternator), disconnect the negative battery terminal to prevent electrical shocks or short circuits.
- Hot Engine: Allow the engine to cool completely before touching any components. The engine, pulleys, and belt can become extremely hot during operation.
- Moving Parts: Never put your hands near the serpentine belt or pulleys while the engine is running. The rotating parts can cause serious injury.
- Eye Protection: Wear safety glasses to protect your eyes from debris.
- Belt Tension: Be aware of the stored energy in the belt tensioner. When releasing the tension, use the correct tools and techniques to avoid injury.
- Consult Repair Manual: Always consult your vehicle's repair manual for specific instructions and safety precautions related to serpentine belt replacement and maintenance.
Note: The tensioner spring can be extremely strong. Always use the proper tool and exercise caution when relieving the belt tension.
By following these safety guidelines and using the diagram as a guide, you can safely and effectively maintain your Mercedes-Benz serpentine belt system.
We have a comprehensive collection of Mercedes-Benz serpentine belt diagrams available. Please [link to contact information] to request the diagram specific to your vehicle model and engine.