
Mercruiser 5.7 Serpentine Belt Diagram
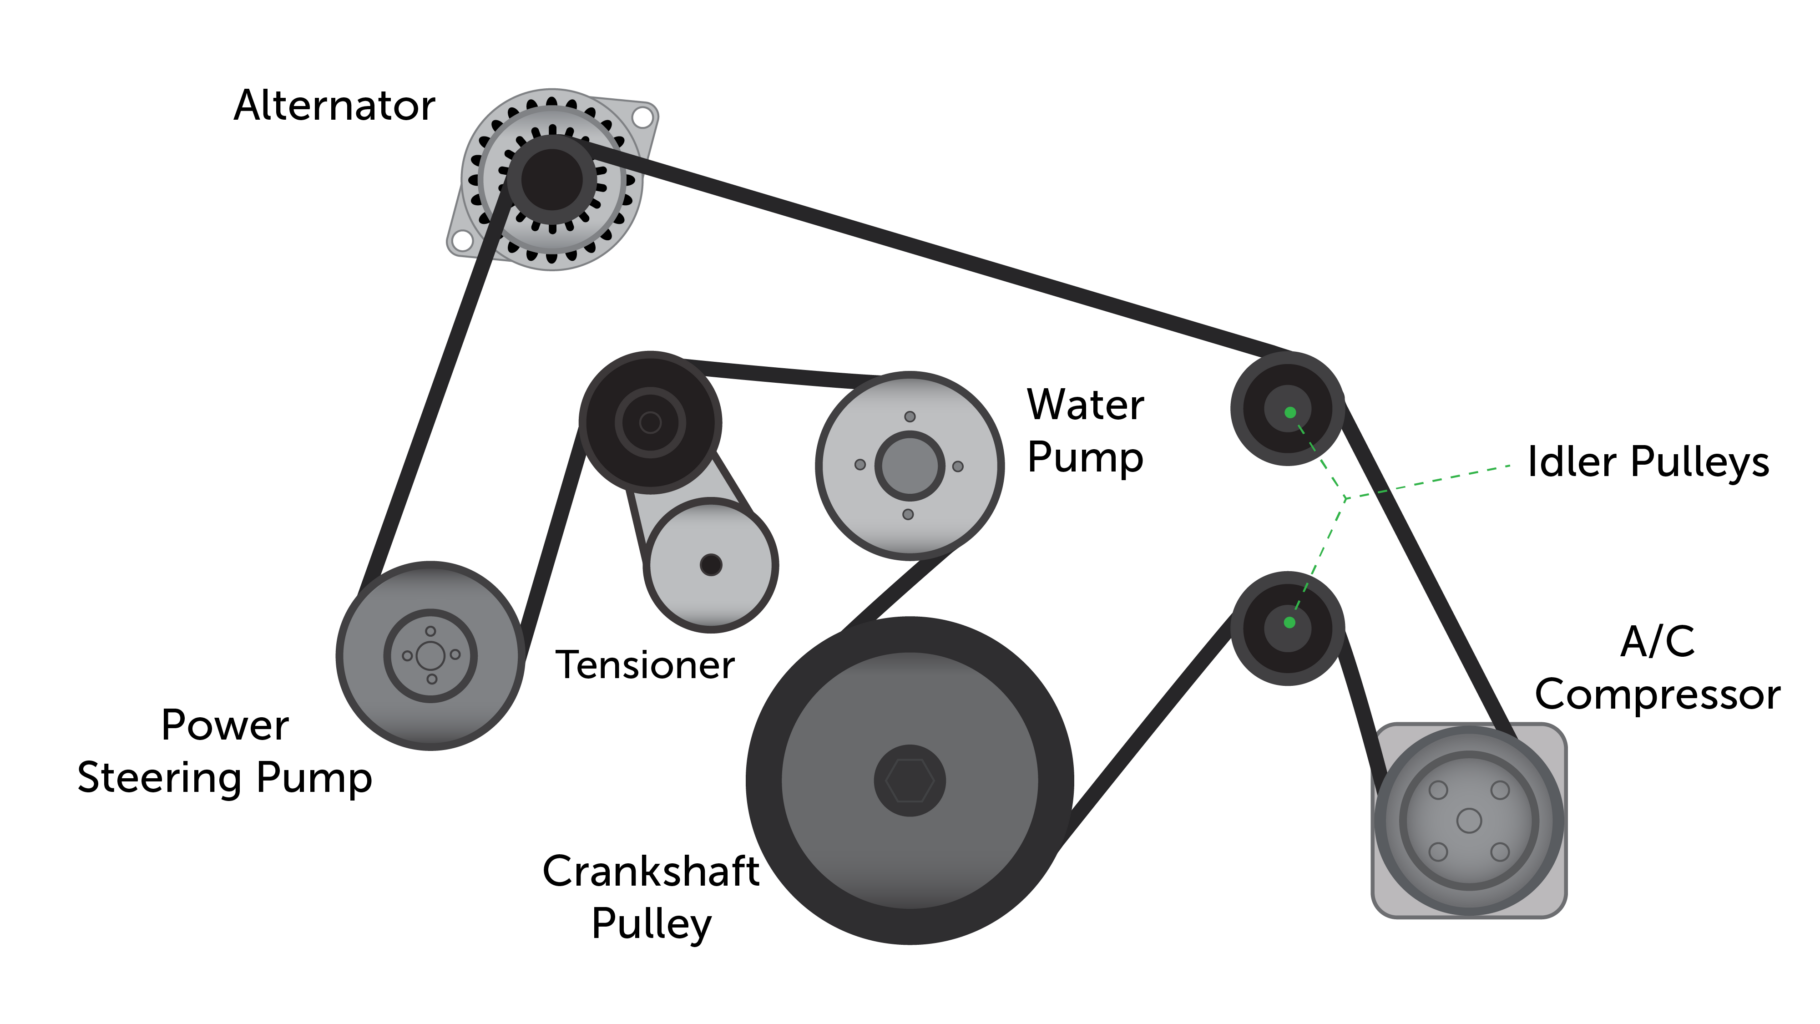
The serpentine belt system on a Mercruiser 5.7 engine might seem straightforward, but understanding its intricacies is crucial for proper maintenance, troubleshooting, and repairs. This article provides a detailed breakdown of the serpentine belt diagram, empowering you to confidently tackle any issues that arise. We'll cover everything from the key components to practical troubleshooting, ensuring you have the knowledge to keep your boat running smoothly.
Purpose of the Serpentine Belt Diagram
Why bother understanding the serpentine belt diagram? Simply put, it's your roadmap to diagnosing and fixing belt-related problems. Here’s why it's essential:
- Repair and Replacement: When replacing a worn or broken belt, the diagram ensures you route the new belt correctly. Incorrect routing can lead to component damage and performance issues.
- Troubleshooting: Squealing belts, overheating, or charging problems can often be traced back to the serpentine belt system. The diagram helps you identify the components involved and their relationship to one another.
- Preventive Maintenance: Regularly inspecting the belt and its components according to the diagram helps identify potential problems before they become major headaches.
- Understanding Engine Systems: Familiarizing yourself with the diagram provides a better understanding of how the engine's various accessories (alternator, power steering pump, water pump) are driven.
- Learning and Education: Even if you're not actively working on your engine, understanding the serpentine belt system can deepen your general knowledge of marine engine mechanics.
Key Specs and Main Parts
The Mercruiser 5.7 engine uses a single serpentine belt to drive multiple engine accessories. Here's a breakdown of the key components:
Main Components:
- Serpentine Belt: The heart of the system, responsible for transferring rotational power from the crankshaft to the accessories. Belts are typically made of EPDM rubber (Ethylene Propylene Diene Monomer), known for its resistance to heat, cracking, and wear.
- Crankshaft Pulley: Connected directly to the crankshaft, this pulley is the driving force for the entire system.
- Alternator Pulley: The alternator generates electrical power for the boat's systems. The serpentine belt drives the alternator pulley.
- Water Pump Pulley: The water pump circulates coolant through the engine to prevent overheating. The serpentine belt drives the water pump pulley.
- Power Steering Pump Pulley: (If Equipped) Provides hydraulic pressure to assist steering. The serpentine belt drives the power steering pump pulley.
- Idler Pulleys: Smooth, bearing-mounted pulleys that guide the belt and maintain proper tension. They don't drive any accessories.
- Tensioner Pulley: A spring-loaded pulley that maintains constant tension on the serpentine belt. It's crucial for preventing slippage and ensuring proper accessory operation. A functioning tensioner is vital.
Key Specs:
- Belt Length: Specified in inches or millimeters and crucial for proper fit. Using the wrong belt length can cause damage to the belt, pulleys, or accessories. The correct length is specific to the engine model and accessory configuration.
- Belt Width: Also specified in inches or millimeters. Common widths are available, but using the correct width is critical for proper engagement with the pulley grooves.
- Rib Count: The number of longitudinal ribs on the belt that engage with the grooves on the pulleys. The number of ribs must match the pulleys.
- Tensioner Torque: When replacing the tensioner, it's important to torque the mounting bolts to the manufacturer's specification to avoid damage or loosening.
Understanding Serpentine Belt Diagram Symbols
Serpentine belt diagrams use standard symbols to represent different components and belt routing. Here’s a breakdown:
- Solid Lines: Represent the serpentine belt itself. The thickness of the line might vary depending on the diagram, but it always indicates the belt's path.
- Circles: Represent pulleys. Different types of pulleys may be indicated with additional symbols or labels. For example, pulleys connected to driven accessories (alternator, water pump) may have an icon representing that accessory.
- Arrows: Indicate the direction of belt travel around the pulleys. Following the arrows helps you visualize the belt's path and ensures correct routing.
- Text Labels: Identify each component. Common labels include "Crankshaft," "Alternator," "Water Pump," "Tensioner," and "Idler."
- Dotted Lines: May represent the "backside" of the belt contacting a pulley. This signifies that the smooth side of the belt is driving that particular pulley, rather than the ribbed side.
- Color Coding: Some diagrams use color coding to highlight specific sections of the belt or individual components. Check the legend for the diagram to understand the meaning of each color.
How the Serpentine Belt System Works
The serpentine belt system operates on a simple principle: transferring rotational power from the crankshaft to various engine accessories. Here’s how it works:
- The crankshaft rotates, driven by the engine's combustion process.
- The crankshaft pulley, mounted on the crankshaft, rotates along with it.
- The serpentine belt wraps around the crankshaft pulley and other accessory pulleys.
- As the crankshaft pulley rotates, it drives the serpentine belt, which in turn drives the accessory pulleys (alternator, water pump, power steering pump, etc.).
- The tensioner pulley maintains constant tension on the belt, preventing slippage and ensuring efficient power transfer.
- Idler pulleys guide the belt along the proper path, ensuring it clears other engine components.
The tensioner is absolutely critical. If the tensioner loses its ability to properly load the belt, the accessories will not get the power they need to function correctly.
Real-World Use: Basic Troubleshooting Tips
Here are some common problems associated with the serpentine belt system and how to troubleshoot them using the diagram:
- Squealing Belt: Often caused by a loose belt or worn pulleys. Check the tensioner for proper operation. Inspect the belt for cracks, glazing, or missing ribs. Refer to the diagram to identify potential pulley misalignment issues.
- Overheating: If the water pump isn't being driven effectively due to a slipping or broken belt, the engine can overheat. Check the belt tension and condition. Verify that the water pump pulley is rotating smoothly.
- Charging Problems: If the alternator isn't being driven properly, the battery may not charge. Check the belt tension and condition. Verify that the alternator pulley is rotating smoothly.
- Power Steering Issues: (If Equipped) If the power steering pump isn't being driven properly, steering may become difficult. Check the belt tension and condition. Verify that the power steering pump pulley is rotating smoothly.
- Belt Slippage: Evidenced by a loss of power to accessories or a "chirping" sound. Check the belt tension and condition. Inspect the pulleys for signs of wear or damage.
Safety Considerations
Working on the serpentine belt system involves certain risks. Always prioritize safety:
- Disconnect the Battery: Before working on any electrical components (like the alternator), disconnect the negative battery cable to prevent short circuits.
- Hot Engine: Allow the engine to cool completely before working on the serpentine belt system to avoid burns.
- Moving Parts: Never place your hands or tools near a running engine with the serpentine belt engaged. The belt and pulleys can cause serious injury.
- Tensioner Spring: Be careful when releasing the tension on the belt. The tensioner spring can be strong and could snap back unexpectedly. Always use the correct tool to relieve tension.
- Sharp Edges: Some engine components may have sharp edges. Wear gloves to protect your hands.
- Proper Tools: Use the correct tools for the job. Avoid using makeshift tools, as they can damage components or cause injury.
The tensioner itself is potentially dangerous. The spring can be powerful, so ensure to follow all safety procedures when releasing or installing it. Additionally, working around the crankshaft pulley requires extreme caution due to its direct connection to the engine's rotating assembly.
By understanding the serpentine belt diagram and following these guidelines, you'll be well-equipped to maintain, troubleshoot, and repair your Mercruiser 5.7 engine's serpentine belt system. Remember to consult your engine's service manual for specific instructions and torque specifications.
We have a downloadable version of the Mercruiser 5.7 Serpentine Belt Diagram readily available. Contact us for the file, and good luck with your project!