Metra 72 4568 Speaker Wiring Harness
So, you're looking at the Metra 72-4568 speaker wiring harness diagram. Whether you're replacing blown speakers, upgrading your car audio system, or just trying to understand how things are wired in your ride, this diagram is your roadmap. It’s a key resource for avoiding wiring mistakes that can damage your stereo or your car's electrical system. We're going to break down everything you need to know to confidently navigate this diagram and get your audio system singing.
Why This Diagram Matters
Let's face it: car audio wiring can be a tangled mess. Without a clear guide, you're basically guessing, and that's a recipe for disaster. This diagram provides a specific blueprint for connecting aftermarket speakers to your vehicle's existing wiring. It ensures a proper electrical connection, maintains the correct polarity (positive and negative), and prevents short circuits. Here's why it's crucial:
- Speaker Replacement: When your factory speakers give up the ghost, this harness lets you seamlessly install new ones without cutting or splicing into your original wiring.
- System Upgrades: Planning a complete audio overhaul? Understanding the speaker wiring is the first step to integrating new amplifiers, processors, and head units.
- Troubleshooting: If your speakers aren't working correctly, the diagram helps you trace the wiring, identify potential problems (like loose connections or damaged wires), and diagnose the issue.
- Learning and Education: Want to understand the basic electrical system of your car and how the sound system is integrated? This diagram provides great information to get started.
Key Specs and Main Parts of the Metra 72-4568
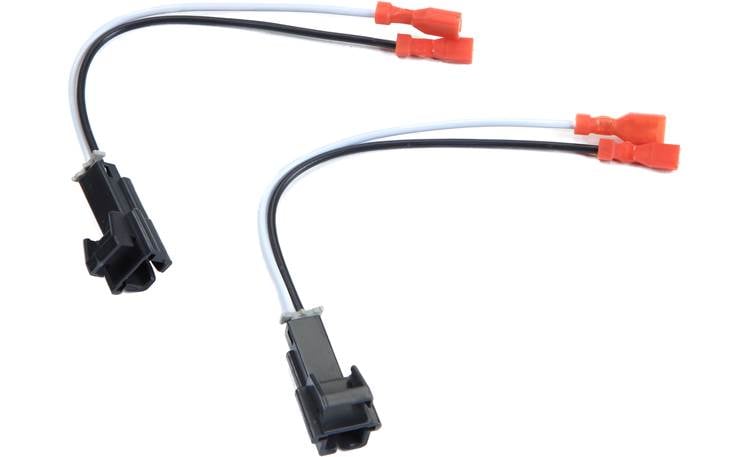
The Metra 72-4568 is a standardized speaker wiring harness designed to fit a specific range of vehicle makes and models (mostly GM vehicles). It acts as an adapter, bridging the gap between the factory speaker connector in your car and the terminals on your new aftermarket speaker.
Main Components:
- Vehicle-Specific Connector: This molded plastic connector plugs directly into the factory speaker connector in your car's door or rear deck. It's designed to be a tight, secure fit, ensuring a reliable electrical connection.
- Speaker Terminals: These are typically spade connectors (also known as quick disconnects) that attach directly to the terminals on your aftermarket speaker. Spade connectors come in various sizes, but the 72-4568 usually uses standard sizes that fit most aftermarket speakers.
- Wiring: The wires themselves are usually color-coded to indicate positive (+) and negative (-) connections. The gauge (thickness) of the wire is typically 18-20 AWG (American Wire Gauge), which is sufficient for most speaker applications.
Key Specifications:
- Compatibility: This is THE most important specification. The Metra 72-4568 is NOT a universal harness. It is specifically designed for select General Motors (GM) vehicles. It's *critical* to verify compatibility with your specific make, model, and year *before* purchasing. You can use Metra's online fit guide or consult with a car audio specialist to confirm compatibility.
- Wire Gauge: Typically 18-20 AWG. This is sufficient for most speakers powered by the head unit. If you're using a powerful external amplifier, you might need to upgrade the wiring with thicker gauge wire for better performance.
- Connector Type: Depends on the specific vehicle application. The diagram will show the specific connector type and its pin configuration.
- Polarity: The harness maintains the correct polarity between the factory wiring and the speaker. This is essential for proper sound reproduction. Reversed polarity can lead to cancellation of sound waves and poor audio quality.
Understanding the Diagram: Symbols, Colors, and Icons
The Metra 72-4568 diagram, like most electrical diagrams, uses standardized symbols and color codes to represent different components and wires. Here's a breakdown of the key elements:
- Lines: Lines represent wires or electrical conductors. A solid line typically indicates a direct connection, while a dashed line might indicate a shielded wire or a less critical connection.
- Color Codes: Each wire is assigned a specific color to indicate its function. The most common color codes are:
- White: Usually indicates a speaker wire.
- White/Black Stripe: Usually indicates the corresponding negative (-) speaker wire.
- Gray: Another common color for speaker wires.
- Gray/Black Stripe: The corresponding negative (-) speaker wire for gray.
- Other colors: May be used for specific applications. The diagram will always provide a key or legend to explain the color coding.
Always double-check the color codes with the diagram's legend, as they can vary slightly depending on the vehicle and harness manufacturer.
- Connectors: Connectors are represented by rectangular or trapezoidal shapes, often with numbers or letters indicating the pin assignments. The diagram will show how the wires from the harness connect to the pins on the vehicle-specific connector.
- Speaker Symbol: A simplified representation of a speaker, usually a circle with a cone inside.
- Polarity Markings (+ and -): Indicates the positive and negative terminals of the speaker and the corresponding wires on the harness.
How It Works: A Step-by-Step Explanation
The Metra 72-4568 simplifies speaker installation by acting as a bridge between your car's factory wiring and your new speakers. Here's how it works:
- Disconnect the Factory Speaker: Carefully disconnect the factory speaker from its connector. This usually involves pressing a tab or releasing a clip on the connector.
- Plug in the Metra Harness: Plug the vehicle-specific connector on the Metra 72-4568 into the factory speaker connector. It should click into place, ensuring a secure connection.
- Connect to the Aftermarket Speaker: Attach the spade connectors on the Metra harness to the corresponding terminals on your aftermarket speaker. Pay close attention to the polarity! Connect the positive (+) wire from the harness to the positive (+) terminal on the speaker, and the negative (-) wire to the negative (-) terminal.
- Secure the Speaker: Mount the new speaker in the speaker enclosure or door panel. Ensure it's securely fastened to prevent vibrations and rattles.
Essentially, the harness takes the electrical signal from your car's amplifier (either the factory amplifier or an aftermarket amp) and routes it to the correct terminals on your new speaker, ensuring that the speaker produces sound. The color coding and proper connector design prevent you from accidentally wiring the speaker incorrectly.
Real-World Use: Basic Troubleshooting Tips
Even with a detailed diagram, things can sometimes go wrong. Here are some basic troubleshooting tips for using the Metra 72-4568:
- No Sound:
- Double-check all connections to make sure they are secure. Make sure the vehicle-specific connector is fully seated in the factory connector, and that the spade connectors are firmly attached to the speaker terminals.
- Verify the polarity of the speaker wiring. Reversed polarity can cause sound cancellation and result in very weak or no sound.
- Check the speaker itself. Use a multimeter to test the speaker's impedance. A reading of zero ohms (short circuit) or infinite ohms (open circuit) indicates a faulty speaker.
- Inspect the wiring for any signs of damage, such as cuts, frayed wires, or exposed conductors.
- Distorted Sound:
- Make sure the speaker is properly mounted and not rubbing against anything.
- Check the speaker impedance. Using a speaker with the wrong impedance can overload the amplifier and cause distortion.
- Ensure the speaker wires are not touching each other, causing a short circuit.
- Incorrect Fit:
- If the harness doesn't fit your vehicle's connector, *stop immediately*. Forcing it can damage the connector. Double-check the compatibility of the harness with your vehicle's make, model, and year. You may need a different harness.
Safety First: Working with Car Electrical Systems
Working with car electrical systems can be dangerous if you're not careful. Here are some safety precautions to keep in mind:
- Disconnect the Battery: Always disconnect the negative terminal of your car battery before working on any electrical components. This will prevent accidental short circuits and electric shocks.
- Avoid Working with Live Wires: Never work on the electrical system with the engine running or the ignition on.
- Use Insulated Tools: Use tools with insulated handles to protect yourself from electric shocks.
- Be Aware of Airbags: Be extremely careful when working near airbags. Accidental deployment of an airbag can cause serious injury. Consult your vehicle's repair manual for specific instructions on disabling airbags.
- Fuse Box: Familiarize yourself with the location of the fuse box and the function of each fuse. If you suspect a short circuit, check the fuses and replace any blown fuses with the correct amperage rating.
Remember to always prioritize safety when working on your car's electrical system. If you're not comfortable working with electricity, consult a qualified car audio installer.
You now have a solid understanding of the Metra 72-4568 speaker wiring harness and how to use it effectively. Remember that we have the complete, high-resolution wiring diagram available for you to download. This detailed diagram will provide you with all the necessary information to confidently tackle your speaker installation or troubleshooting project. Good luck!