
Mini Cooper R56 Cooling System Diagram
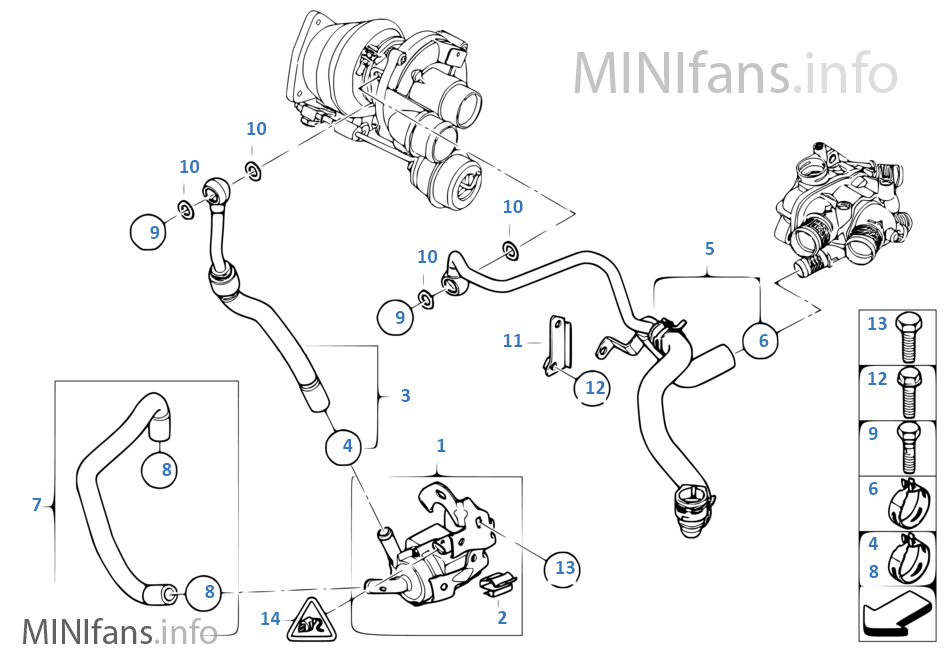
Understanding the cooling system of your Mini Cooper R56 is crucial for maintaining its performance and preventing catastrophic engine damage. This article will delve into the specifics of the R56 cooling system diagram, providing you with the knowledge to diagnose issues, perform repairs, and even enhance your cooling system for performance modifications. We have the complete high-resolution cooling system diagram available for download; you can find the link at the end of this article.
Purpose of the Cooling System Diagram
The cooling system diagram serves as a roadmap to the entire cooling system. It's more than just a visual aid; it's a critical tool for:
- Diagnosis: Identifying the root cause of overheating, coolant leaks, or other cooling-related problems.
- Repair: Guiding you through the proper procedures for replacing components like the water pump, thermostat, or radiator.
- Modification: Understanding the system's layout for upgrades like a larger radiator or an oil cooler.
- Understanding: Simply comprehending how the cooling system functions within your R56.
Key Specs and Main Parts of the R56 Cooling System
The R56 cooling system is a closed-loop, pressurized system that relies on a coolant mixture (typically a 50/50 mix of antifreeze and distilled water) to transfer heat away from the engine. Key components include:
- Radiator: The primary heat exchanger. Coolant flows through the radiator core, and air passing through the fins dissipates heat.
- Water Pump: A mechanically driven pump (usually belt-driven) that circulates coolant throughout the engine and cooling system. It is often a point of failure on R56 models.
- Thermostat: A temperature-sensitive valve that regulates coolant flow to the radiator. It ensures the engine reaches optimal operating temperature quickly and prevents overheating.
- Coolant Expansion Tank (or Overflow Tank): A reservoir that accommodates coolant expansion and contraction due to temperature changes. It also acts as a pressure relief point.
- Hoses: Various hoses connect the different components, allowing coolant to flow. These hoses are subject to wear and tear, becoming brittle and prone to leaks over time.
- Cooling Fan(s): Electric fan(s) that draw air through the radiator when the vehicle is stationary or moving slowly, assisting with heat dissipation.
- Temperature Sensors: These sensors monitor coolant temperature and provide readings to the ECU (Engine Control Unit) which can then control the cooling fans and other engine parameters.
Specific to the R56, you'll find variations depending on the engine (N12, N14, N16, N18). Turbocharged models (N14, N18) often have additional cooling circuits for the turbocharger. The thermostat housing is also a common area for leaks, and should be inspected regularly.
Understanding Symbols on the Diagram
The cooling system diagram uses a standardized set of symbols to represent different components and fluid flow. Here's a breakdown:
- Solid Lines: Represent coolant hoses or pipes carrying coolant. The thickness of the line may indicate the diameter of the hose.
- Dashed Lines: May represent vacuum lines or electrical connections related to the cooling system (e.g., fan control).
- Arrows: Indicate the direction of coolant flow.
- Rectangles or Squares: Typically represent components like the radiator, coolant expansion tank, or water pump.
- Circles: Could represent sensors, valves, or connectors.
- Specific Component Icons: The diagram will use simplified representations of each component, such as a wavy line inside a rectangle for the radiator core or a propeller shape for the water pump impeller.
- Color Coding: Some diagrams use color coding to distinguish between different types of coolant lines or circuits. For example, high-temperature lines might be red, while low-temperature lines might be blue. Consult the diagram's legend for specific color meanings.
Understanding these symbols is key to interpreting the diagram and tracing the coolant flow through the system.
How the R56 Cooling System Works
The R56 cooling system operates in a cyclical manner:
- The water pump circulates coolant from the engine block, where it absorbs heat generated by combustion.
- The heated coolant flows towards the thermostat.
- If the engine is cold (below the thermostat's opening temperature, typically around 105°C or 221°F), the thermostat remains closed, diverting coolant back into the engine block for faster warm-up. This is called the bypass circuit.
- Once the engine reaches operating temperature, the thermostat opens, allowing coolant to flow to the radiator.
- As coolant passes through the radiator core, heat is dissipated into the surrounding air.
- The cooled coolant then returns to the water pump to repeat the cycle.
- The coolant expansion tank compensates for changes in coolant volume due to temperature fluctuations. Excess pressure is released through the tank's pressure cap.
- The cooling fans activate when the vehicle is stationary or moving slowly, drawing air through the radiator to enhance heat dissipation. The ECU controls the fan speed based on coolant temperature and other engine parameters.
Real-World Use: Basic Troubleshooting Tips
The cooling system diagram is your best friend when troubleshooting cooling-related issues. Here are a few common problems and how the diagram can help:
- Overheating: Check the coolant level in the expansion tank first. Then, using the diagram, trace the coolant flow to identify potential blockages or leaks. Look for leaks around the water pump, thermostat housing, and radiator. Ensure the cooling fans are operating correctly. A faulty thermostat that remains closed will also cause overheating.
- Coolant Leak: The diagram helps you pinpoint the source of the leak. Examine hoses, connections, and components along the coolant path. Look for telltale signs of coolant residue. A common leak point on R56 Minis is the thermostat housing.
- Coolant Loss: If you are regularly topping off the coolant, there is likely a leak somewhere. Use the diagram to methodically check all connections and components. Also, inspect the cylinder head gasket, as coolant loss can sometimes indicate a head gasket failure. Look for white smoke from the exhaust.
- No Heat in Cabin: This could indicate a low coolant level or a problem with the heater core. The diagram will show the heater core's location and the hoses that supply it with coolant.
Important Note: Always allow the engine to cool completely before working on the cooling system. Opening the system while it is hot can result in severe burns.
Safety Considerations
Working on the cooling system involves handling hot coolant and pressurized components. Here are crucial safety precautions:
- Never open the coolant expansion tank cap while the engine is hot. The system is under pressure, and hot coolant can spray out, causing severe burns. Wait until the engine has cooled down completely.
- Wear safety glasses and gloves to protect your eyes and skin from coolant.
- When draining coolant, dispose of it properly. Antifreeze is toxic and harmful to the environment. Recycle it at a designated facility.
- Be careful when working around the cooling fans. They can turn on automatically, even with the engine off. Disconnect the battery before working near the fans.
- Always double-check your work and ensure all connections are secure before starting the engine.
The most risky components are those under pressure and containing hot coolant: the radiator, the hoses, the engine block itself, and, most importantly, the expansion tank cap when the engine is hot.
With a good understanding of the R56 cooling system diagram and proper safety precautions, you can confidently tackle a variety of cooling system maintenance and repair tasks. Remember, consistent maintenance is key to preventing costly repairs down the road.
Download the high-resolution Mini Cooper R56 Cooling System Diagram: [Download Link Here – Placeholder, replace with your actual link]