Model 917 Craftsman Riding Lawn Mower Parts Diagram
If you're a seasoned DIYer tackling repairs on your Craftsman Model 917 riding lawn mower, you know the importance of having a solid parts diagram. Think of it as the blueprint for your machine, a critical resource for everything from basic maintenance to complex overhauls. This article breaks down the intricacies of the Model 917 parts diagram, empowering you to diagnose problems, order the correct components, and ultimately keep your mower running smoothly. We’ll cover the key components, the diagram's symbology, troubleshooting techniques, and crucial safety considerations.
Purpose of the Model 917 Parts Diagram
The Model 917 Craftsman riding lawn mower parts diagram serves several crucial purposes:
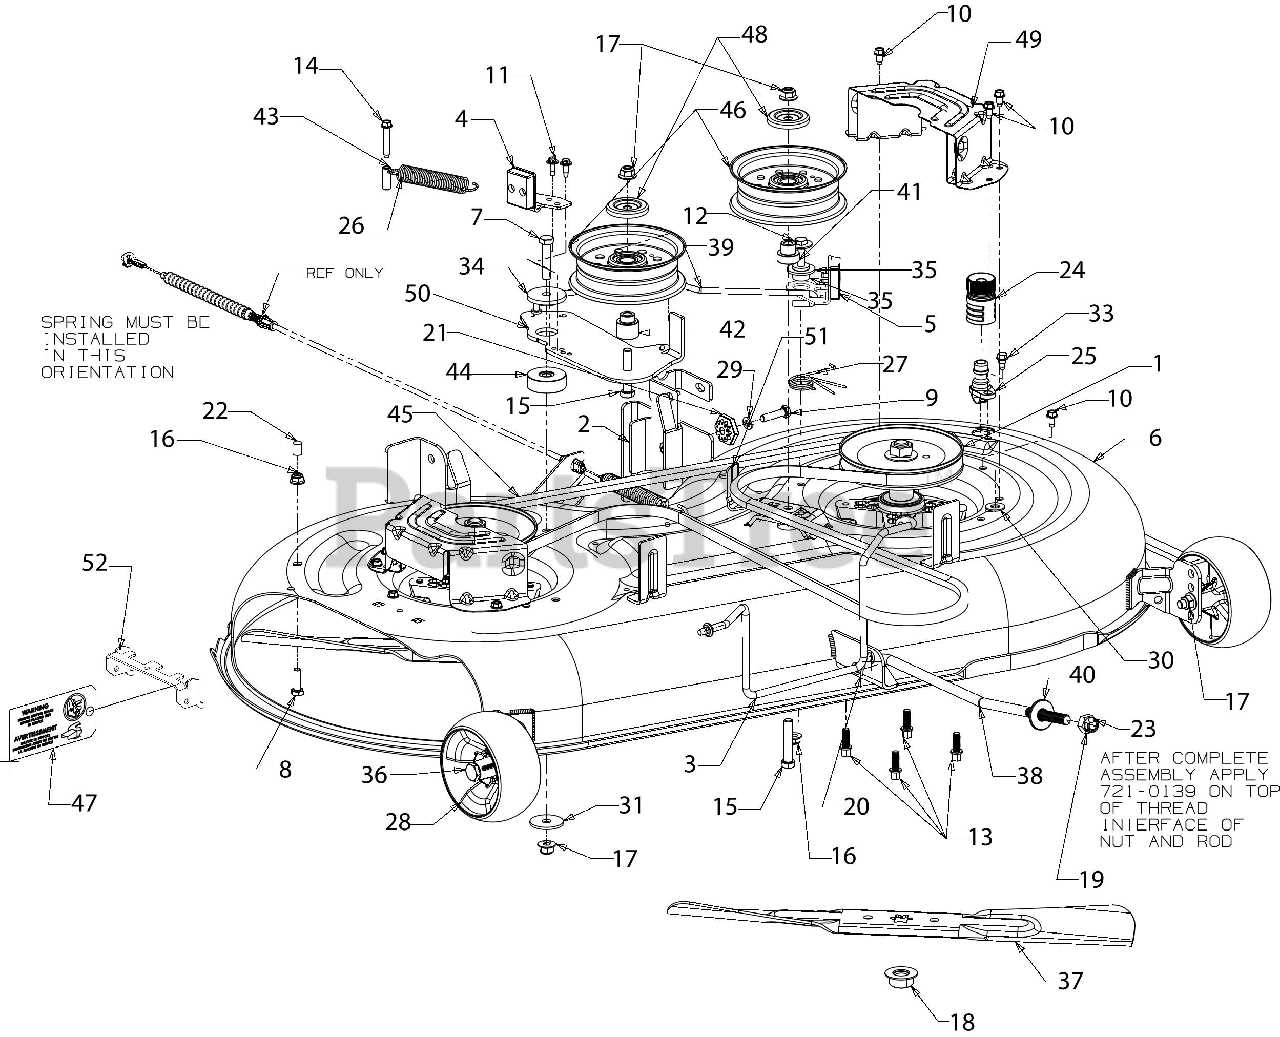
- Parts Identification: It allows you to accurately identify and locate specific parts of your mower. This is essential when ordering replacements. No more guessing about whether you need a "belt tensioner pulley" or a "deck idler pulley" – the diagram shows you exactly which is which.
- Assembly/Disassembly Reference: When taking apart components for repair or cleaning, the diagram provides a visual reference for how everything goes back together. This is especially helpful for complex assemblies like the carburetor or the steering mechanism.
- Troubleshooting: By understanding how the various parts interact, the diagram can aid in troubleshooting problems. For example, if your mower isn't cutting evenly, the diagram can help you pinpoint potential issues with the deck leveling system or blade spindle assemblies.
- Preventative Maintenance: The diagram highlights parts prone to wear, allowing for scheduled replacement and reduces the risk of mower failure.
- Modification/Customization: If you're considering modifying your mower (within safe and reasonable limits, of course), the diagram can give you a better understanding of the underlying systems and how different components interact.
Key Specs and Main Parts Overview
The Craftsman Model 917 encompasses a range of riding mowers, so specific specs can vary. However, some common characteristics include:
- Engine: Typically powered by a single-cylinder Briggs & Stratton or Kohler engine, ranging from 15-20 horsepower. Horsepower dictates the engine's power output.
- Cutting Deck: Usually a stamped steel deck, ranging from 42-46 inches in width. The deck width directly affects the size of the lawn you can mow efficiently.
- Transmission: Can be either a gear-driven transmission (with multiple forward speeds) or a hydrostatic transmission (offering infinitely variable speed control). A hydrostatic transmission uses fluid pressure to transmit power, providing smoother operation.
- Fuel System: Consists of a fuel tank, fuel lines, fuel filter, and carburetor.
- Electrical System: Includes a battery, starter motor, alternator (for charging the battery), ignition switch, and various wiring harnesses.
The main parts commonly depicted in the diagram include:
- Engine Components: Carburetor, air filter, spark plug, muffler, starter motor, alternator.
- Transmission Components: Gears, belts, pulleys, shift levers (for gear-driven transmissions), hydrostatic pump and motor (for hydrostatic transmissions).
- Cutting Deck Components: Blades, spindles, pulleys, belts, idler pulleys, deck hangers, leveling mechanisms. A spindle is the rotating shaft that holds the blade.
- Steering System Components: Steering wheel, steering shaft, linkages, tie rods, sector gear.
- Brake System Components: Brake pedal, brake linkage, brake pads or shoes, brake drum or rotor.
- Frame and Chassis: The structural foundation of the mower.
Understanding the Diagram's Symbols
Parts diagrams use standardized symbols and conventions to convey information efficiently. Here's a breakdown:
- Solid Lines: Generally represent rigid components or direct connections between parts.
- Dashed Lines: May indicate hidden components or the path of motion for moving parts (like a belt).
- Arrows: Show the direction of movement, flow (e.g., fuel flow), or force.
- Numbers or Letters: Correspond to a parts list, which provides the part number, description, and quantity required.
- Exploded Views: Show how parts are assembled, with components separated slightly to illustrate their relative positions.
- Colors: While not always present, colors might be used to differentiate between systems (e.g., fuel lines in red, electrical wiring in blue). Consult the diagram's legend for specific color coding.
Also important are the isometric projections, which give you a 3D view of the part on a 2D surface.
How It Works: Using the Diagram for Repair
Let's say your mower's cutting deck isn't engaging. Here's how you'd use the diagram to troubleshoot:
- Identify the System: The problem lies within the cutting deck engagement system.
- Locate Relevant Parts: Consult the diagram to find the deck engagement lever, cable, belt, idler pulley, and any associated springs or linkages.
- Visual Inspection: Using the diagram as a reference, visually inspect each of these components on your mower. Look for broken cables, worn belts, seized pulleys, or dislodged springs.
- Component Testing: If a component appears suspect, use the diagram to understand its function and how to test it. For example, you might check the tension of the deck belt or the free movement of the idler pulley.
- Part Replacement: Once you've identified the faulty part, use the part number from the diagram to order a replacement.
- Reassembly: Refer to the diagram during reassembly to ensure everything is installed correctly. Pay close attention to the orientation of parts and the routing of cables and belts.
Real-World Use: Basic Troubleshooting Tips
- Engine Won't Start: Check the fuel system components (fuel filter, fuel lines) and electrical system components (spark plug, battery, starter motor). The diagram can help you locate these components quickly.
- Mower Cuts Unevenly: Examine the cutting deck components, particularly the blade spindles, blades, and deck leveling mechanisms. Use the diagram to ensure the deck is properly aligned.
- Mower Lacks Power: Inspect the engine components, such as the air filter, carburetor, and spark plug. A clogged air filter or a dirty carburetor can restrict airflow and reduce engine power.
- Strange Noises: Use the diagram to pinpoint the location of the noise. Noises often correlate to failed bearings in rotating assemblies.
Safety Considerations
Working on a lawn mower can be dangerous if you're not careful. Here are some critical safety precautions:
- Disconnect the Spark Plug: Always disconnect the spark plug wire before working on the engine or cutting deck to prevent accidental starting.
- Drain Fuel: Before working on the fuel system, drain the fuel tank to minimize the risk of fire.
- Secure the Mower: Use jack stands or ramps to safely elevate the mower for access to the underside. Never work under a mower supported only by a jack.
- Wear Safety Glasses: Protect your eyes from debris when working with tools.
- Be Mindful of Rotating Parts: Exercise extreme caution around rotating parts like blades and belts. Never attempt to adjust or repair the mower while it's running.
- High-Pressure Fuel Systems: Be aware that fuel injected models use high-pressure fuel systems. Special care is required to bleed and depressurize the system before working on it. Refer to the service manual for detailed procedures.
The carburetor and fuel lines are particularly risky due to the flammability of gasoline. The blades and belts pose a risk of injury if the mower is accidentally started or if you come into contact with them while they're moving.
This article provides a solid foundation for understanding and using the Model 917 Craftsman riding lawn mower parts diagram. With a little practice, you'll be able to diagnose problems, perform repairs, and keep your mower running in top condition for years to come.
We have the file, so download the diagram today to start planning your repairs!