Nissan Altima 2005 Fuse Box Diagram
Alright, let's dive into the fuse box diagram for the 2005 Nissan Altima. Whether you're tackling a quirky electrical issue, planning to add some aftermarket goodies, or just trying to better understand your car's inner workings, this diagram is your best friend. Think of it as the roadmap to your Altima's electrical system. We'll break down what each part means, what the symbols represent, and how to use it effectively for troubleshooting and DIY projects.
Purpose: Why You Need This Diagram
The fuse box diagram isn't just some piece of paper that came with your car. It's essential for several reasons:
- Electrical Troubleshooting: When something electrical malfunctions – a headlight goes out, the radio dies, or a window stops working – the first place to check is the fuse box. The diagram lets you quickly identify which fuse controls that specific circuit.
- Preventing Damage: Replacing a blown fuse with one of the correct amperage rating (more on that later) prevents further damage to the circuit and connected components. Using the wrong fuse can lead to overheating, melted wires, and even fires.
- Adding Aftermarket Accessories: Planning to install a new sound system, auxiliary lights, or a dashcam? Knowing which circuits are available and how they're fused allows you to tap into the electrical system safely and efficiently.
- Understanding Your Car: Even if you're not actively working on your car, understanding the fuse layout gives you a better overall knowledge of how its electrical system is designed.
Key Specs and Main Parts
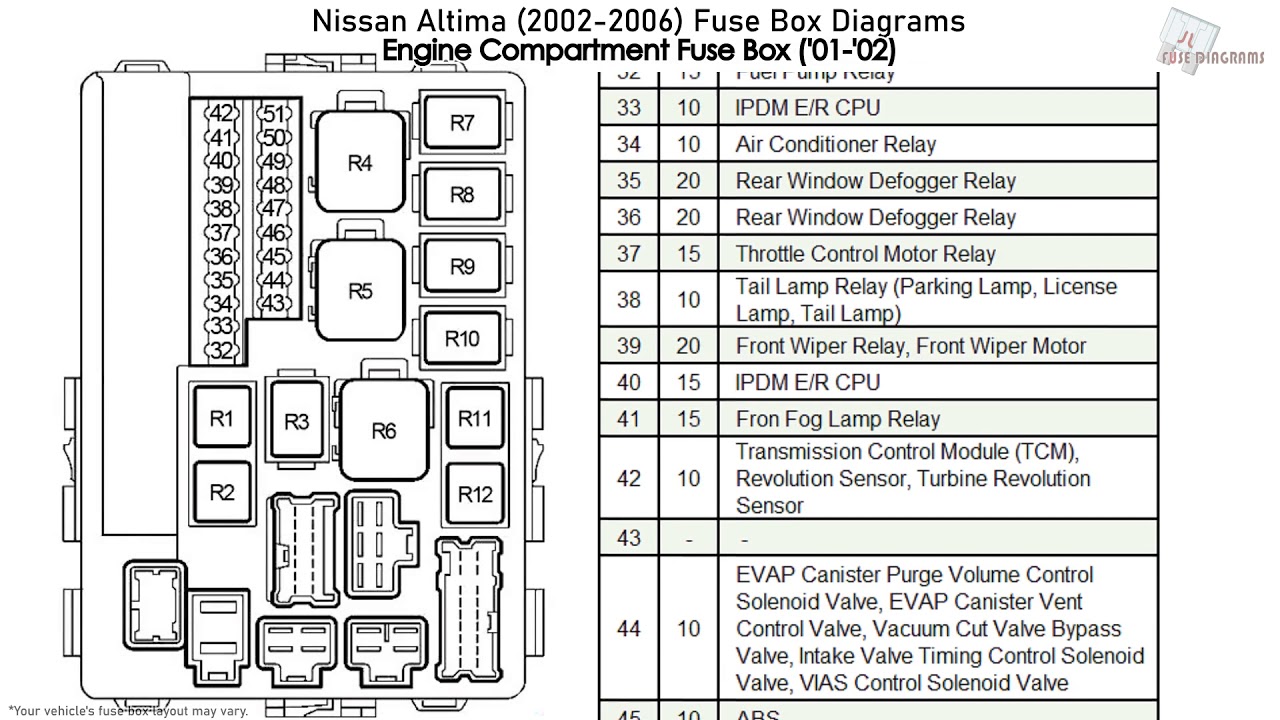
The 2005 Altima, like most cars, has at least two fuse boxes: one located inside the cabin (usually under the dashboard, on the driver's side) and another in the engine compartment. Some models may have a third, smaller fuse box as well.
- Interior Fuse Box: Controls interior components like the radio, lights, power windows, cigarette lighter (power outlet), and various control modules.
- Engine Compartment Fuse Box: Handles critical engine-related functions, including the fuel pump, ignition system, cooling fan, and headlights.
Each fuse box contains a variety of fuses and relays. Fuses are sacrificial components designed to protect circuits from overcurrent, while relays are electrically operated switches that control higher-current circuits based on signals from lower-current circuits (like turning on headlights with a switch inside the car).
Symbols: Deciphering the Diagram
Fuse box diagrams use a set of symbols to represent different components and connections. Understanding these symbols is crucial for interpreting the diagram correctly.
- Lines: Lines represent wires or electrical conductors. Thicker lines may indicate heavier-gauge wires capable of carrying higher currents.
- Boxes: Boxes typically represent fuses or relays. The diagram will usually include a legend or key that identifies each box and its corresponding circuit.
- Numbers: Numbers next to the fuses indicate their amperage rating (e.g., 10A, 15A, 20A). This number tells you the maximum current the fuse can handle before it blows. Always replace a blown fuse with one of the same amperage!
- Color Coding (On Some Diagrams): Some diagrams use color coding to differentiate circuits or indicate the function of a component. For example, red wires often indicate power supply, while black wires indicate ground.
- Icons: Icons are used to represent specific components connected to each circuit. Common icons include a headlight for the headlight circuit, a radio for the radio circuit, a fan for the cooling fan circuit, and so on. The diagram's legend will explain each icon.
- Relay Symbols: Relays are usually represented by a square with internal diagrams showing the coil and the switch contacts. The diagram will also indicate which components control the relay's operation.
Important Note: Always refer to the diagram specifically for your 2005 Nissan Altima. While many models share similar fuse layouts, there can be variations depending on the trim level and options package. Using the wrong diagram can lead to misdiagnosis and further problems.
How It Works: Tracing a Circuit
To understand how to use the fuse box diagram, let's trace a simple circuit, like the one for the headlights. Suppose your low-beam headlights are not working.
- Locate the Diagram: Get the fuse box diagram for your 2005 Altima. This is often found in the owner's manual or online (we have the file ready for you to download at the end of this article).
- Identify the Headlight Fuse: Find the icon or label that corresponds to the headlights. The diagram will show which fuse protects that circuit. It might be labeled "Headlight (LO)" or something similar.
- Locate the Fuse in the Fuse Box: Open the fuse box cover and find the fuse that matches the diagram's location.
- Inspect the Fuse: Visually inspect the fuse. A blown fuse will have a broken filament inside. You can also use a multimeter to test for continuity. Set the multimeter to the continuity setting (it usually has a sound indicator). Place the probes on each of the fuse's metal contacts. If the multimeter doesn't beep or show continuity, the fuse is blown.
- Replace the Fuse: If the fuse is blown, replace it with a new fuse of the same amperage rating.
- Test the Circuit: Turn on the headlights to see if they now work. If they still don't work, there may be a problem with the wiring, the headlight bulbs themselves, the headlight switch, or the relay.
Real-World Use: Basic Troubleshooting Tips
Here are some tips to help you troubleshoot electrical problems using the fuse box diagram:
- Start with the Obvious: Before diving into the fuse box, check the simplest things first, like the bulb itself.
- Keep a Spare Set of Fuses: Always have a selection of spare fuses on hand in various amperages.
- Use a Fuse Puller: These inexpensive tools make it easier to remove fuses without damaging them or the fuse box.
- Document Your Work: When replacing fuses, make a note of which ones you replaced and why. This can help you track down recurring problems.
- If a Fuse Blows Repeatedly: If a fuse blows repeatedly, it indicates a short circuit or an overload in the circuit. Don't just keep replacing the fuse; find and fix the underlying problem. This might involve inspecting wiring, connectors, and components connected to the circuit.
- Consult a Professional: If you're not comfortable working on electrical systems, or if you're unable to diagnose the problem, it's best to consult a qualified mechanic.
Safety: Highlighting Risky Components
Working with electrical systems can be dangerous. Always take the following precautions:
- Disconnect the Battery: Before working on any electrical system, disconnect the negative (-) terminal of the battery. This will prevent accidental shorts and shocks.
- Avoid Working in Wet Conditions: Water and electricity don't mix. Never work on electrical systems in wet or damp conditions.
- Use Insulated Tools: Use tools with insulated handles to protect yourself from electric shock.
- Be Careful with High-Voltage Circuits: Some circuits, such as the ignition system, operate at very high voltages. Exercise extreme caution when working on these circuits.
- Never Bypass a Fuse: Never bypass a fuse with a wire or other conductive material. This can overload the circuit and cause a fire.
- Be Aware of Airbags: Airbags are electrically activated. Before working near airbags, consult the service manual for proper deactivation procedures. Incorrect handling can cause accidental deployment, which can be dangerous.
By understanding the fuse box diagram and following these safety precautions, you can confidently diagnose and repair many electrical problems in your 2005 Nissan Altima. Remember to take your time, be thorough, and don't be afraid to ask for help if you need it.
As promised, the fuse box diagram for the 2005 Nissan Altima is available for download. Now you can easily access and utilize this vital resource whenever you need it. With this diagram in hand, you'll be well-equipped to tackle any electrical challenges your Altima throws your way! Stay safe and happy wrenching!