Nissan Altima 2006 Fuse Box Diagram
The 2006 Nissan Altima fuse box diagram is an indispensable tool for any Altima owner who wants to perform basic electrical maintenance, troubleshoot issues, or even undertake more ambitious modifications. It’s essentially the roadmap to your car's electrical system, allowing you to pinpoint the exact fuse responsible for a specific circuit. Without it, you're essentially working blind, leading to wasted time, potential damage, and unnecessary expense.
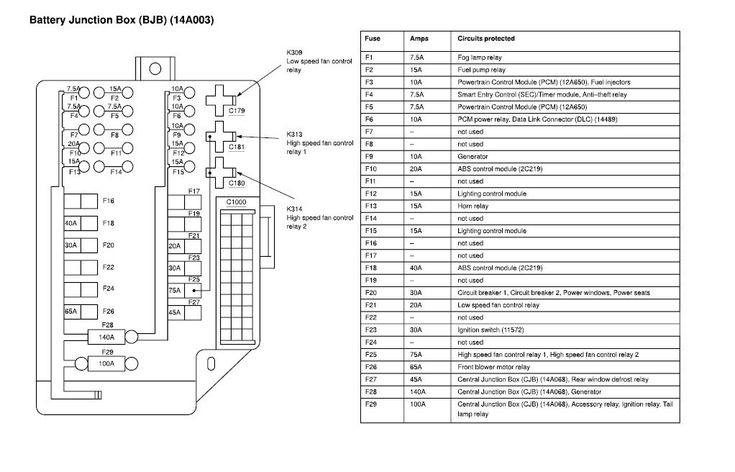
Purpose of the Fuse Box Diagram
Why is this diagram so critical? Consider these scenarios:
- Troubleshooting Electrical Issues: Your headlights stop working, the radio goes silent, or the power windows refuse to budge. The fuse box diagram allows you to quickly identify and check the fuse associated with that particular component.
- Performing Electrical Repairs: Before attempting any electrical repair, it's crucial to disconnect the circuit by removing the appropriate fuse. This prevents accidental short circuits and potential damage to your car's electronics.
- Adding Aftermarket Accessories: Installing a new sound system, auxiliary lights, or a dashcam often requires tapping into the car's electrical system. The fuse box diagram shows you available circuits and their amperage ratings, helping you choose a safe and suitable power source.
- Understanding Your Vehicle's Electrical System: Even if you don't plan on doing any repairs yourself, understanding the fuse box layout provides a valuable overview of how your car's electrical system is organized.
Key Specs and Main Parts
The 2006 Nissan Altima typically has two fuse box locations:
- Interior Fuse Box: Located inside the passenger compartment, usually under the dashboard on the driver's side. This box primarily houses fuses for interior components like the radio, lights, power windows, and instrument panel.
- Engine Compartment Fuse Box: Located in the engine bay, near the battery. This box contains fuses and relays for critical engine components like the fuel pump, ignition system, and cooling fan, as well as exterior lights.
The fuse box diagram itself is usually found on the inside of the fuse box cover. If it's missing, don't worry; we have a downloadable version available for you (link at the end of this article).
Key components you'll find related to the fuse box:
- Fuses: These are the sacrificial components that protect your car's electrical circuits from overcurrent. When a circuit draws too much current (due to a short circuit or a faulty component), the fuse blows, interrupting the flow of electricity and preventing damage. Fuses are rated in amperes (amps or A), which indicates the maximum current they can handle.
- Relays: Relays are electromechanical switches that use a small electrical current to control a larger current. They're used to switch on and off high-power devices like headlights, the starter motor, and the air conditioning compressor. Relays protect the switch (e.g., headlight switch) from carrying high amperage.
- Fuse Puller: A small plastic tool used to safely remove fuses from the fuse box. Using pliers or other metal tools can damage the fuse box and potentially cause a short circuit.
Understanding Fuse Box Symbols
The fuse box diagram uses a combination of lines, colors, and icons to represent different components and circuits. Here's a breakdown of what they typically mean:
- Lines: Lines on the diagram represent electrical circuits. A solid line usually indicates a direct connection, while a dashed line might indicate a connection through a relay or switch.
- Colors: Colors are used to differentiate between circuits and to indicate the amperage rating of the fuses. Common colors include:
- Yellow: Typically represents 20 amp fuses.
- Blue: Typically represents 15 amp fuses.
- Red: Typically represents 10 amp fuses.
- Brown: Typically represents 7.5 amp fuses.
Important: Always refer to the specific diagram for your car, as color coding can vary slightly.
- Icons: Icons are used to represent the components protected by each fuse. Some common icons include:
- Headlight Icon: Represents the headlight circuit.
- Radio Icon: Represents the radio circuit.
- Window Icon: Represents the power window circuit.
- Cigar Lighter Icon: Represents the accessory power socket (cigarette lighter) circuit.
- Engine Icon: Represents various engine management systems.
The diagram will also include text labels that describe the function of each fuse. These labels are usually abbreviated, but they should be clear enough to understand. For example, "HEAD LP" might refer to the headlight circuit, and "ACC" might refer to the accessory power circuit.
How It Works
The electrical system of your Altima operates on a 12-volt direct current (DC) system. The battery provides the initial power, and the alternator recharges the battery while the engine is running. Fuses are placed in series within each circuit to protect the wiring and components from overcurrent.
When a circuit is functioning normally, the current flows through the fuse without any interruption. However, if there's a short circuit (e.g., a wire chafes against the chassis and creates a direct path to ground) or if a component malfunctions and draws excessive current, the fuse will blow. The fuse contains a thin strip of metal that melts when the current exceeds its rated amperage, breaking the circuit and preventing further damage.
Relays are used to control high-current circuits with low-current switches. For example, the headlight switch only needs to carry a small current to activate the relay, which then switches on the high-current headlight circuit. This protects the switch from overheating and burning out.
Real-World Use: Basic Troubleshooting Tips
Here’s a simple troubleshooting scenario:
Problem: The radio in your 2006 Altima has stopped working.
Solution:
- Consult the Fuse Box Diagram: Locate the fuse box diagram (either on the fuse box cover or using our downloadable version).
- Identify the Radio Fuse: Find the fuse labeled "RADIO" or something similar. Note its amperage rating (e.g., 15A).
- Locate the Fuse: Find the corresponding fuse in the fuse box.
- Inspect the Fuse: Use the fuse puller to remove the fuse. Examine it closely. If the thin strip of metal inside the fuse is broken or melted, the fuse is blown.
- Replace the Fuse: Replace the blown fuse with a new fuse of the same amperage rating. Never use a fuse with a higher amperage rating, as this could damage the circuit.
- Test the Radio: Turn on the radio to see if it works.
If the radio still doesn't work after replacing the fuse, there may be a more serious problem with the radio itself or the wiring. In that case, it's best to consult a qualified mechanic.
Safety Considerations
Working with electrical systems can be dangerous, so it's essential to take precautions:
- Disconnect the Battery: Before working on any electrical components, disconnect the negative terminal of the battery. This will prevent accidental short circuits and potential electric shock.
- Avoid Working in Wet Conditions: Water is a conductor of electricity, so avoid working on your car's electrical system in wet conditions.
- Identify High-Risk Components: Be particularly cautious when working around components like the airbag system, the fuel pump, and the ignition system. These components can be dangerous if handled improperly. Consult a professional if you are not comfortable working with these systems.
- Use the Correct Fuses: Always replace a blown fuse with a fuse of the same amperage rating. Using a fuse with a higher amperage rating can overload the circuit and cause a fire.
Warning: The airbag system is a particularly sensitive and potentially dangerous component. Never attempt to repair or modify the airbag system yourself. If you suspect a problem with the airbag system, consult a qualified mechanic immediately.
By understanding the 2006 Nissan Altima fuse box diagram and taking the necessary safety precautions, you can perform basic electrical maintenance and troubleshooting tasks with confidence. It will save you money and empower you to better understand the complexities of your vehicle.
Ready to get your hands on the diagram? Click here to download the 2006 Nissan Altima Fuse Box Diagram: [LINK TO FILE WILL BE HERE]