Nissan Altima 2012 Fuse Box Diagram
Alright, let's dive into the 2012 Nissan Altima's fuse box diagram. Understanding this seemingly simple chart can be a lifesaver, whether you're tackling a minor electrical gremlin, installing aftermarket accessories, or just trying to learn more about your car's inner workings. This isn't just about replacing a blown fuse; it's about understanding the entire electrical system and preventing potentially catastrophic damage. We're going to walk through everything you need to know, from the basics to some real-world troubleshooting.
Purpose of the Fuse Box Diagram
Why bother with a fuse box diagram? Well, several reasons. First and foremost, it's essential for repairs. When an electrical component fails – your radio, headlights, power windows – the first thing you should check is the fuse. The diagram pinpoints the exact fuse responsible for that circuit, saving you valuable time and preventing you from needlessly replacing parts. Secondly, it's vital for learning how your car's electrical system is laid out. Understanding which fuse controls what component allows you to trace circuits and diagnose more complex issues. Finally, if you're planning on modifying your Altima – installing a new sound system, adding auxiliary lights, or even something more involved – you need to know where to safely tap into the car's electrical system. Ignoring the diagram can lead to short circuits, blown fuses, and even fires, turning a fun project into a costly nightmare.
Key Specs and Main Parts
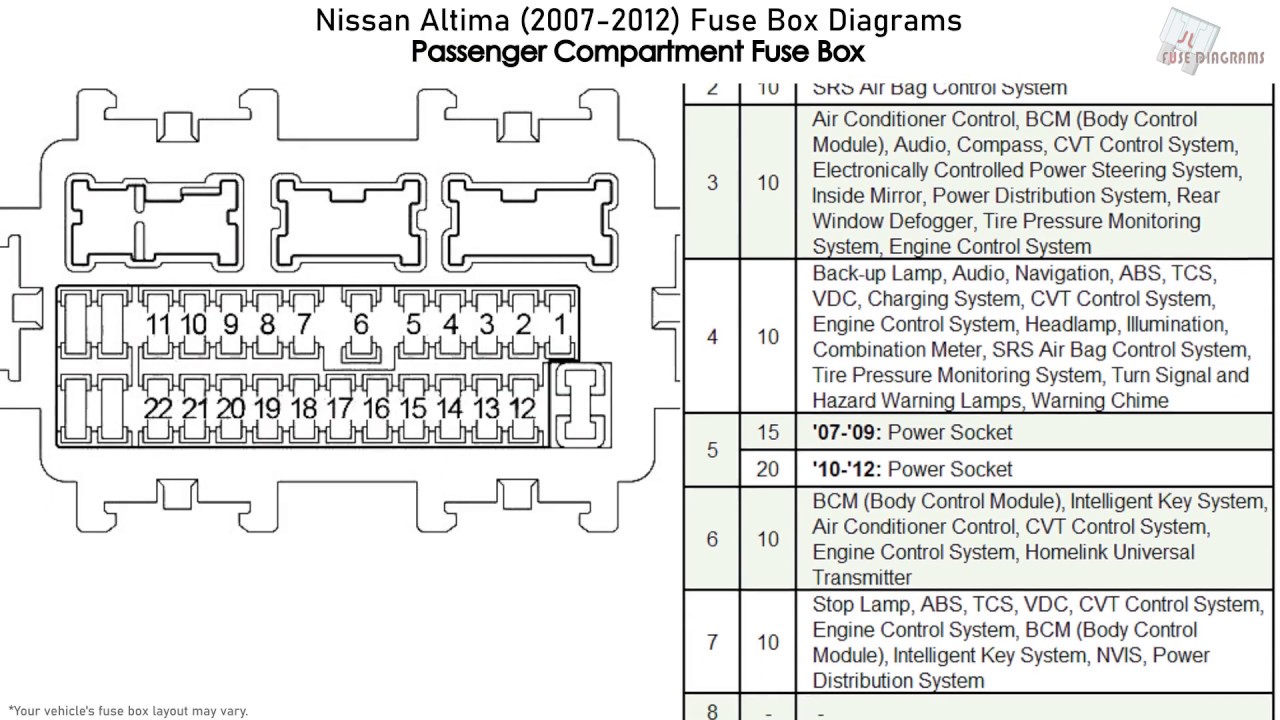
The 2012 Altima actually has multiple fuse boxes. The most common one we'll be focusing on is usually located in one of two places:
- Inside the cabin: Typically, this fuse box is found on the driver's side, often tucked away behind a small panel near the steering wheel or under the dashboard.
- Under the hood: There's also a larger fuse box in the engine compartment, usually near the battery. This box handles high-current components like the headlights, starter motor, and ABS system.
The diagram itself is a schematic representation of the fuse box. It shows the location of each fuse, its amperage rating (measured in Amperes, or Amps), and the electrical circuit it protects. Understanding the amperage rating is crucial. Replacing a blown fuse with one of a higher amperage can overload the circuit and cause serious damage. Always use the correct replacement fuse as specified in the diagram.
Understanding the Symbols
Fuse box diagrams employ a range of symbols and conventions that can seem cryptic at first. Here's a breakdown:
- Fuse Representation: Fuses are typically represented by a simple rectangular box. The number inside or next to the box indicates the fuse's amperage rating (e.g., "15A" means a 15-Amp fuse).
- Lines: Solid lines represent electrical wires connecting the fuses to the various components. These lines show the flow of current.
- Colors: While not always present in every diagram, color coding can be used to differentiate between various circuits. For example, one color might represent circuits related to the engine, while another represents circuits related to the interior lighting. Consult your specific diagram's legend if colors are used.
- Icons: Some diagrams may use icons to represent the component protected by a particular fuse. For example, a headlight icon next to a fuse indicates that it protects the headlight circuit. Similarly, an icon of a radio might indicate the audio system fuse.
Understanding these symbols allows you to quickly identify the fuse you're looking for and the circuit it protects. The diagram will also contain labels next to the fuses, indicating what each one controls. These labels can be abbreviated, so a little research might be required if you're unsure what they mean (e.g., "ENG IGN" might stand for "Engine Ignition").
How It Works: The Fuse in Action
A fuse is a sacrificial device designed to protect an electrical circuit from overcurrent. It contains a thin wire or filament that melts and breaks the circuit if the current exceeds a predetermined level. This prevents excessive current from flowing through the wiring and components, which could cause overheating, damage, or even fire. Think of it as a safety valve for your car's electrical system. When a component draws too much current (due to a short circuit or a malfunction), the fuse blows, interrupting the power supply and protecting the rest of the circuit.
The amperage rating of a fuse indicates the maximum current it can handle before blowing. Choosing the correct fuse is paramount for the safety and proper operation of your vehicle. Using a fuse with a lower amperage will cause it to blow prematurely, while using a higher amperage could allow excessive current to flow, potentially damaging the wiring and components. Always replace a blown fuse with one of the same amperage rating.
Real-World Use: Basic Troubleshooting Tips
Here are some basic troubleshooting tips using the fuse box diagram:
- Symptom: Your radio isn't working.
- Action: Consult the fuse box diagram to identify the fuse labeled for the radio (it might be labeled "AUDIO," "RADIO," or something similar).
- Check the Fuse: Remove the fuse and visually inspect it. A blown fuse will have a broken filament. You can also use a multimeter to test the fuse for continuity.
- Replace the Fuse: If the fuse is blown, replace it with a new fuse of the same amperage rating.
- Test the Radio: Turn on the radio to see if it works. If the fuse blows again immediately, there's likely a short circuit in the radio or its wiring, requiring further investigation.
- Symptom: Your headlights aren't working.
- Action: Consult the diagram. Headlight fuses are usually in the engine compartment fuse box.
- Check the Fuses: Headlights often have separate fuses for the left and right sides. Check both fuses.
- Replace and Test: Replace any blown fuses with the correct amperage. If the problem persists, the headlight bulbs themselves, the headlight switch, or the wiring might be faulty.
Remember, always start with the simplest solution – checking the fuses – before moving on to more complex troubleshooting steps.
Safety Considerations
Working with electrical systems can be dangerous. Here are some important safety precautions:
- Disconnect the Battery: Before working on any electrical system, disconnect the negative (-) terminal of the battery. This prevents accidental short circuits and potential shocks.
- Identify Risky Components: Be particularly cautious when working around high-current components like the starter motor, alternator, and ABS system. These circuits can carry significant current and pose a greater risk of electric shock or burns.
- Use Insulated Tools: Always use insulated tools when working on electrical circuits to prevent accidental shorts and shocks.
- Never Replace a Fuse with a Higher Amperage: This is extremely important. Using a fuse with a higher amperage can overload the circuit and cause serious damage or even fire.
- If in Doubt, Seek Professional Help: If you're unsure about any aspect of the repair, it's always best to consult a qualified mechanic or automotive electrician.
Warning: Tampering with the airbag system can be extremely dangerous. Airbag circuits are often identified in the fuse box diagram. Do not attempt to repair or modify airbag circuits yourself. Leave this work to trained professionals.
We have access to the detailed fuse box diagram for the 2012 Nissan Altima. You can download a copy from [Insert Download Link Here - Replace with actual link]. Keep it handy; you never know when you might need it!