Nissan Altima 2013 Fuse Box Diagram
Welcome, fellow gearheads! Today, we're diving deep into the heart of your 2013 Nissan Altima's electrical system – the fuse box. Understanding your fuse box diagram isn't just about replacing a blown fuse; it's about empowering yourself to diagnose electrical issues, perform modifications safely, and truly understand how your Altima ticks. Think of this as your electrical system cheat sheet. We'll cover everything from deciphering the symbols to basic troubleshooting. And the best part? We've got a downloadable fuse box diagram for your 2013 Altima that you can refer to as you work. So, let's get started!
Why Bother with the Fuse Box Diagram?
You might be thinking, "Why do I even need a fuse box diagram?" Well, the diagram is crucial for several reasons:
- Troubleshooting Electrical Problems: A blown fuse is often the first sign of a more significant electrical issue. The diagram allows you to quickly identify which circuit is affected.
- Performing Electrical Modifications: Planning to install a new stereo, auxiliary lights, or a dashcam? Knowing which fuse controls which circuit is vital for tapping into the electrical system safely and correctly.
- Routine Maintenance: Just like checking your oil, periodically inspecting your fuses can help prevent larger electrical problems down the road.
- Understanding Your Vehicle: Simply put, knowledge is power. Understanding the fuse box layout provides a deeper understanding of your car's electrical architecture.
Key Specs and Main Parts
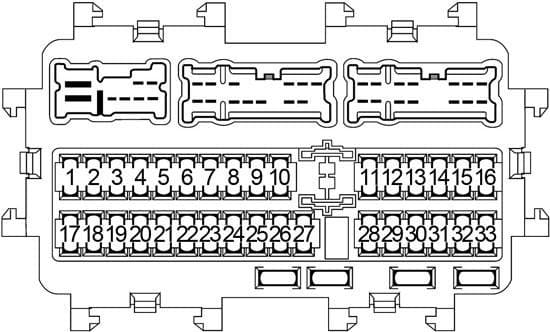
The 2013 Nissan Altima actually has two fuse box locations. It's important to know about both:
- Interior Fuse Box: Typically located under the dashboard on the driver's side, this fuse box houses fuses related to interior components like the radio, power windows, interior lights, and the cigarette lighter (accessory power outlet).
- Engine Compartment Fuse Box: Situated in the engine bay, this fuse box contains fuses and relays responsible for critical engine functions, headlights, ABS (Anti-lock Braking System), and other high-current systems.
Key Specs:
- Fuse Types: The 2013 Altima predominantly uses blade-type fuses, often referred to as ATO or APR fuses. These are color-coded based on their amperage rating.
- Amperage Ratings: Fuses come in various amperage ratings (e.g., 5A, 7.5A, 10A, 15A, 20A, 25A, 30A). Using a fuse with the wrong amperage rating can be dangerous. Too low, and it will blow prematurely. Too high, and it could allow excessive current, potentially damaging the circuit and even causing a fire.
- Relays: These are electromechanical switches that control high-current circuits using a low-current signal. Relays are often found alongside fuses in both fuse box locations.
Decoding the Symbols: Lines, Colors, and Icons
The fuse box diagram isn't just a bunch of lines and numbers; it's a coded language. Here's how to translate it:
- Lines: Lines on the diagram represent the electrical circuits. Thicker lines usually indicate circuits with higher current draw.
- Colors: While not always present on every diagram, color-coding can sometimes indicate the function of the circuit. For example, red might indicate power, while black might indicate ground. Refer to the specific legend on your diagram.
- Icons: This is where the magic happens. Icons represent the component protected by a particular fuse. Common icons include:
- Lightbulb: Indicates the fuse protects a lighting circuit (headlights, taillights, interior lights).
- Radio Symbol: Protects the radio or infotainment system.
- Fan Symbol: Protects the blower motor or cooling fan.
- Horn Symbol: Protects the horn circuit.
- Window Symbol: Protects the power window circuit.
- Outlet Symbol: Protects an accessory power outlet (cigarette lighter).
- ECU/ECM: Represents the Engine Control Unit (ECU) or Engine Control Module (ECM), the car's computer.
- Amperage Numbers: Adjacent to each fuse location on the diagram, you'll find a number followed by "A," which indicates the fuse's amperage rating (e.g., 10A, 20A).
- Fuse Number/Designation: Each fuse location also has a number or alphanumeric designation (e.g., Fuse #12, E15). This is how you identify a specific fuse on the diagram.
How It Works: The Fuse as a Circuit Protector
A fuse is essentially a weak link in an electrical circuit. It's designed to break (blow) and stop the flow of electricity if the current exceeds a safe level. This protects the more expensive and critical components in the circuit from damage caused by:
- Short Circuits: A short circuit occurs when electricity finds an unintended path to ground, bypassing the intended load (like a lightbulb or motor). This causes a massive surge in current.
- Overloads: An overload happens when too many devices are drawing power from the same circuit, exceeding its capacity.
When a fuse blows, it's a sign that something is wrong. Simply replacing the fuse without diagnosing the underlying problem is like putting a band-aid on a broken leg. The fuse will likely blow again.
Real-World Use: Basic Troubleshooting
Let's say your 2013 Altima's radio suddenly stops working. Here's how you'd use the fuse box diagram to troubleshoot the problem:
- Consult the Diagram: Refer to the interior fuse box diagram. Locate the fuse designated for the radio.
- Identify the Fuse: Find the corresponding fuse in the fuse box, using the diagram's fuse number/designation as your guide.
- Inspect the Fuse: Visually inspect the fuse. A blown fuse will typically have a broken filament inside. Some fuses have a clear window, making inspection easier.
- Test the Fuse (Optional): For a more definitive test, use a multimeter set to continuity mode. Place the probes on both ends of the fuse. A working fuse will show continuity (a beep or near-zero resistance). A blown fuse will show no continuity (an open circuit).
- Replace the Fuse: If the fuse is blown, replace it with a new fuse of the exact same amperage rating.
- Test the Circuit: Turn on the radio. If it works, you've solved the problem. If the fuse blows again immediately, there's a short circuit or overload in the radio circuit. You'll need to investigate further, potentially checking the wiring harness and the radio unit itself.
Safety First: Handle with Care
Working with electrical systems can be dangerous. Here are some safety precautions to keep in mind:
- Disconnect the Battery: Before working on any electrical components, disconnect the negative (black) terminal of the battery. This minimizes the risk of accidental shorts and electrical shock.
- Use the Right Tools: Use insulated tools designed for automotive electrical work.
- Never Exceed the Amperage Rating: As mentioned before, always replace a fuse with one of the same amperage rating. Using a higher amperage fuse can bypass the circuit protection and lead to serious damage or fire.
- Be Aware of Airbag Circuits: Airbag circuits are highly sensitive. Never tamper with airbag fuses or wiring unless you are a trained professional. Accidental activation of an airbag can cause serious injury. These fuses are often clearly marked and may require specialized tools to access.
- Work in a Well-Lit Area: Good visibility is crucial for avoiding mistakes.
Getting Your Diagram
We understand how important it is to have a clear and accurate fuse box diagram for your 2013 Nissan Altima. Therefore, we have a downloadable file available containing detailed diagrams for both the interior and engine compartment fuse boxes. This file will be an invaluable resource as you troubleshoot electrical issues or plan modifications.