Nissan Altima 2.5 Serpentine Belt Diagram
So, you're tackling a serpentine belt replacement on your Nissan Altima 2.5L? Smart move! A worn or broken serpentine belt can leave you stranded, and understanding its routing is crucial for a successful DIY job. This article provides a detailed breakdown of the serpentine belt diagram for your Altima 2.5L, empowering you to diagnose problems, replace the belt correctly, and even gain a better understanding of your engine's accessory drive system.
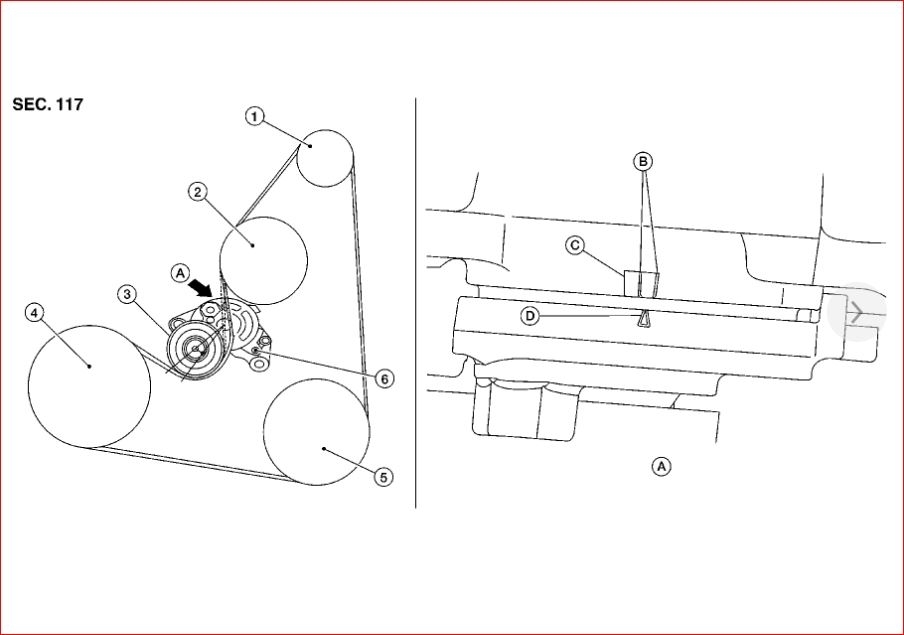
Purpose of the Serpentine Belt Diagram
The serpentine belt diagram is your roadmap for the accessory drive system. It's essential for several reasons:
- Belt Replacement: The most obvious use. It shows the exact path the belt must take around all the pulleys, ensuring proper tension and operation of the accessories.
- Troubleshooting: If your belt is squealing, slipping, or showing signs of wear, the diagram helps you identify potential issues with individual components (e.g., a seized pulley causing excessive belt friction).
- Maintenance: Familiarizing yourself with the diagram allows you to visually inspect the belt and pulleys regularly for signs of wear, damage, or misalignment. Early detection can prevent a breakdown.
- Learning: Understanding the serpentine belt layout gives you a deeper understanding of how your engine's accessories – alternator, power steering pump, AC compressor, etc. – are driven.
We have the diagram itself available for download at the end of this article. It's a handy reference to keep in your toolbox.
Key Specs and Main Parts
Before diving into the diagram, let's cover the critical components of the serpentine belt system on your Altima 2.5L:
- Serpentine Belt: The single, continuous belt that snakes around all the pulleys. It's typically made of a reinforced rubber compound to withstand high temperatures and tension. The belt has grooves (ribs) that mate with corresponding grooves on the pulleys.
- Crankshaft Pulley (or Harmonic Balancer): This pulley is bolted to the crankshaft and is the driving force behind the entire system. Its rotation is what transfers power to all the other components.
- Alternator Pulley: Drives the alternator, which charges the battery and powers the vehicle's electrical system.
- Power Steering Pump Pulley: Drives the power steering pump, which provides hydraulic assistance for steering.
- Air Conditioning (AC) Compressor Pulley: Drives the AC compressor, which circulates refrigerant and provides cooling.
- Idler Pulley(s): Smooth, non-driven pulleys that guide the belt and maintain proper wrap around other pulleys. They help optimize belt tension and prevent slippage.
- Tensioner Pulley: This is the critical component that maintains the correct tension on the serpentine belt. It's usually spring-loaded and automatically adjusts for belt stretch and wear. A failing tensioner can lead to belt slippage, noise, and premature belt failure. The tensioner often has a square hole or a bolt head that allows you to relieve the tension for belt removal and installation.
Important Note: Specific belt lengths and part numbers vary by year and trim of your Altima. Always consult your vehicle's owner's manual or a reputable parts supplier to ensure you get the correct belt.
Understanding the Serpentine Belt Diagram Symbols
The serpentine belt diagram isn't just a picture; it's a symbolic representation of the system. Here's how to interpret the common symbols:
- Solid Lines: Represent the belt itself. The thicker the line, the more prominent the belt section may appear in the diagram (though this isn't always consistent).
- Circles: Represent pulleys. The size of the circle usually doesn't indicate the actual size of the pulley.
- Filled Circles/Shapes within Circles: These often denote the type of component the pulley is connected to. For example:
- A symbol resembling a battery inside the pulley circle often represents the alternator.
- A steering wheel symbol may represent the power steering pump.
- A snowflake symbol typically represents the AC compressor.
- Arrows: Indicate the direction of rotation for each pulley. This is crucial for understanding how the belt drives each component.
- Text Labels: Pulleys are typically labeled with abbreviations (ALT for alternator, P/S for power steering, AC for air conditioning, CRANK for crankshaft, etc.). The tensioner is often labeled as "TENSIONER" or "AUTO TENSIONER". Idler pulleys may be labeled as "IDLER" or simply "IDLER PULLEY".
- Dotted Lines (Less Common): In some diagrams, dotted lines may represent the backside of the belt as it passes behind a pulley. However, most diagrams only show the belt's path on the pulley faces.
How the Serpentine Belt System Works
The serpentine belt system is a relatively simple but ingenious design. The crankshaft pulley, driven by the engine, provides the rotational force. This force is then transferred to the serpentine belt, which wraps around all the other pulleys connected to the various accessories.
The tensioner pulley plays a vital role in maintaining the correct belt tension. Too little tension, and the belt will slip, causing reduced performance or failure of the accessories. Too much tension, and you risk premature wear on the belt, pulleys, and accessory bearings. The spring-loaded tensioner automatically compensates for belt stretch and slight variations in pulley alignment.
The direction of rotation of each pulley is determined by the way the belt wraps around it. Pay attention to the arrows on the diagram! Some accessories might rotate clockwise, while others rotate counter-clockwise. This is important if you are ever disassembling and reassembling any of the accessory components.
Real-World Use: Basic Troubleshooting Tips
The serpentine belt diagram is invaluable for diagnosing common problems:
- Squealing Noise: A squealing belt often indicates slippage. Use the diagram to check the following:
- Belt Tension: Is the tensioner pulley moving freely and maintaining adequate tension? If it's loose or sticking, the tensioner may need replacement.
- Pulley Alignment: Are all the pulleys properly aligned? Misalignment can cause excessive friction and belt slippage. Use a straight edge or laser alignment tool to check.
- Pulley Condition: Are any of the pulleys worn, damaged, or seizing? A seized pulley will cause the belt to screech and potentially snap.
- Cracked or Frayed Belt: Visually inspect the belt for cracks, fraying, or missing ribs. These are signs of wear and indicate the need for replacement. Check the entire length of the belt.
- Accessory Failure: If a particular accessory (e.g., AC compressor) stops working, check the belt and pulley associated with that component. A broken belt or seized pulley could be the cause.
Safety Considerations
Working on the serpentine belt system involves potential hazards. Always disconnect the negative battery cable before starting any work to prevent accidental starting of the engine.
Rotating Components: The most significant risk is contact with rotating components. Never put your hands or tools near the belt or pulleys while the engine is running. Even at idle, the belt moves quickly and can cause serious injury.
Spring Tension: The tensioner pulley is spring-loaded and can snap back forcefully if released improperly. Use the correct tools and techniques to relieve the tension safely. Always wear eye protection.
Hot Engine: Allow the engine to cool completely before working on the serpentine belt system. Exhaust manifolds and other engine components can remain hot for a significant time after the engine is shut off.
With the information and the diagram (available for download below), you're well-equipped to tackle your Altima 2.5L's serpentine belt maintenance or replacement. Remember to work safely, consult your vehicle's repair manual for specific instructions, and don't hesitate to seek professional help if you're unsure about any aspect of the procedure.
Download the Serpentine Belt Diagram
Click here to download the Serpentine Belt Diagram for the Nissan Altima 2.5L engine.