Nissan Murano Serpentine Belt Diagram
The serpentine belt, a seemingly simple component, is the unsung hero of your Nissan Murano's accessory drive system. It powers vital functions like the power steering, air conditioning, alternator (which keeps your battery charged), and potentially the water pump, depending on the model year. Understanding its routing, tensioning, and condition is crucial for maintaining your vehicle's reliability. This article will delve into the intricacies of the Nissan Murano's serpentine belt diagram, providing you with the knowledge to diagnose issues, perform replacements, and ultimately, keep your Murano running smoothly. We have the diagram available for download, which you can reference as you read this article.
Purpose: Why the Serpentine Belt Diagram Matters
The serpentine belt diagram is your roadmap to the accessory drive system. It's not just a pretty picture; it's an essential tool for:
- Repairs and Replacements: When replacing a worn or broken serpentine belt, the diagram is invaluable for ensuring correct routing. Incorrect routing can lead to component failure, noise, and reduced performance.
- Diagnosis: A squealing belt, a common symptom of a worn or misaligned belt, can be difficult to pinpoint without knowing the correct routing. The diagram helps you inspect each component and pulley involved.
- Maintenance: Regularly inspecting the belt and pulleys is a crucial part of preventative maintenance. The diagram helps you identify all the components that need attention.
- Learning and Understanding: For the DIY enthusiast, studying the diagram provides a deeper understanding of how the accessory drive system functions and how each component interacts.
Key Specs and Main Parts of the Serpentine Belt System
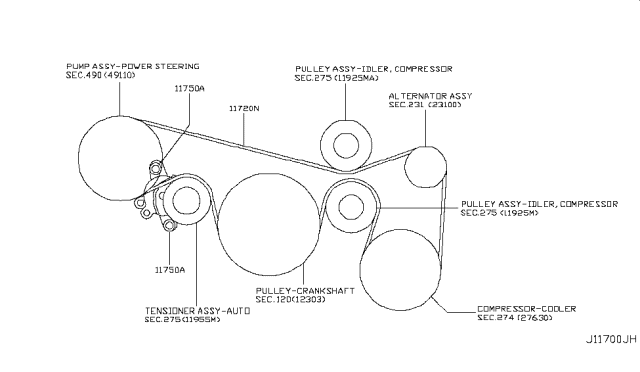
Before diving into the diagram itself, let's identify the key components involved:
- Serpentine Belt: This is the main component, a long, continuous belt made of reinforced rubber. Its length and width are specific to your Murano's engine and year. It must be rated for high temperatures and constant flexing.
- Crankshaft Pulley: Attached to the crankshaft, this pulley is the driving force behind the entire system. It's responsible for transferring engine power to the other accessories.
- Alternator Pulley: Powers the alternator, which generates electricity to charge the battery and power the vehicle's electrical system.
- Power Steering Pump Pulley: Drives the power steering pump, which provides hydraulic assistance to the steering system.
- Air Conditioning Compressor Pulley: Powers the air conditioning compressor, which circulates refrigerant to cool the cabin.
- Water Pump Pulley (Potentially): In some Murano models, the water pump is driven by the serpentine belt. The water pump circulates coolant to regulate engine temperature.
- Tensioner Pulley: This spring-loaded pulley maintains the correct tension on the serpentine belt. It's critical for proper belt operation and preventing slippage.
- Idler Pulley: Smooth, non-driven pulleys used to guide the belt around the various components and maintain optimal wrap angles.
Understanding Serpentine Belt Diagram Symbols
Serpentine belt diagrams use a combination of lines, symbols, and sometimes colors to convey information. Here's a breakdown:
- Solid Lines: These lines represent the path of the serpentine belt. Follow them carefully to ensure correct routing.
- Dashed Lines: Sometimes used to indicate the back side of the belt where it isn't visible in a particular view, or to show the direction of the belt around a pulley.
- Arrows: Arrows indicate the direction of rotation of each pulley. This is important for understanding how the belt tension is applied.
- Pulley Symbols: Each pulley is represented by a circle. Some diagrams might label the pulleys (e.g., ALT for alternator, P/S for power steering).
- Tensioner Symbol: The tensioner pulley is often represented with a spring symbol to indicate its adjustable nature. Look for a label indicating "TENSIONER" or similar.
- Colors: While less common, some diagrams use colors to highlight specific sections of the belt path or different components.
How the Serpentine Belt System Works
The serpentine belt system operates on a simple principle: transferring rotational force from the engine's crankshaft to various accessories. The crankshaft pulley, driven directly by the engine, spins the serpentine belt. The belt then wraps around the other pulleys, causing them to rotate and power their respective accessories. The tensioner pulley ensures that the belt remains taut, preventing slippage and maintaining optimal performance. Without proper tension, the belt will slip, leading to reduced accessory performance, overheating, and potential belt damage. The idler pulleys ensure the right angle of wrap on each driven component. The "wrap angle" describes the angle between the belt coming into and leaving a pulley; more wrap angle generally means better torque transfer and less slippage.
Real-World Use: Basic Troubleshooting Tips
Here are some common issues you might encounter and how the serpentine belt diagram can help:
- Squealing Belt: A squealing belt is often caused by slippage. Use the diagram to inspect the belt for wear, cracks, or glazing. Also, check the tensioner pulley to ensure it's functioning correctly. Sometimes, a worn pulley bearing can cause the squeal.
- Belt Damage: Inspect the belt regularly for cracks, fraying, or missing chunks. The diagram helps you identify potential points of contact where the belt might be rubbing against other components.
- Accessory Malfunction: If an accessory is not functioning correctly (e.g., weak power steering, poor A/C performance), check the belt's condition and tension. A slipping belt might not be providing enough power to the accessory.
- Incorrect Routing: If you suspect the belt is routed incorrectly (e.g., after a repair), use the diagram to verify the routing. Incorrect routing is a major cause of belt failure and accessory damage.
Safety Precautions
Working on the serpentine belt system can be hazardous. Here are some important safety precautions:
- Disconnect the Battery: Always disconnect the negative battery terminal before working on the engine. This prevents accidental starting and electrical shock.
- Hot Engine: Never work on the serpentine belt system when the engine is hot. Allow the engine to cool completely before starting any work.
- Moving Parts: Be extremely cautious when the engine is running. Keep your hands and clothing away from the serpentine belt and pulleys. These components can cause serious injury.
- Proper Tools: Use the correct tools for the job. A serpentine belt tool can help you release the tension on the tensioner pulley safely and easily.
- Eye Protection: Wear safety glasses to protect your eyes from debris.
Remember, if you are not comfortable performing these repairs yourself, consult a qualified mechanic. A professional has the experience and tools to diagnose and repair the serpentine belt system safely and effectively.
We hope this detailed guide has provided you with a comprehensive understanding of the Nissan Murano's serpentine belt diagram and its importance. We have the serpentine belt diagram file ready for you to download and reference for your specific Murano model year.