Nissan Sentra 2008 Fuse Box Diagram
If you're tackling electrical repairs, modifications, or simply trying to understand your 2008 Nissan Sentra better, a fuse box diagram is an indispensable tool. This article provides a detailed explanation of the 2008 Nissan Sentra's fuse box diagram, equipping you with the knowledge to confidently troubleshoot and resolve common electrical issues. Consider this your comprehensive guide to navigating the electrical heart of your Sentra.
Why This Diagram Matters
The fuse box diagram isn't just a piece of paper; it's the key to unlocking your Sentra's electrical system. Here's why it's so important:
- Troubleshooting: When an electrical component fails (e.g., headlights, radio, wipers), the first step is usually to check the corresponding fuse. The diagram pinpoints the exact fuse location.
- Repairs: Identifying the correct fuse prevents accidental damage by removing the wrong one, potentially causing further problems.
- Modifications: If you're adding aftermarket accessories (e.g., an amplifier, new lights), you need to know which circuits are available and their amperage ratings to avoid overloading the system.
- Understanding Your Vehicle: Familiarizing yourself with the fuse box layout gives you a deeper understanding of your car's electrical infrastructure.
Key Specs and Main Parts
The 2008 Nissan Sentra typically has two fuse box locations:
- Interior Fuse Box: Usually located under the dashboard on the driver's side. This fuse box primarily handles circuits for interior components like the radio, lights, climate control, and instrument cluster.
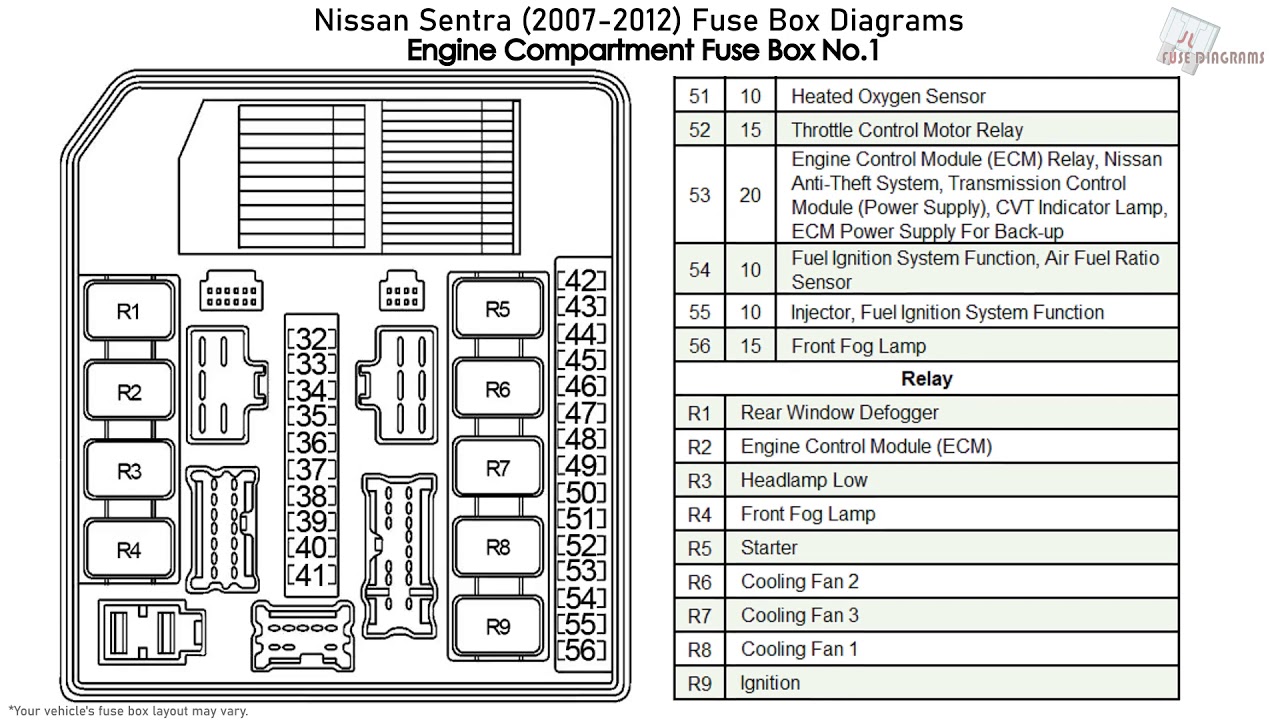
- Engine Compartment Fuse Box: Found in the engine bay, often near the battery. This box protects critical engine-related systems, including the fuel pump, ignition system, and engine control unit (ECU). It also often contains relays for major components.
Main Parts:
- Fuses: These are the sacrificial links in the electrical circuits. They're designed to break (or "blow") if the current exceeds a safe level, protecting the wiring and components from damage. Fuses are rated in amperes (amps), indicating the amount of current they can handle before blowing. Common amp ratings include 5A, 7.5A, 10A, 15A, 20A, 25A, and 30A.
- Relays: Electrically operated switches that control high-current circuits using a low-current signal. Relays are used for components like headlights, the starter motor, and the fuel pump. They allow a smaller switch (like a headlight switch) to control a large current load.
- Fuse Puller: A small plastic tool used to safely remove fuses without damaging them. Most fuse boxes have a fuse puller located inside the lid.
- Diagram Label: The key to understanding the fuse box. It identifies each fuse and relay, indicating the circuit it protects.
Understanding the Symbols
Fuse box diagrams use symbols to represent various components and their functions. Here's a breakdown of common symbols and their meanings:
- Fuses: Typically represented by a rectangle with a wavy line inside. The amperage rating is usually printed next to the symbol (e.g., 10A, 20A).
- Relays: Often shown as a square or rectangle with internal connections indicating the switch's internal circuitry. The diagram may also indicate the relay's function (e.g., "Headlight Relay").
- Lines: Solid lines represent wired connections. Thicker lines may indicate higher current carrying capacity. Dotted lines sometimes indicate a ground connection.
- Colors: While not always present on the diagram itself, the wiring associated with each fuse or relay might have specific color codes. However, focus on the function indicated on the diagram first. Color coding can vary depending on the specific sub-model and options installed.
- Icons: Some diagrams use icons to visually represent the components protected by each fuse. For example, a headlight icon indicates a fuse for the headlights, a radio icon for the radio, etc.
How It Works
The fuse box serves as a central distribution point for electrical power in your Sentra. Power from the battery flows to the fuse box, and from there, it's distributed to various electrical circuits, each protected by a fuse or relay.
When an electrical fault occurs (e.g., a short circuit), the current flow increases dramatically. This excessive current heats up the fuse element, causing it to melt and break the circuit. This interruption prevents damage to the wiring and the component powered by that circuit.
Relays allow low-current circuits to control high-current circuits. For example, when you turn on your headlights, a small current flows through the headlight switch, energizing the headlight relay. The relay then closes a high-current circuit, providing power to the headlights.
Real-World Use: Basic Troubleshooting
Here's a step-by-step guide to troubleshooting a blown fuse:
- Identify the Problem: Determine which electrical component isn't working.
- Locate the Fuse Box: Find the relevant fuse box (interior or engine compartment).
- Consult the Diagram: Use the fuse box diagram to identify the fuse corresponding to the non-working component.
- Inspect the Fuse: Use a fuse puller to carefully remove the fuse. Visually inspect it. A blown fuse will have a broken or blackened element inside the glass or plastic casing.
- Replace the Fuse: Replace the blown fuse with a new fuse of the same amperage rating. Never use a fuse with a higher amperage rating, as this could overload the circuit and cause a fire.
- Test the Component: Turn on the component to see if it now works.
If the fuse blows again immediately after replacement, there's likely a more serious problem in the circuit, such as a short circuit. Do not continue replacing fuses. Seek professional assistance from a qualified mechanic.
Safety First
Working with electrical systems can be dangerous. Take these precautions:
- Disconnect the Battery: Before working on the fuse box, disconnect the negative (-) terminal of the battery to prevent accidental shorts.
- Avoid Water: Never work on the fuse box in wet or damp conditions.
- Use Proper Tools: Use a fuse puller to remove fuses. Avoid using metal tools that could short circuit the system.
- High-Current Components: Be especially cautious when working near relays for high-current components like the starter motor and fuel pump. These circuits can deliver a powerful shock.
- Don't Modify Fuses: Never attempt to repair or modify a fuse. Always replace it with a new fuse of the correct amperage rating.
- When in doubt, consult a professional: If you're not comfortable working with electrical systems, seek help from a qualified mechanic.
Remember, the ECU (Engine Control Unit) and SRS (Supplemental Restraint System - airbags) are very sensitive to voltage changes. Improper handling of these circuits can trigger fault codes or even deploy airbags unexpectedly. Be extremely careful when working with fuses related to these systems.
By understanding your 2008 Nissan Sentra's fuse box diagram, you can confidently tackle many common electrical issues. However, always prioritize safety and seek professional assistance when needed.
We have a downloadable copy of the 2008 Nissan Sentra fuse box diagram available. [Link to download the diagram would be placed here]. This diagram can be a valuable resource for your DIY projects and troubleshooting needs.