Owner Manual 1999 Ford F150 Fuse Box Diagram
Alright, let's dive into the 1999 Ford F-150 fuse box diagram. This is a crucial piece of documentation, often overlooked until you're staring at a non-functional taillight or a dead radio. Whether you're troubleshooting electrical issues, planning modifications, or just trying to understand your truck's systems, knowing how to read and interpret this diagram is invaluable. We're going to break it down, step-by-step, like I would explain it to a fellow wrench-turner in my shop.
Purpose of the Fuse Box Diagram
The 1999 Ford F-150 fuse box diagram serves as a roadmap for the vehicle's electrical system. Its primary purposes are:
- Troubleshooting Electrical Problems: It allows you to quickly identify and locate the fuse responsible for a specific circuit. This dramatically speeds up the process of diagnosing a blown fuse as the cause of a malfunctioning component.
- Identifying Circuit Function: The diagram clearly labels what each fuse protects. This is vital for understanding the relationship between components and their power source. Knowing which fuse controls the power windows, for example, is crucial when diagnosing window problems.
- Planning Modifications: If you're adding aftermarket accessories, such as a new stereo system, auxiliary lighting, or a trailer brake controller, the diagram helps you find appropriate power sources and plan your wiring safely. Proper fuse selection is critical for protecting your new circuits and the truck's electrical system.
- General Understanding: It provides a basic understanding of how the electrical system is laid out and how different components are connected. This understanding is helpful for preventative maintenance and anticipating potential issues.
Key Specs and Main Parts
The 1999 F-150, depending on the trim level and engine, can have multiple fuse box locations. The two most common are:
- Under-Dash Fuse Box (Interior): Located typically on the driver's side, beneath the dashboard. This box houses fuses for interior components like the radio, power windows, dome lights, and instrument panel.
- Power Distribution Box (Engine Compartment): Found under the hood, usually near the battery. This box contains fuses and relays for critical systems like the engine management system, headlights, starter motor, and anti-lock brakes.
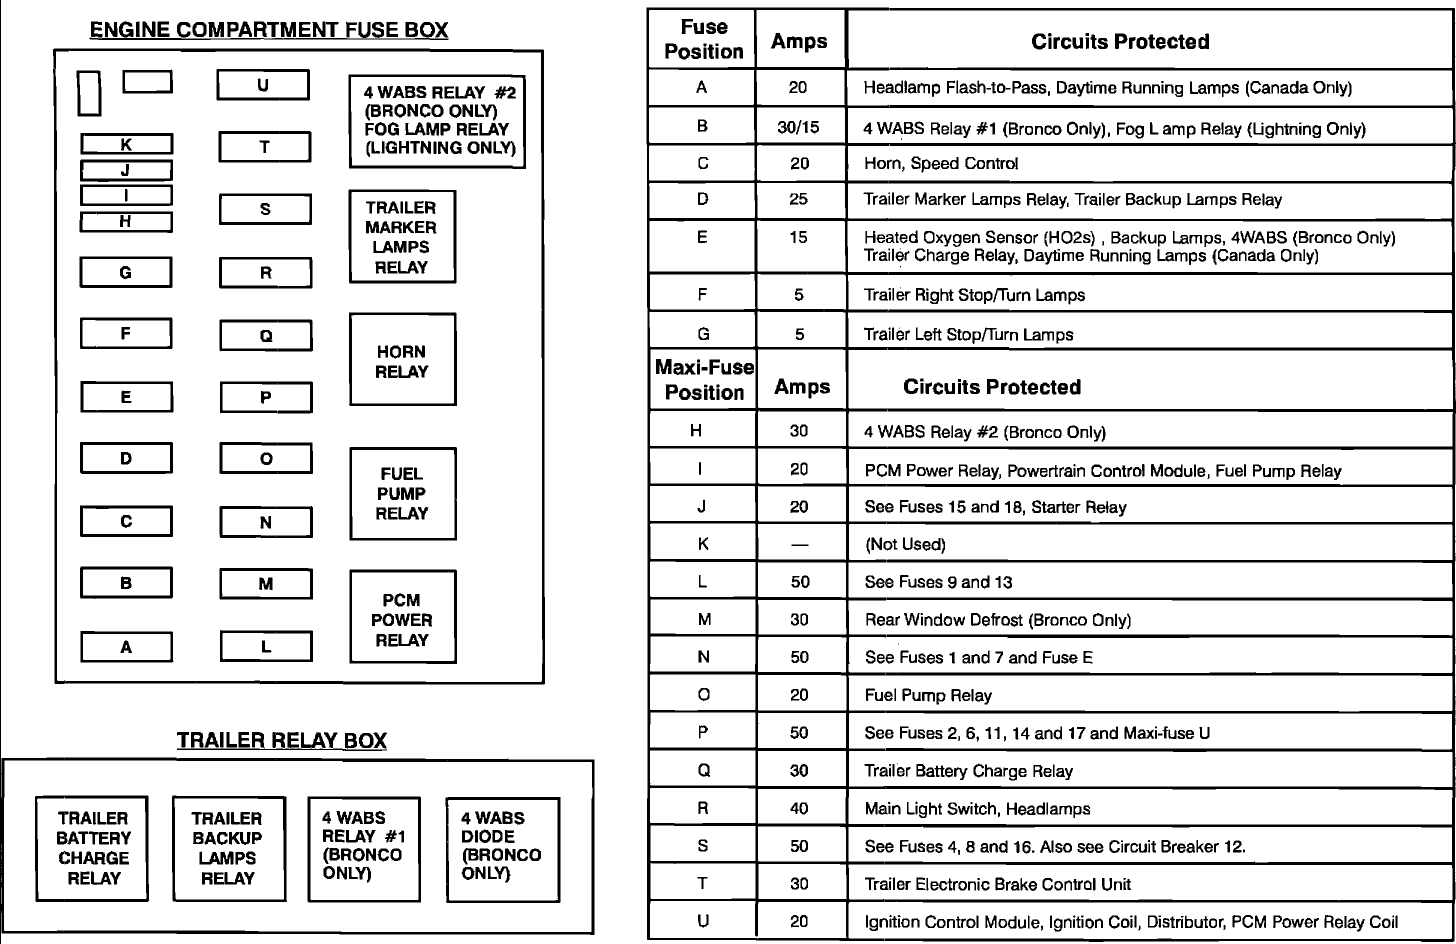
The diagram will typically provide a legend correlating a fuse number (e.g., Fuse #22) to a specific circuit or component (e.g., "Radio"). It will also specify the amperage rating of each fuse (e.g., "15A"). Amperage is the measure of electrical current flow, and using the correct fuse rating is absolutely critical. Using a fuse with a lower amperage can cause it to blow prematurely, while a higher amperage fuse can allow too much current to flow, potentially damaging wiring and components, even causing a fire.
Symbols: Lines, Colors, and Icons
Fuse box diagrams use various symbols to represent different elements of the electrical system. Understanding these symbols is essential for interpreting the diagram accurately:
- Lines: Lines represent wires or conductors that connect different components. Thicker lines often indicate higher current capacity.
- Colors: Different wire colors (e.g., red, black, blue) signify different functions or polarities. The diagram may have a color key that indicates the meaning of each color. For example, red is typically used for power, and black for ground.
- Icons: Specific icons represent fuses, relays, and other components.
- Fuse: A fuse is typically represented by a simple line broken in the middle, sometimes with a small "F" inside.
- Relay: A relay is usually depicted as a square or rectangle with several terminals and a coil symbol. A relay is an electrically operated switch that allows a low-current circuit to control a high-current circuit.
- Ground: Ground connections are often indicated by a symbol resembling a series of stacked horizontal lines or a triangle pointing downwards.
- Amperage Ratings: Numbers associated with the fuse symbol indicate the fuse's amperage rating.
How It Works
The fuse box acts as a central protection point for your truck's electrical circuits. Each circuit is connected to a fuse, which is designed to break the circuit if the current exceeds a safe level. This prevents damage to wiring and components caused by shorts, overloads, or malfunctions.
Think of it like this: each circuit is a water pipe, and the fuse is a narrow section of that pipe. If the water pressure (current) gets too high, the narrow section breaks, preventing the high pressure from damaging the rest of the pipe system. When a fuse blows, it interrupts the flow of electricity to the circuit it protects, causing the affected component to stop working.
Real-World Use: Basic Troubleshooting Tips
Here’s how to put this knowledge to work when troubleshooting electrical problems:
- Identify the Problem: Determine which component or system is not working. For example, "the cigarette lighter doesn't work."
- Consult the Diagram: Locate the fuse box diagram (either in your owner's manual or a downloaded copy – we have a copy of the 1999 F-150 fuse box diagram available for download at the end of this article).
- Find the Correct Fuse: Using the diagram, identify the fuse associated with the non-functional component. The diagram will likely list it as something like "Cigar Lighter" or "Accessory Power."
- Inspect the Fuse: Visually inspect the fuse. A blown fuse will typically have a broken filament inside the glass or a blackened appearance. A good fuse will have an intact filament.
- Test the Fuse (Optional): For a more reliable test, use a multimeter to check the fuse for continuity. Continuity means there is a complete electrical path through the fuse. If the multimeter shows no continuity, the fuse is blown.
- Replace the Fuse: If the fuse is blown, replace it with a new fuse of the exact same amperage rating. Do not use a higher amperage fuse!
- Test the System: After replacing the fuse, test the component to see if it now works.
- If the Fuse Blows Again: If the new fuse immediately blows, there is likely a short circuit or overload in the circuit. This requires further investigation and may be best left to a professional mechanic. Don't just keep replacing fuses; you're masking a potentially dangerous underlying issue.
Safety: Highlight Risky Components
Working with electrical systems can be dangerous. Here are some key safety precautions:
- Disconnect the Battery: Before working on any electrical components, disconnect the negative (-) terminal of the battery. This will prevent accidental shorts and shocks. Always disconnect the negative terminal first.
- Use the Correct Fuses: Never replace a fuse with one of a higher amperage rating. This can overload the circuit and cause a fire.
- Avoid Working in Wet Conditions: Water conducts electricity and can create a shock hazard.
- Be Careful Around Airbags: Airbag systems contain capacitors that can store a charge even after the battery is disconnected. Refer to your owner's manual or a service manual for specific instructions on disabling the airbag system before working near it. Never probe or tamper with airbag wiring unless you are specifically trained to do so.
- High-Current Relays: Be cautious when working around high-current relays in the power distribution box, such as those for the starter motor or fuel pump. These relays can carry significant current, and a short circuit can cause sparks and potential burns.
Understanding the 1999 Ford F-150 fuse box diagram is a valuable skill for any DIY mechanic. By following these guidelines and taking proper safety precautions, you can confidently troubleshoot electrical problems and maintain your truck's electrical system. Remember, when in doubt, consult a qualified mechanic.
Ready to get started? You can download the 1999 Ford F-150 Fuse Box Diagram [link to download file here – replace with actual download link].