Owner Manual 2004 Ford F150 Fuse Box Diagram
Alright, let's dive into the fuse box diagram for your 2004 Ford F-150. Understanding this diagram is absolutely crucial whether you're tackling a minor electrical gremlin, installing aftermarket accessories, or just trying to get a better handle on your truck's inner workings. Think of it as the electrical roadmap for your vehicle – without it, you're navigating in the dark.
Purpose: Your Electrical Troubleshooting Guide
The fuse box diagram is primarily used for troubleshooting electrical issues. When something stops working – your radio, a light, the power windows – the first place you should check is the fuse box. The diagram will show you exactly which fuse protects which circuit. Replacing a blown fuse is often a quick and easy fix, saving you time and money compared to taking it to a shop. Beyond repairs, this diagram is indispensable when adding aftermarket electronics like amplifiers, auxiliary lights, or alarm systems. Knowing the amperage and circuit pathways allows you to properly tap into the system without overloading anything.
Key Specs and Main Parts of the 2004 F-150 Fuse Box
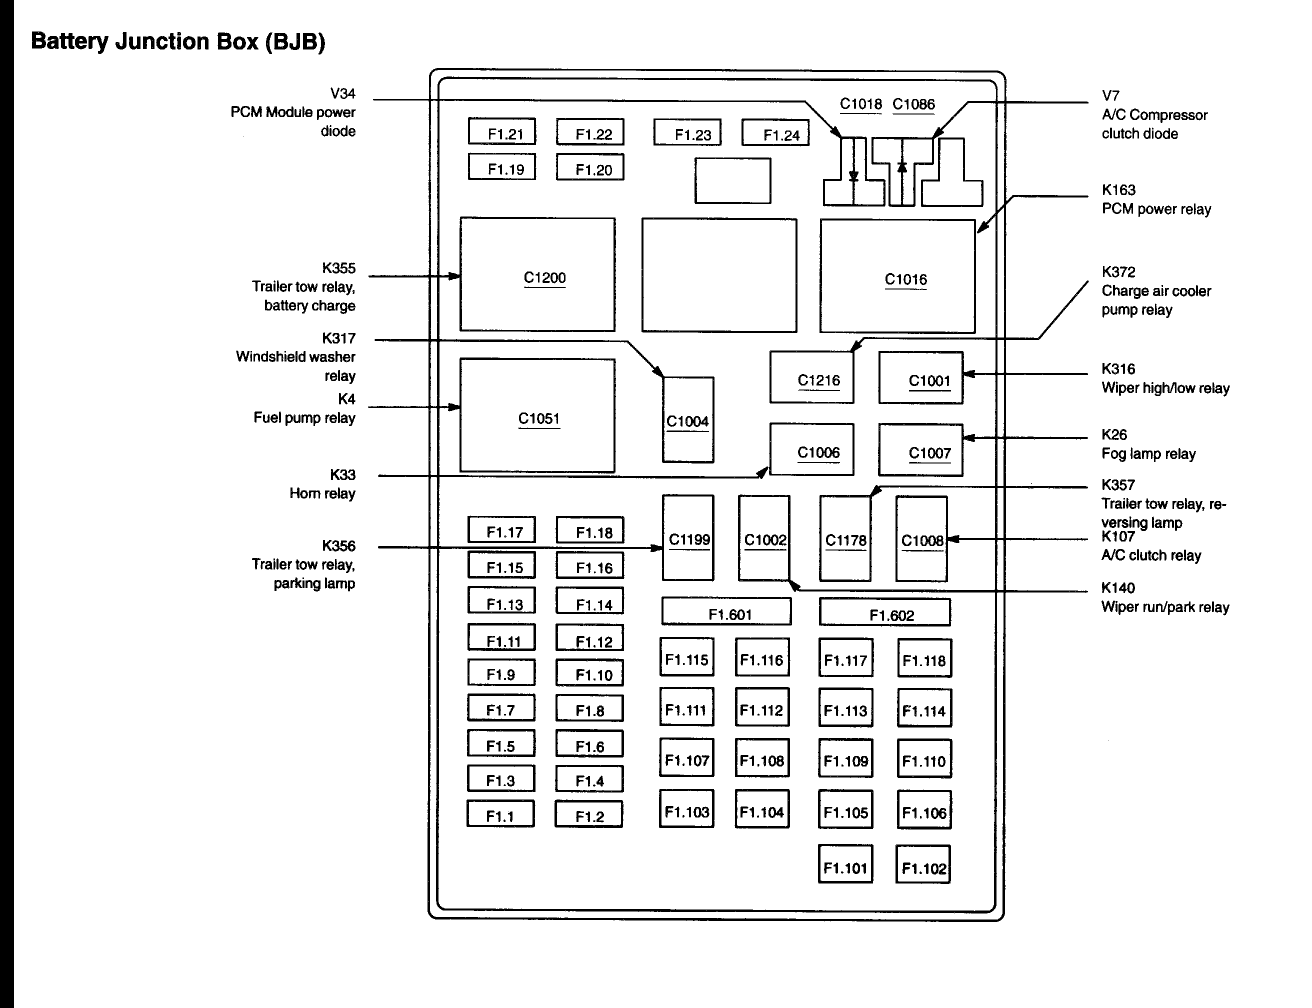
Your 2004 F-150 actually has *two* main fuse boxes. One is located inside the cabin, usually on the passenger side, often behind a kick panel or inside the glove box. This is called the Central Junction Box (CJB). The second fuse box is under the hood, typically near the battery or the driver's side fender. This one is referred to as the Power Distribution Box (PDB). Both are equally important, and the diagram covers both locations. The diagram itself outlines the physical layout of the fuses and relays, along with a legend that identifies each component by its function, amperage rating, and often a color code. Don't underestimate the importance of checking *both* locations when troubleshooting!
Fuse Types and Amperage
You'll encounter various types of fuses in these boxes. Common types include:
- Blade Fuses (ATO/ATC): These are the most common type, with a plastic body and two prongs. They come in different sizes (mini, standard, maxi) and amperage ratings.
- Mini Fuses: Smaller versions of blade fuses, used in circuits with lower amperage requirements.
- Maxi Fuses: Larger blade fuses designed for high-current circuits.
- Cartridge Fuses: Cylindrical fuses, often used for heavier-duty applications.
The amperage rating (e.g., 5A, 10A, 20A, 30A) is crucial. It indicates the maximum current the fuse can handle before blowing. Never replace a fuse with one of a higher amperage. Doing so can bypass the circuit protection and potentially cause a fire or damage components. Always use the same amperage rating as specified in the diagram.
Relays are electromechanical switches that control higher-current circuits using a lower-current signal. They're used for things like headlights, fuel pumps, and starters. The diagram will identify the location and function of each relay in the PDB.
Deciphering the Symbols and Layout
Fuse box diagrams aren't exactly works of art, but they're designed to be functional. Here's a breakdown of what you'll typically find:
- Fuse Location: The diagram will show the physical placement of each fuse within the box. This is usually a grid-like representation, making it easy to locate a specific fuse.
- Fuse Number: Each fuse is assigned a number, which corresponds to an entry in the legend.
- Fuse Amperage: The amperage rating of the fuse is usually printed directly on the diagram or in the legend. It's often abbreviated (e.g., "20A" for 20 Amperes).
- Circuit Description: This is the most important part. The description tells you what the fuse protects. For example, "Radio," "Power Windows," "Headlights (Low Beam)," etc.
- Wire Colors: Some diagrams may include wire color codes. These codes indicate the color of the wire connected to the fuse, which can be helpful for tracing circuits. Common abbreviations include: BK (Black), RD (Red), WH (White), GN (Green), BL (Blue), YL (Yellow), OR (Orange), BR (Brown).
Symbols used are pretty straightforward: dashed lines typically indicate grounding points, solid lines represent the wiring, and small rectangles or squares represent fuses/relays.
How It Works: The Electrical Flow
Understanding how the electrical system works is key to using the fuse box diagram effectively. Electricity flows from the battery, through the wiring, and to the various components in your truck. Each circuit is protected by a fuse. The fuse contains a thin wire that will melt and break the circuit if the current exceeds the fuse's amperage rating. This protects the wiring and components from overheating and potential damage. When a fuse blows, it's usually a sign of an overload or a short circuit. An overload means that too much current is being drawn through the circuit, perhaps due to a faulty component or an excessive load. A short circuit occurs when a wire accidentally comes into contact with ground, creating a low-resistance path for the current to flow, resulting in a surge of current.
Real-World Use: Basic Troubleshooting
Let's say your radio suddenly stops working. Here's how you'd use the fuse box diagram to troubleshoot:
- Consult the Diagram: Locate the fuse box diagram for your 2004 F-150 (we have it available for download at the end of this article!). Find the fuse labeled "Radio" or something similar in the CJB (Central Junction Box - inside the cabin).
- Locate the Fuse: Physically locate the fuse in the fuse box, using the diagram as a guide.
- Inspect the Fuse: Visually inspect the fuse. Look for a broken filament inside the clear plastic housing. If the filament is broken, the fuse is blown.
- Test the Fuse: Even if the fuse *looks* okay, it's always a good idea to test it with a multimeter. Set the multimeter to continuity mode (often indicated by a beep symbol). Touch the probes to the two terminals of the fuse. If the multimeter beeps, the fuse is good. If it doesn't beep, the fuse is bad.
- Replace the Fuse: If the fuse is blown, replace it with a new fuse of the same amperage rating.
- Test the Radio: Turn on the radio to see if it works. If it does, you've solved the problem!
- If the Fuse Blows Again: If the new fuse blows immediately, you have a more serious problem, likely a short circuit in the radio wiring or the radio itself. This requires further investigation.
If a fuse keeps blowing after replacement, it indicates a persistent problem within that circuit. Further diagnostics will be needed to locate the underlying issue.
Safety First: Highlighting Risky Components
Warning: Working with automotive electrical systems can be dangerous. Always disconnect the negative terminal of the battery before working on the electrical system to prevent accidental shocks or short circuits.
Specifically, be cautious when working around the following components:
- High-Current Fuses/Relays: Maxi fuses and relays control circuits with high amperage, such as the starter motor, alternator, and power windows. Accidental shorts in these circuits can cause serious damage and even fires.
- Airbag System: Some fuses and relays are related to the airbag system. Mishandling these components can trigger the airbags, causing injury. If you need to work on the airbag system, it's best to consult a qualified technician.
- Fuel Pump Relay: The fuel pump relay controls the fuel pump, which delivers fuel to the engine. Be careful when working with this circuit, as fuel is flammable.
When replacing fuses, always use the correct amperage rating. Never use a higher amperage fuse as a "quick fix," as this can bypass the circuit protection and potentially cause a fire or damage components. If you're not comfortable working with electrical systems, it's best to consult a qualified mechanic.
By understanding the fuse box diagram and following proper safety precautions, you can confidently troubleshoot and repair many electrical problems on your 2004 Ford F-150. Remember to take your time, be methodical, and always double-check your work.
Ready to get your hands on the actual diagram? We've got the 2004 Ford F-150 Fuse Box Diagram available for download. Click the link below to access the PDF file. Happy wrenching!
Download the 2004 Ford F-150 Fuse Box Diagram: [Link to PDF Download Here]