Parts Catalog Body Part Chevy Silverado Oem Parts Diagram
Alright, let's dive deep into something every serious Chevy Silverado DIYer or modder should be familiar with: the OEM parts diagram for body components. Specifically, we're talking about the exploded view diagrams you find in the official Chevy parts catalog. These aren’t just pretty pictures; they’re invaluable tools for repairs, restoration projects, modifications, and even just plain understanding how your truck is put together.
Purpose: Why You Need the Diagram
Think of the OEM body parts diagram as a visual roadmap to your Silverado's exterior. Its primary purpose is to accurately illustrate the relationship between individual body panels, trim pieces, and structural components. Here's why having access to this diagram is crucial:
- Precise Repairs: Need to replace a fender, door, or bumper? The diagram shows you every bolt, clip, and bracket involved, minimizing guesswork and preventing damage to surrounding parts. It provides torque specifications and installation sequences often absent from generic repair manuals.
- Accurate Parts Ordering: Ever ordered the wrong part? The diagram provides the official General Motors (GM) part numbers, cross-referenced to the visual representation of each component. This dramatically reduces the chances of ordering incorrect or incompatible parts.
- Restoration Projects: Restoring a classic Silverado? These diagrams are essential for identifying original parts and ensuring correct reassembly. They help you track down missing or damaged components and understand how they were originally installed.
- Modifications & Customization: Planning to add aftermarket bumpers, side steps, or body kits? Understanding the OEM structure helps you plan your modifications safely and effectively. You can anticipate potential fitment issues and identify any necessary modifications to the existing structure.
- Learning & Understanding: Even if you're not actively working on your truck, the diagram is a fantastic resource for understanding its construction and how different parts interact. This knowledge can be invaluable for diagnosing problems and making informed decisions about maintenance and repairs.
Key Specs and Main Parts
The specific parts covered by the "Body" section of the parts catalog are vast, but some of the most frequently referenced components include:
- Body Panels: Fenders, doors, hood, tailgate, bed sides, roof panel, quarter panels. These are the primary exterior surfaces of the truck.
- Bumpers: Front and rear bumpers, including energy absorbers, mounting brackets, and trim pieces. Modern bumpers are more complex than they appear.
- Grille and Headlights: The front grille, headlights, turn signals, and associated mounting hardware. These components affect both appearance and safety.
- Trim & Moldings: Door moldings, window trim, rocker panel covers, and other decorative pieces. These are often held on with clips or adhesive.
- Glass: Windshield, side windows, and rear window (including any associated defroster elements). Proper glass installation is critical for safety and sealing.
- Hardware: Bolts, screws, clips, retainers, and other fasteners used to secure the body components. The diagram indicates the size, type, and quantity of each fastener.
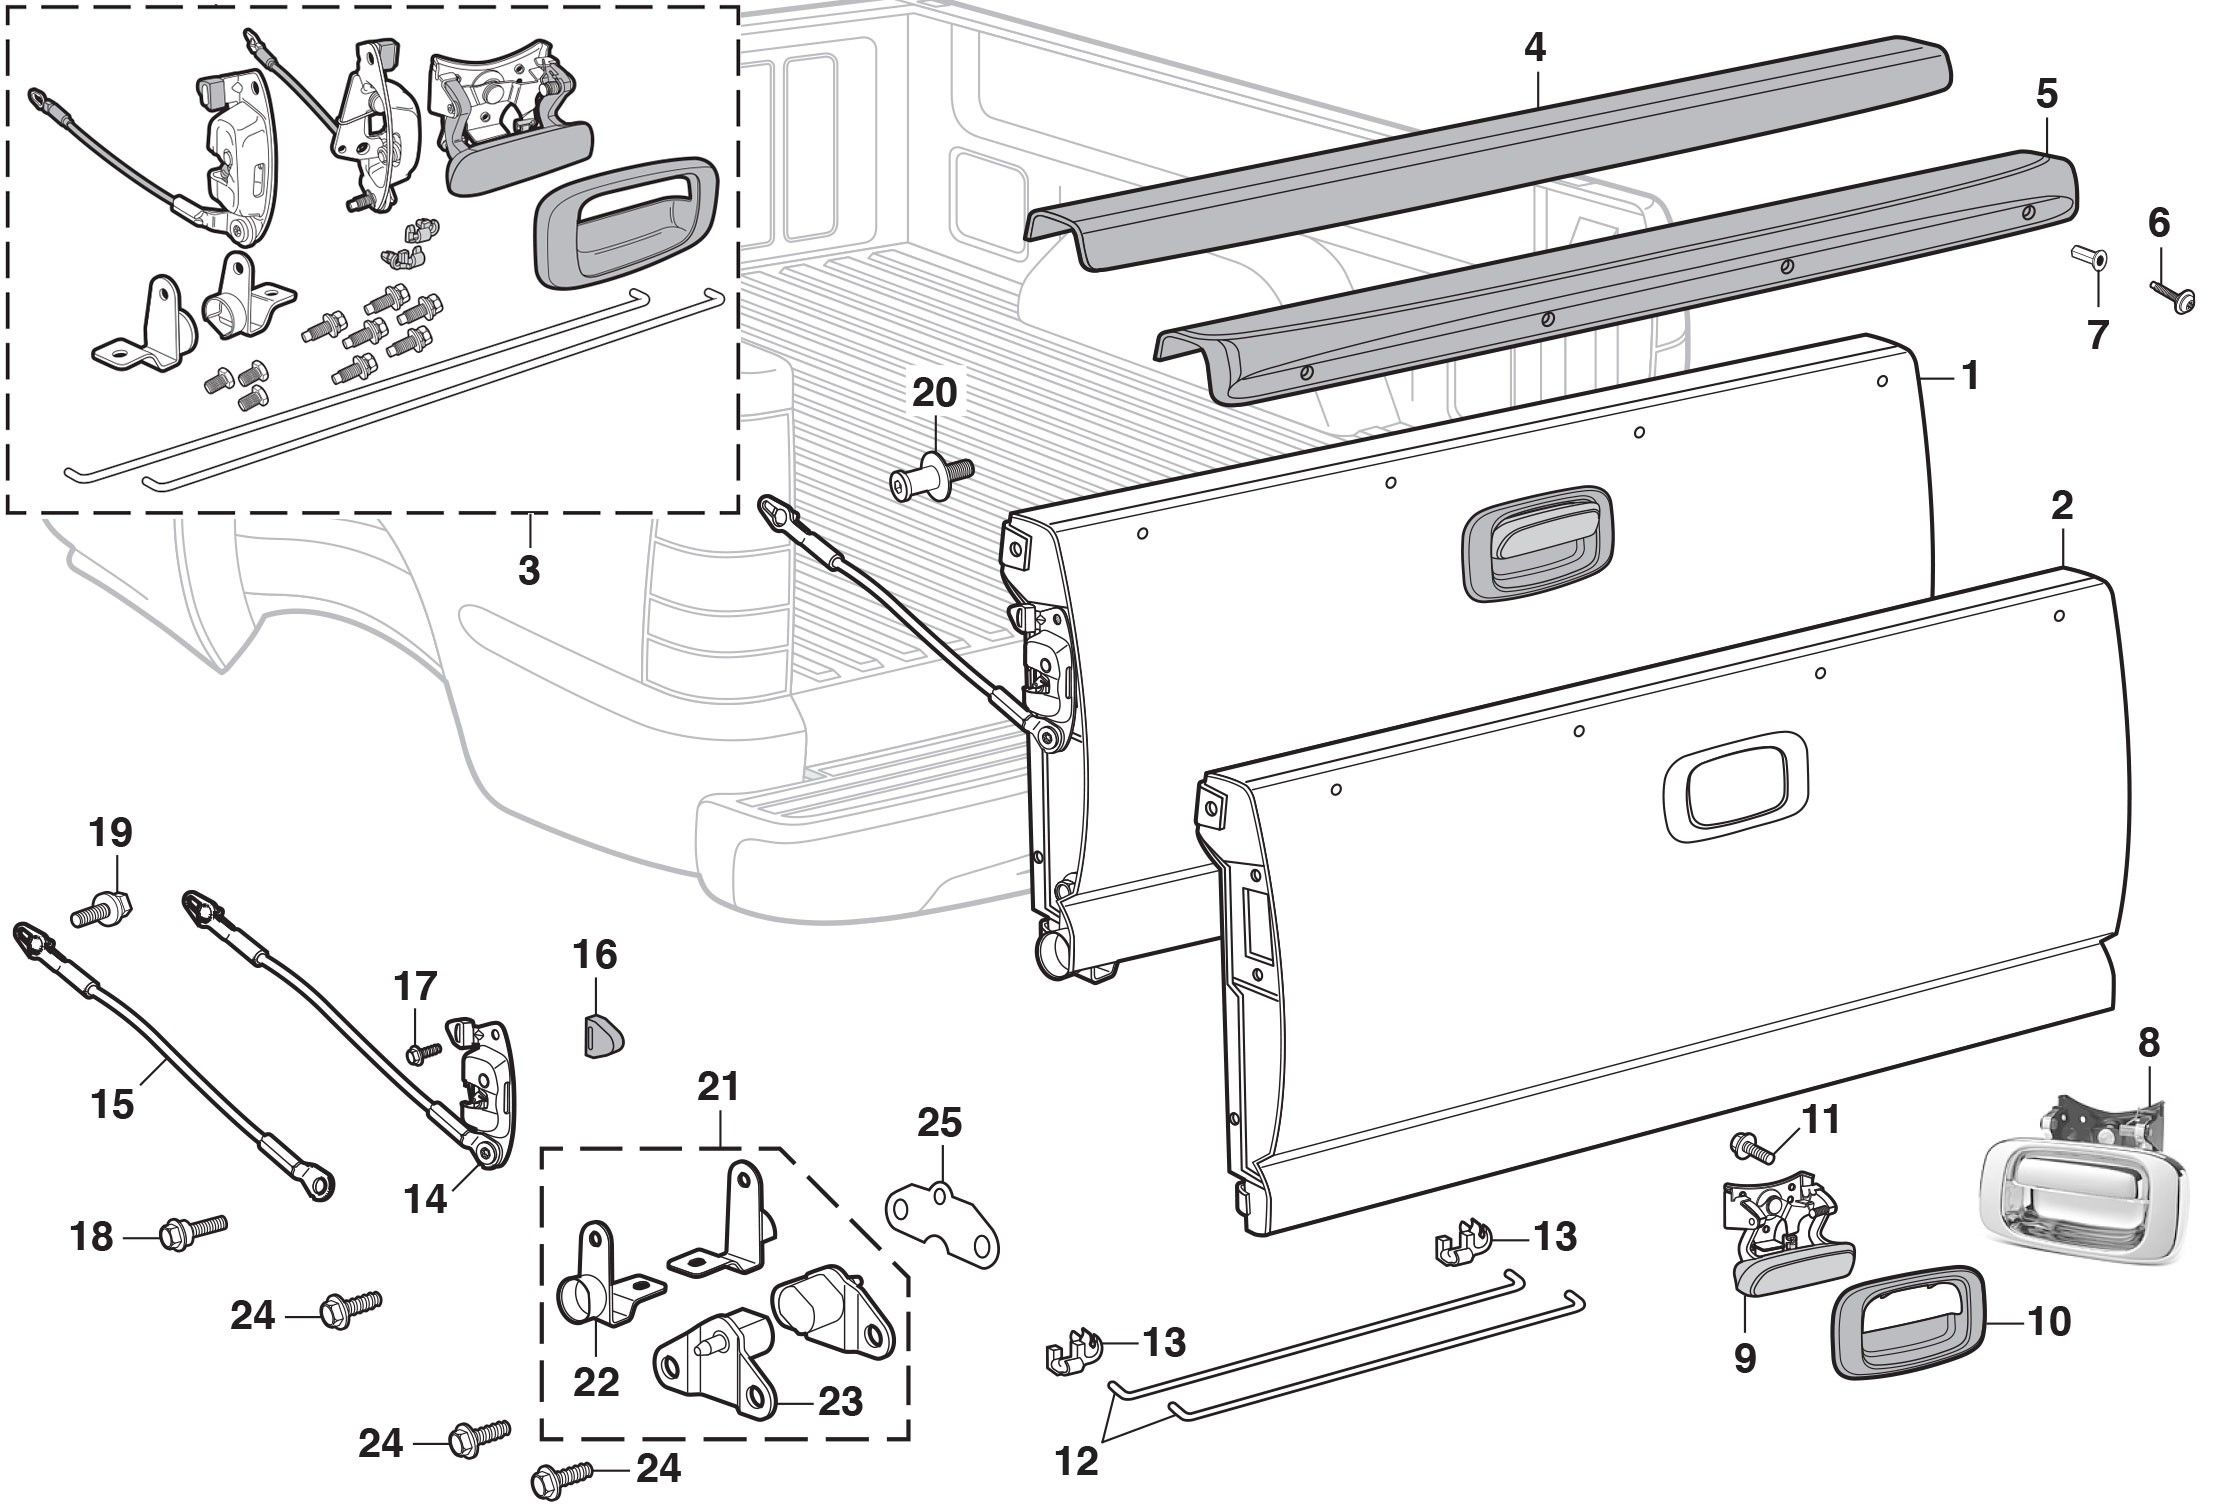
- Bed Components: Bed liner, bed rails, tailgate hardware, and any other components specific to the truck bed.
Key specifications aren’t explicitly stated on the diagram, but understanding what to look for is essential. This includes:
- Part Numbers: The most critical spec! Use this when ordering parts.
- Torque Specifications: Crucial for fasteners! Look for this in a separate repair manual or database, often cross-referenced by part number.
- Material: Understanding if a part is steel, aluminum, plastic, or composite helps with repair methods.
- Paint Codes: Necessary for matching paint when replacing or repairing body panels. Find this on your truck's VIN sticker.
Symbols: Deciphering the Diagram
Understanding the symbols used in the OEM parts diagram is critical for accurate interpretation. These diagrams use a standardized system of lines, colors, and icons to convey information about the parts and their relationships.
- Solid Lines: Typically represent the physical outlines of the parts.
- Dashed Lines: Often indicate hidden components, pathways (e.g., wiring harnesses), or the *location* of parts on a different view.
- Arrows: Show the direction of assembly or disassembly, indicating the order in which parts should be installed or removed.
- Numbers/Callouts: Each part is assigned a unique number, which corresponds to a listing in the parts catalog. This number is used to identify the part and order it correctly.
- Icons: Small icons may represent specific types of fasteners (e.g., bolts, screws, clips), indicating the type and quantity required.
- Colors: While not always present, colors might be used to differentiate between different types of materials or components. For example, different shades of grey might indicate different types of metal.
It's important to remember that the specific symbols used may vary slightly depending on the year and model of the Silverado. Always refer to the legend or key provided with the diagram to ensure accurate interpretation.
How It Works: The Exploded View
The OEM body parts diagram is typically presented as an exploded view. Imagine your Silverado being carefully disassembled, with each component slightly separated from its neighbors. This allows you to see how the parts fit together and how they are connected.
The diagram usually starts with a main assembly (e.g., the door assembly), then breaks it down into its individual components (e.g., door panel, window regulator, latch, hinges). Each component is labeled with a number, which corresponds to a listing in the parts catalog. This listing provides the part number, description, and any relevant specifications.
The diagram also shows the relationship between the parts, indicating how they are connected and how they interact. This information is crucial for understanding how the assembly works and for ensuring that the parts are installed correctly.
Real-World Use: Basic Troubleshooting
Let's say you need to replace a damaged fender. Using the diagram, you can:
- Identify all the fasteners (bolts, screws, clips) that hold the fender in place.
- Determine the correct size and type of replacement fasteners (if needed).
- See the order in which the fasteners should be removed and installed.
- Locate any hidden components (e.g., wiring harnesses, brackets) that need to be disconnected or relocated.
- Identify any potential interference points (e.g., the door, hood) that need to be protected.
Even without the official diagram, troubleshooting starts with observation. Look for signs of:
- Corrosion: Rust can weaken body panels and fasteners.
- Damage: Dents, scratches, and cracks can compromise the structural integrity of the body.
- Misalignment: Gaps or uneven surfaces can indicate underlying problems.
- Loose Fasteners: Check for missing or loose bolts, screws, and clips.
The diagram helps you understand *why* these issues are happening and provides a visual guide for addressing them.
Safety: Watch Out for These Components
Working on body components can be relatively safe, but some areas require extra caution:
- Airbags: Never work on or near airbags without disconnecting the battery and waiting at least 30 minutes. Accidental deployment can cause serious injury. Consult a repair manual for proper airbag deactivation procedures.
- Glass: Always wear safety glasses and gloves when handling glass. Broken glass can cause severe cuts.
- Sharp Edges: Body panels can have sharp edges. Wear gloves to protect your hands.
- Welding: If welding is required, take all necessary safety precautions, including wearing a welding helmet, gloves, and protective clothing. Ensure proper ventilation to avoid inhaling fumes.
- Lifting Heavy Components: Use proper lifting techniques and equipment when handling heavy body panels (e.g., doors, hoods). Get help if needed.
Remember to always prioritize safety when working on your vehicle. If you're unsure about any aspect of the repair, consult a qualified mechanic.
Now, knowing the importance of these diagrams, we have the Chevy Silverado OEM Body Parts Diagram file available for you to download. This invaluable resource will undoubtedly assist you in your repair, restoration, or modification projects.