Parts Of A Car Interior Diagram
So, you're ready to dive deeper into the guts of your ride? Awesome! A detailed car interior diagram is your roadmap to understanding, maintaining, and even modifying the often-overlooked, but crucial, world inside your vehicle. Think of it as a blueprint that unveils the secrets hidden beneath the surfaces, helping you diagnose issues, plan upgrades, and execute repairs with confidence.
Purpose: Why Bother with an Interior Diagram?
Why would an experienced DIYer like yourself need a car interior diagram? Several reasons jump to mind:
- Troubleshooting Electrical Problems: Interior components are increasingly integrated into complex electrical systems. A diagram helps you trace wiring, identify connectors, and pinpoint faulty components like switches, relays, and control modules.
- Planning Modifications: Thinking of upgrading your sound system, installing aftermarket lighting, or adding custom gauges? An interior diagram shows you where to tap into power sources, route wires, and mount components safely.
- Performing Repairs: Need to replace a broken window regulator, repair a damaged dashboard, or fix a faulty climate control system? The diagram provides a visual guide to disassembly, reassembly, and component location.
- Understanding System Functionality: Even if you're not actively working on your car, understanding the interplay between different interior systems – like the airbag system, security system, or infotainment system – can give you a deeper appreciation for your vehicle.
- Sourcing Replacement Parts: The diagram often includes part numbers or detailed illustrations that make it easier to identify and order the correct replacement components.
Key Specs and Main Parts: Decoding the Interior Landscape
A typical car interior diagram will represent the locations and arrangement of numerous key components. Understanding what these components are and their functions is essential.
Main Component Groups:
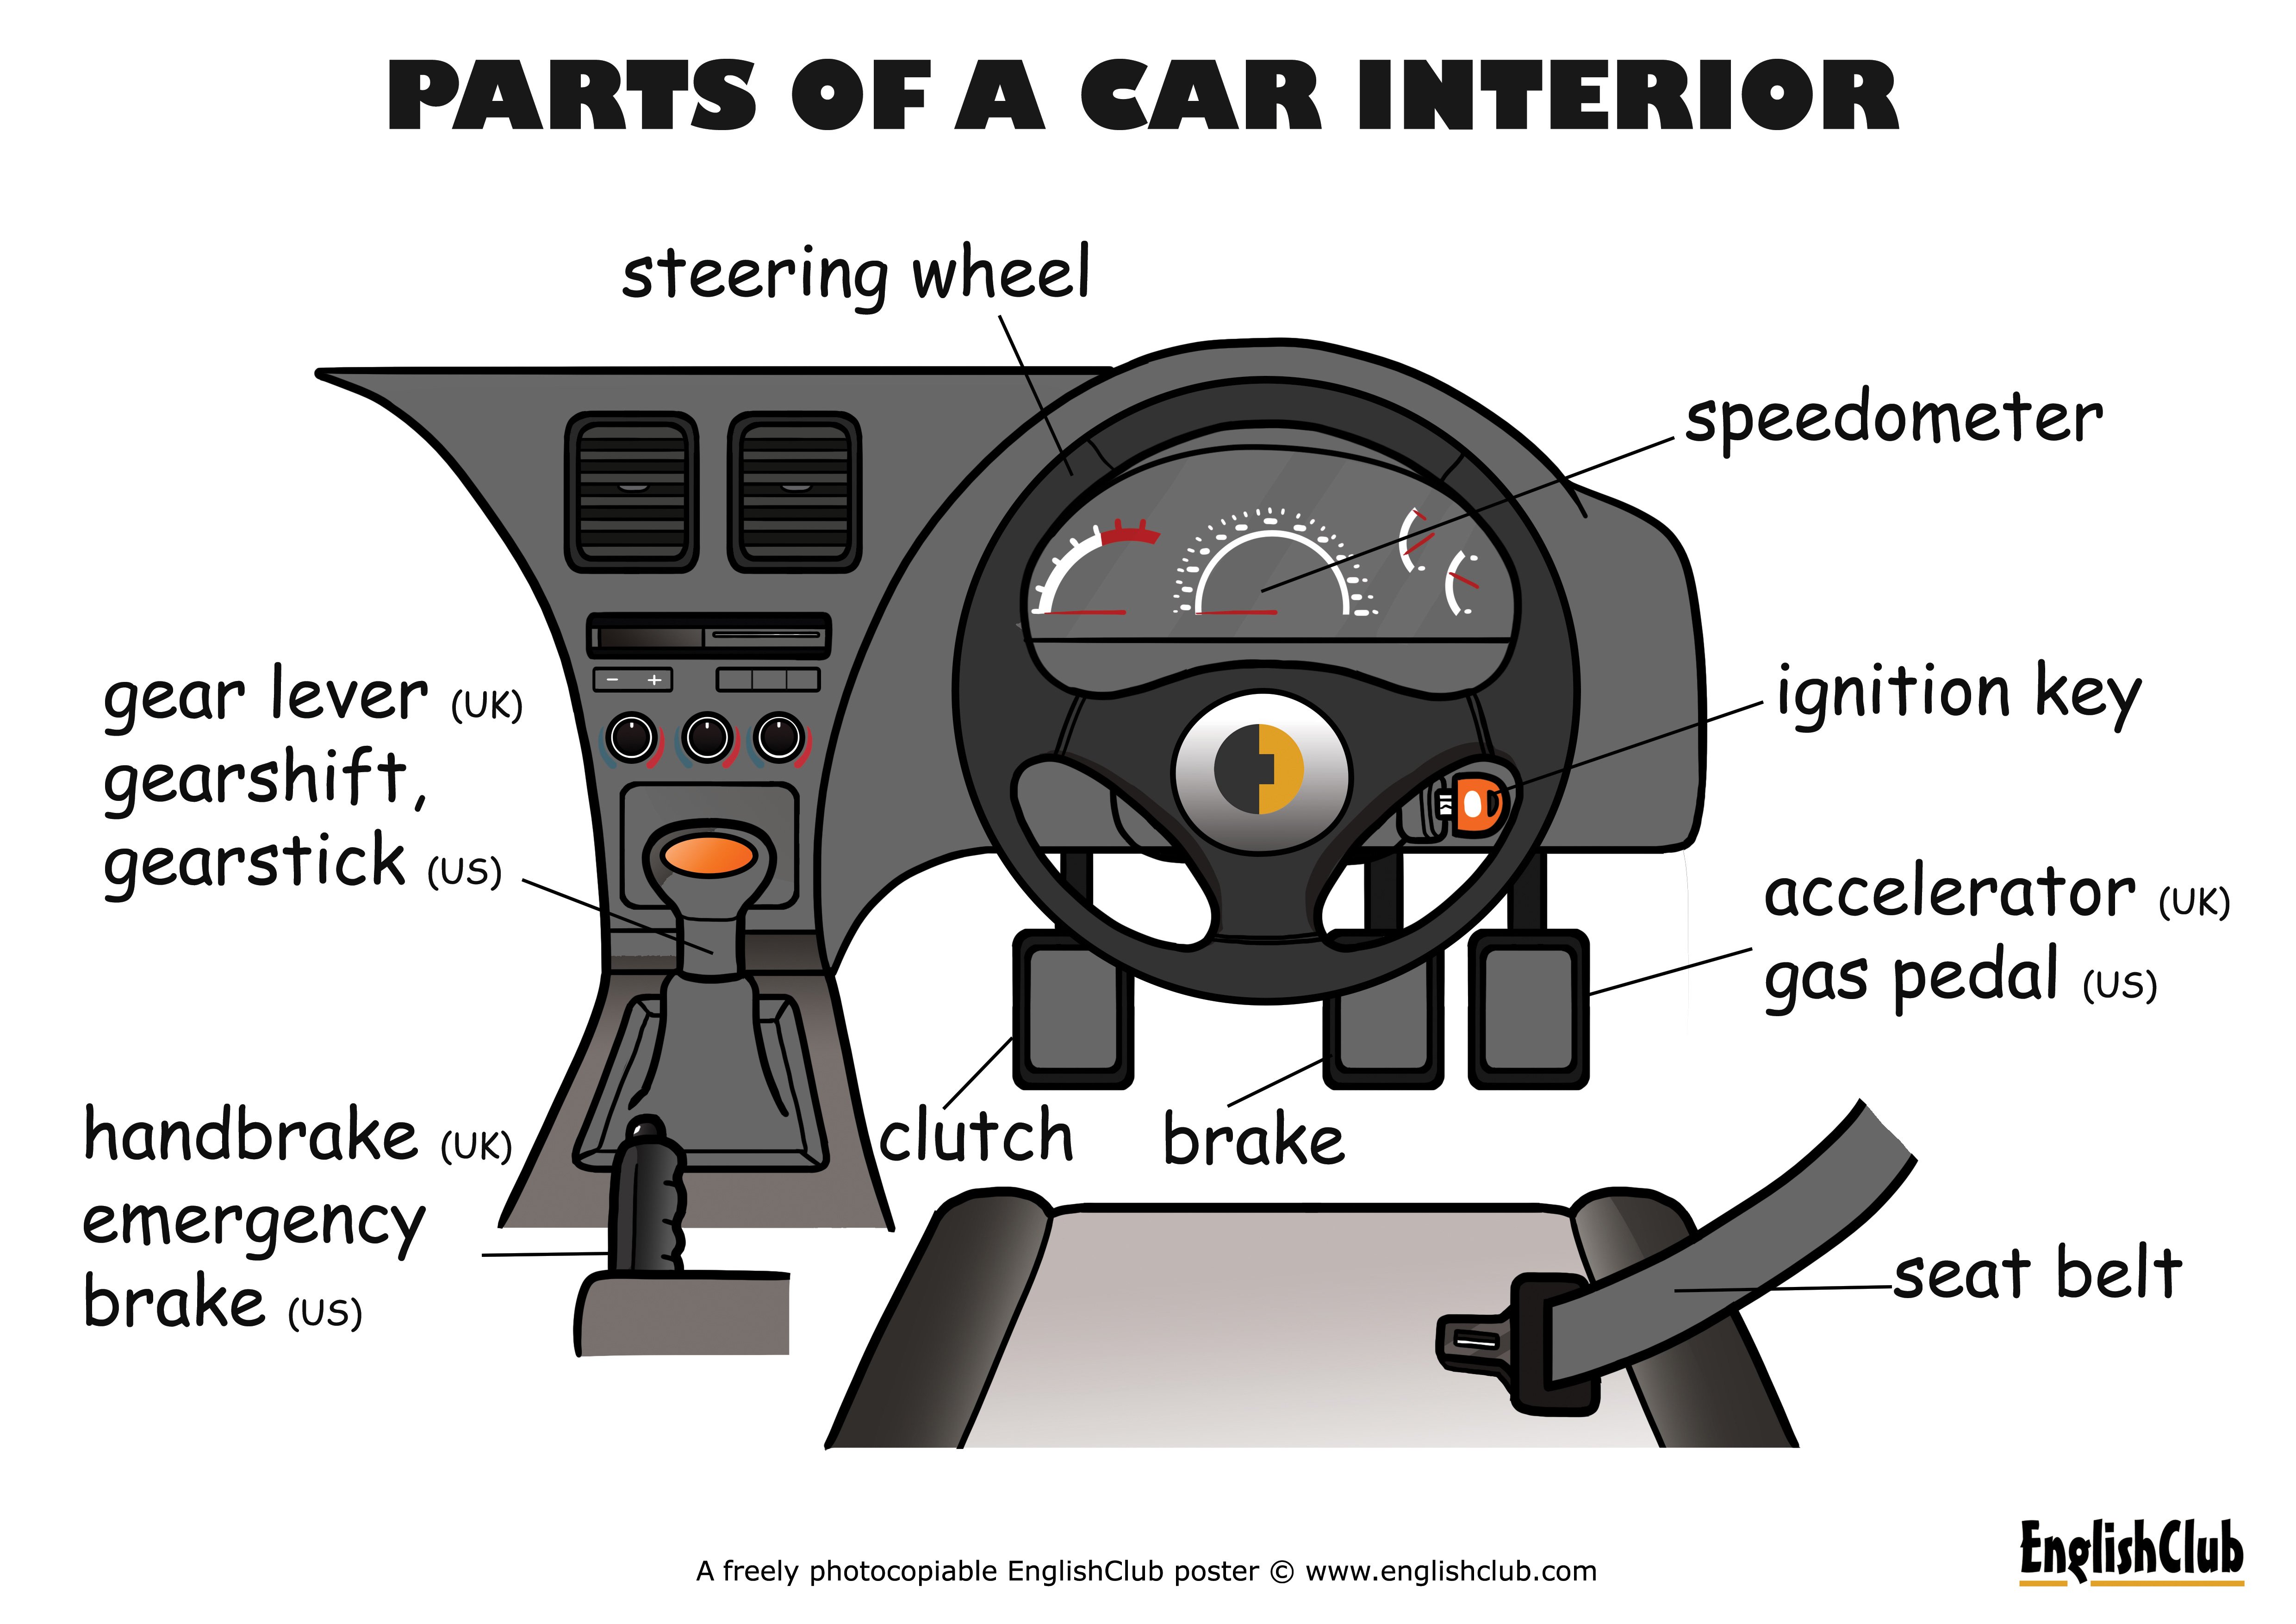
- Dashboard Assembly: This includes the main instrument panel, glove compartment, air vents, and often houses the infotainment system and climate control. Key elements within the dashboard include the instrument cluster (speedometer, tachometer, fuel gauge), various control switches, and supporting structures.
- Seating System: This goes beyond just the seats themselves. The diagram will show the seat frames, adjustment mechanisms (manual or electric), headrests, and any integrated safety features like seatbelt pretensioners or side airbags.
- Door Panels and Hardware: Door panels house the window regulators, door locks, interior handles, speakers, and wiring harnesses. The diagram will show the location and connections of these components.
- Center Console: The center console typically houses the gear selector, parking brake lever, cup holders, storage compartments, and often the infotainment system controls.
- Steering Column and Controls: This includes the steering wheel, steering column switches (for lights, wipers, and turn signals), ignition switch, and airbag system components.
- Headliner and Trim: The headliner provides interior insulation and aesthetics. The diagram may show the location of overhead lights, sun visors, grab handles, and trim panels.
- Floor Covering: This includes the carpets and floor mats. While not often explicitly detailed, the diagram may show the location of mounting points for the seats and center console.
- HVAC System Components (Inside): Air vents, control panels, and potentially the heater core and evaporator core locations.
- Wiring Harnesses: These are the lifelines of your car's interior, connecting all the electrical components. The diagram will show the routing and connections of the main harnesses, as well as any branch circuits.
Key Specs to Note:
- Wiring Gauge: The thickness of the wires, indicated by a number (e.g., 18 AWG), determines the current-carrying capacity. Using the wrong gauge wire can lead to overheating and electrical fires.
- Connector Types: Identifying the type of connector (e.g., Molex, Deutsch) is crucial for proper connections and repairs.
- Grounding Points: Properly grounded electrical components are essential for reliable operation and safety. The diagram will show the location of grounding points.
- Torque Specifications: When reassembling interior components, it's important to tighten fasteners to the correct torque specifications to prevent damage.
Symbols: Deciphering the Diagram's Language
Interior diagrams use a variety of symbols to represent different components, wiring, and connections. Understanding these symbols is key to interpreting the diagram correctly. Here are some common examples:
- Lines:
- Solid Lines: Typically represent wires or physical connections.
- Dashed Lines: May indicate hidden wires or connections.
- Thick Lines: Often indicate higher current-carrying wires or main power feeds.
- Colors: Wires are often color-coded to indicate their function. For example, red may indicate power, black may indicate ground, and other colors may indicate specific signal wires. A legend should always accompany the diagram to explain the color codes.
- Icons:
- Resistors: Represented by a zigzag line.
- Capacitors: Represented by two parallel lines.
- Diodes: Represented by a triangle with a line at the point.
- Switches: Represented by a line that can be open or closed.
- Relays: Represented by a coil and a switch.
- Fuses: Represented by a wavy line inside a rectangle.
Different manufacturers may use slightly different symbols, so always refer to the legend accompanying the specific diagram you're using.
How It Works: Tracing the Flow
Interior diagrams show how different components are connected and how they interact with each other. For example, you can trace the wiring from a headlight switch to the headlights to understand how the headlights are controlled. You can also trace the wiring from the ignition switch to the starter motor to understand how the engine is started.
By understanding the flow of electricity and signals, you can diagnose problems and identify the root cause of malfunctions. For example, if a power window isn't working, you can use the diagram to trace the wiring from the power window switch to the window motor to see if there's a break in the circuit.
Real-World Use: Basic Troubleshooting Tips
Here are some basic troubleshooting tips that you can use with a car interior diagram:
- Start with the Basics: Check the fuse for the affected circuit. A blown fuse is often the simplest explanation for a malfunction.
- Use a Multimeter: A multimeter can be used to measure voltage, current, and resistance. This can help you identify breaks in the circuit or faulty components.
- Check Connections: Make sure all connectors are properly seated and free of corrosion. Loose or corroded connections can cause intermittent problems.
- Isolate the Problem: Try to isolate the problem to a specific component or circuit. For example, if multiple components are not working, the problem may be a common ground or power supply.
Safety: Handle with Care
Working on a car's interior can be dangerous if you're not careful. Here are some safety precautions to keep in mind:
- Disconnect the Battery: Always disconnect the battery before working on electrical components. This will prevent accidental shocks and damage to the electrical system. Specifically when working near the SRS (Supplemental Restraint System) or Airbag systems.
- Airbag Systems: The airbag system is a high-voltage system that can be dangerous if not handled properly. Never probe airbag wiring with a multimeter unless you are specifically trained to do so. Accidental deployment can cause serious injury. Follow manufacturer's instructions for disabling the airbag system before working on it.
- Wear Safety Glasses: Wear safety glasses to protect your eyes from debris and chemicals.
- Use Proper Tools: Use the correct tools for the job to avoid damaging components or injuring yourself.
- Work in a Well-Ventilated Area: Some interior components may contain chemicals that can be harmful if inhaled. Work in a well-ventilated area to avoid exposure.
Remember, when in doubt, consult a qualified mechanic. Some repairs are best left to the professionals.
We've got a sample car interior diagram ready for you. You can download it to get a feel for how these diagrams work. With a little practice and a willingness to learn, you'll be navigating your car's interior like a pro in no time!
Please note: While this article provides a general overview, specific diagrams and procedures will vary depending on the make, model, and year of your vehicle. Always consult the manufacturer's service manual for the most accurate and up-to-date information.