Parts Of A Car Tire Diagram
As an experienced DIYer, you know that understanding the intricate details of your vehicle is crucial for effective maintenance and modifications. One component often overlooked is the car tire. While it may seem simple, a tire is a complex piece of engineering, and understanding its anatomy can significantly improve your ability to diagnose problems, choose the right tires, and even perform minor repairs. This guide will walk you through a detailed car tire diagram, explaining each part and its function in a way that's both technical and approachable.
Purpose of a Car Tire Diagram
Why bother with a tire diagram? There are several key reasons:
- Troubleshooting and Diagnosis: A diagram allows you to quickly identify potential issues based on visual cues. For instance, uneven wear patterns can point to specific suspension or alignment problems.
- Informed Tire Selection: Understanding tire specifications and constructions, such as the ply rating or tread pattern, helps you choose the best tires for your driving style and vehicle.
- Repair and Maintenance: While tire repair is often best left to professionals, knowing the location of vulnerable areas like the sidewall can guide your preventative maintenance efforts and help you avoid potentially dangerous situations.
- Learning and Education: Expanding your knowledge of automotive technology empowers you to make smarter decisions about your vehicle and communicate effectively with mechanics.
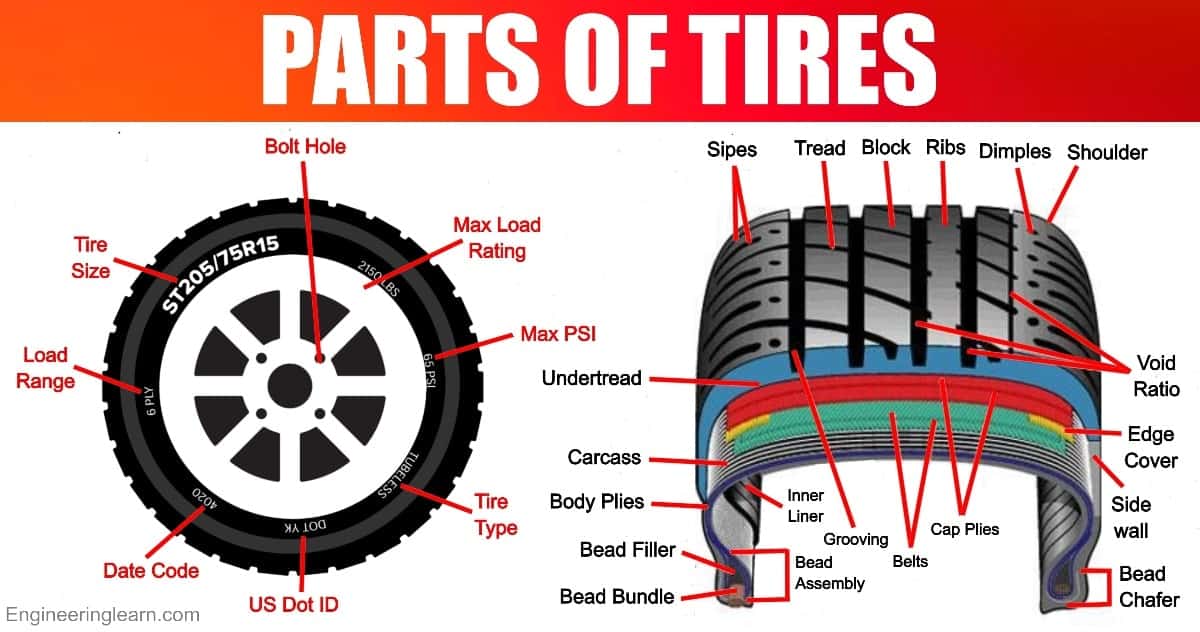
Key Specs and Main Parts
Let's break down the key components you'll find on a typical car tire diagram:
Main Components:
- Tread: This is the part of the tire that makes contact with the road. It's designed with grooves and patterns to provide grip, channel water, and resist wear. The tread depth is a crucial measurement, indicating the remaining grip and safety margin.
- Shoulder: The rounded edge of the tire where the tread meets the sidewall. The shoulder plays a role in cornering grip and heat dissipation.
- Sidewall: The side of the tire, connecting the tread to the bead. It contains important information such as the tire size, load rating, and speed rating. The sidewall's flexibility influences ride comfort.
- Bead: The reinforced edge of the tire that seals against the wheel rim. The bead is usually made of high-strength steel wires encased in rubber.
- Carcass (or Casing): The main body of the tire, providing strength and shape. It's made of multiple layers of fabric cords (plies) embedded in rubber. These plies are usually made of materials like polyester, nylon, or rayon.
- Belt: Layers of reinforcing material (usually steel or aramid) placed between the carcass and the tread. Belts provide rigidity to the tread, improving handling and reducing rolling resistance.
- Inner Liner: A layer of airtight rubber that prevents air from escaping the tire. In tubeless tires, the inner liner replaces the need for an inner tube.
Key Specifications:
These specifications are usually molded onto the sidewall and are essential for selecting the right tires:
- Tire Size: A code that indicates the tire's width, aspect ratio, and rim diameter (e.g., 225/45R17).
- Load Index: A numerical code that represents the maximum weight a tire can carry.
- Speed Rating: A letter code that indicates the maximum speed a tire is designed to handle safely.
- UTQG (Uniform Tire Quality Grading): A rating system developed by the US Department of Transportation that evaluates a tire's treadwear, traction, and temperature resistance.
- DOT Code (Department of Transportation): Indicates that the tire meets DOT safety standards and includes the tire's manufacturing date.
Symbols – Lines, Colors, and Icons
Tire diagrams often use symbols to represent different materials, construction techniques, and areas of stress. Here's a general guideline:
- Solid Lines: Usually indicate the outer surface or boundaries of a component.
- Dashed Lines: Might represent internal layers, cords, or reinforcements.
- Hatching or Cross-Hatching: Used to differentiate between different materials within the tire construction, like steel belts versus rubber compounds.
- Arrows: Can indicate the direction of force or stress within the tire.
- Colors: Some diagrams use color to distinguish between different plies or layers within the tire carcass. Always refer to the diagram's legend for color key.
- Icons: Small icons may represent specific features, such as sipes (small slits in the tread) for enhanced wet traction or wear indicators.
Important: The specific symbols used can vary between different diagrams and manufacturers. Always refer to the diagram's legend for accurate interpretation.
How It Works
A car tire's function boils down to providing a flexible, durable, and grippy interface between the vehicle and the road surface. Here's a simplified explanation:
- Air Pressure: Inflated air within the tire supports the vehicle's weight. Proper inflation is critical for load-carrying capacity, handling, and fuel efficiency.
- Carcass Strength: The layers of cords within the carcass provide the tire with its strength and shape, resisting deformation under load.
- Belt Rigidity: The belts stiffen the tread, improving steering response and reducing rolling resistance. They also help distribute forces evenly across the tread.
- Tread Grip: The tread pattern provides grip through a combination of friction and mechanical interlocking with the road surface. Grooves channel water away, preventing hydroplaning.
- Sidewall Flex: The sidewall allows the tire to absorb bumps and vibrations, contributing to ride comfort.
All these elements work together to ensure a safe, comfortable, and efficient driving experience. Any failure in one of these components can compromise the tire's performance and safety.
Real-World Use – Basic Troubleshooting Tips
Armed with your newfound knowledge, you can use the tire diagram to diagnose common problems:
- Uneven Tread Wear:
- Edge wear can indicate underinflation or excessive cornering.
- Center wear suggests overinflation.
- One-sided wear often points to alignment issues.
- Sidewall Bulges: A bulge in the sidewall indicates damage to the internal cords and represents a serious safety hazard. The tire should be replaced immediately.
- Cracks in the Sidewall: Surface cracks, especially on older tires, can indicate dry rot and weakening of the rubber compound.
- Foreign Objects: Check the tread for nails, screws, or other debris that could cause a puncture.
Safety – Highlight Risky Components
Certain parts of the tire are more vulnerable to damage and pose greater safety risks:
- Sidewall: The sidewall is the most susceptible to impacts and cuts. Damage to the sidewall can compromise the tire's structural integrity and lead to a blowout.
- Bead: A damaged or improperly seated bead can cause air leaks and tire failure. During tire installation, ensure the bead is properly seated and lubricated.
- Inner Liner: Punctures or damage to the inner liner can lead to slow leaks or sudden deflation.
Important Safety Note: Always inspect your tires regularly for signs of damage. If you suspect any tire damage, consult a qualified tire professional for evaluation and repair or replacement. Never attempt to repair a damaged sidewall.
By understanding the components and construction of your car's tires, you can better maintain your vehicle's safety and performance. You're now equipped to discuss tire issues more knowledgeably with professionals and make informed decisions about tire selection and maintenance.
To further assist you, we have a detailed car tire diagram available for download. It includes labeled components and specifications for common tire types. Having this file handy will serve as a useful reference during inspections and troubleshooting.