
Parts Of A Car Under The Hood Diagram
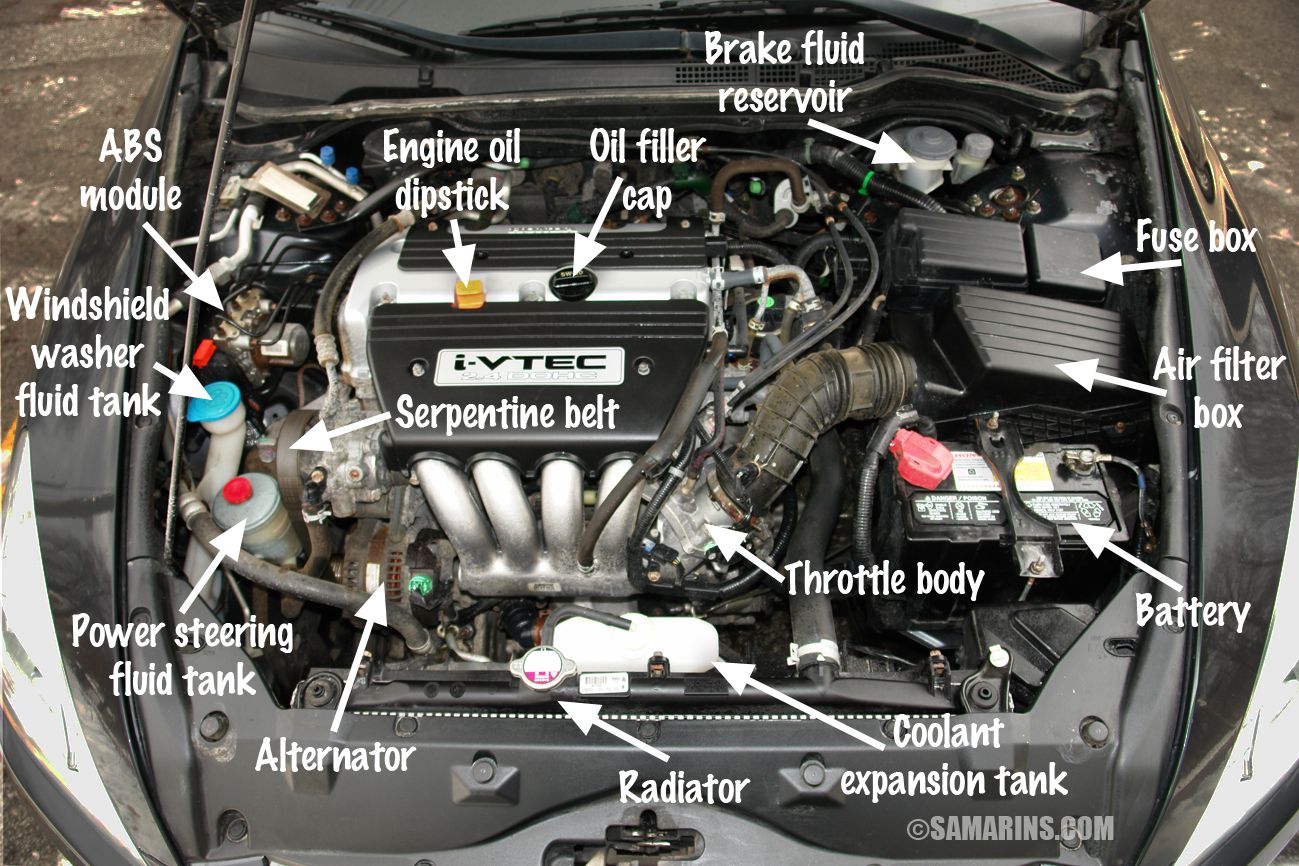
For any seasoned DIY mechanic, gearhead, or even a car owner just looking to understand their vehicle better, a comprehensive under-the-hood diagram is an indispensable tool. It's more than just a picture; it's a roadmap to understanding the intricate workings of your car's engine bay. Think of it as the blueprint to your mechanical adventures, whether you're diagnosing a strange noise, planning a performance upgrade, or simply performing routine maintenance.
Why You Need an Under-the-Hood Diagram
Having a clear and accurate under-the-hood diagram offers several key advantages:
- Efficient Repairs: Quickly locate and identify components, saving time and preventing accidental damage to nearby parts.
- Accurate Diagnosis: Correlate symptoms with specific parts shown in the diagram, guiding your troubleshooting process.
- Maintenance Planning: Use the diagram to identify service points like fluid reservoirs, filter locations, and belt routing.
- Modification Projects: Visualizing the layout of the engine bay is crucial when planning modifications, custom fabrications, or performance upgrades. You can asses available space, mounting points and existing cable and hose routing.
- Educational Value: Understanding the location and function of each component deepens your understanding of automotive technology.
Key Specs and Main Parts in a Typical Diagram
Under-the-hood diagrams vary depending on the vehicle's make, model, and year. However, most share common elements and depict key components. Let's examine what to look for:
Essential Engine Components
- Engine Block: The foundation of the engine, housing the cylinders, pistons, and crankshaft. The diagram usually shows the general location and surrounding components.
- Cylinder Head: Sits atop the engine block and contains the valves, camshaft(s), and spark plugs (in gasoline engines) or fuel injectors (in diesel engines).
- Intake Manifold: Directs air into the engine cylinders. The diagram highlights its position and connection to the throttle body.
- Exhaust Manifold: Collects exhaust gases from the cylinders and directs them to the exhaust system.
- Throttle Body: Controls the amount of air entering the engine. You’ll find the throttle position sensor (TPS) and potentially the idle air control (IAC) valve nearby.
- Fuel Injectors (Gasoline Engines) or Injector Pump (Diesel Engines): Deliver fuel into the cylinders. The diagram shows their location relative to the intake manifold or engine block.
- Spark Plugs (Gasoline Engines): Ignite the air-fuel mixture in the cylinders. The diagram indicates their position on the cylinder head.
Cooling System Components
- Radiator: Cools the engine coolant. The diagram highlights its location at the front of the engine bay and its connections to the radiator hoses.
- Radiator Hoses: Carry coolant between the engine and radiator. The upper and lower radiator hoses are usually labeled.
- Thermostat Housing: Houses the thermostat, which regulates engine temperature. The diagram shows its location and connection to the radiator hoses.
- Coolant Reservoir: Holds excess coolant and allows for expansion and contraction of the coolant as the engine heats up and cools down.
Electrical System Components
- Battery: Provides electrical power to start the engine and operate electrical accessories. The diagram shows its location and the positive and negative terminals.
- Alternator: Charges the battery and provides electrical power while the engine is running.
- Starter Motor: Cranks the engine to start it.
- Fuse Box/Relay Box: Contains fuses and relays that protect electrical circuits. The diagram shows its location and may even include a simplified fuse layout.
Other Important Components
- Power Steering Pump: Provides hydraulic pressure for power steering.
- Air Conditioning Compressor: Compresses refrigerant for the air conditioning system.
- Brake Master Cylinder: Provides hydraulic pressure for the brakes.
- Washer Fluid Reservoir: Holds washer fluid for cleaning the windshield.
Diagram Symbols: Deciphering the Code
Under-the-hood diagrams use a variety of symbols to represent different components and connections. Understanding these symbols is essential for interpreting the diagram accurately.
- Lines: Represent hoses, wires, and mechanical linkages. Different line styles (solid, dashed, dotted) may indicate different types of connections or fluids.
- Colors: Often used to distinguish different types of fluids or electrical circuits. For example, red might indicate a high-pressure line, while blue might indicate a low-pressure line. Wiring diagrams often use colors to identify the function of individual wires.
- Icons: Represent specific components, such as the battery, radiator, or alternator. These icons are usually standardized across different diagrams. The specific symbol used can vary. A square with wavy lines, for example, generally represents a resistor.
- Labels: Abbreviated labels identify the component or circuit being represented. Common abbreviations include "ECT" for Engine Coolant Temperature sensor, "MAF" for Mass Airflow sensor, and "IAC" for Idle Air Control valve.
How It Works: Putting the Diagram to Use
The core principle is simple: locate the component of interest on the diagram and then correlate that location to the physical component under the hood of your car. Start by familiarizing yourself with the overall layout of the engine bay. Compare the diagram to the actual components under your hood. Pay attention to the relative positions of major components like the engine, battery, and radiator.
Once you have a general understanding of the layout, you can use the diagram to locate specific components. For example, if you need to replace the mass airflow (MAF) sensor, find it on the diagram. The diagram will show its location relative to other components and may also indicate the wiring harness connector. Use this information to locate the MAF sensor under the hood and disconnect the wiring harness.
Advanced diagrams often provide information about wiring harnesses, vacuum lines, and fluid lines. This can be invaluable when troubleshooting electrical or vacuum-related problems.
Real-World Use: Basic Troubleshooting Tips
Let's say your engine is overheating. Using the diagram, you can start by visually inspecting the radiator hoses for leaks or damage. Check the coolant level in the coolant reservoir. Locate the thermostat housing and feel if it's getting hot when the engine is running. These simple checks, guided by the diagram, can help you narrow down the cause of the overheating problem.
Another example: your car is running rough. The diagram can help you locate the spark plugs. Inspecting the spark plugs can reveal clues about the engine's condition. Fouled or damaged spark plugs can cause a rough running engine.
Safety First: Identifying Risky Components
Working under the hood involves certain risks. The diagram can help you identify potentially dangerous components:
- Electrical Components: The battery can deliver a dangerous electrical shock. Always disconnect the negative battery cable before working on electrical components. Never touch exposed wires or connectors.
- High-Pressure Lines: Power steering and air conditioning systems contain high-pressure lines that can rupture and cause serious injury. Be cautious when working near these lines.
- Hot Surfaces: The engine, exhaust manifold, and radiator can become extremely hot during operation. Allow the engine to cool down completely before working on these components.
- Moving Parts: The engine fan, belts, and pulleys can cause serious injury. Always disconnect the negative battery cable before working near moving parts.
- Fuel System: Gasoline is highly flammable. Avoid open flames or sparks when working on the fuel system. Relieve fuel pressure before disconnecting fuel lines.
Always consult your vehicle's repair manual and follow all safety precautions when working under the hood.
We have a comprehensive under-the-hood diagram file that can be tailored to many vehicles. You can download it to have a detailed resource for your next automotive project or repair.