Parts Of A Window Frame Diagram
So, you're looking to get your hands dirty with some window frame work, eh? Smart move. Whether you're chasing down a pesky draft, replacing a shattered pane, or just trying to understand the beast a little better, a solid understanding of a window frame diagram is your starting point. Think of it like the schematics for your engine – you can tinker blindly, but you'll get much better (and safer) results if you know what's what. We've got a detailed diagram ready for you to download (link at the end!), but first, let's break it down. It will help you understand the diagram better.
Why Bother with a Window Frame Diagram?
Seriously, why should you care about a diagram? Because knowledge is power, my friend. A good diagram gives you a clear visual representation of all the components and how they fit together. This is critical for:
- Accurate Repairs: Knowing the names and functions of each piece means you can order the correct replacement parts. No more guessing!
- Effective Troubleshooting: Identifying the root cause of a problem (leaks, sticking windows, etc.) becomes much easier when you can visualize the system.
- Informed Modifications: Thinking about upgrading to double-paned glass or adding weather stripping? The diagram will show you exactly how the existing frame is constructed, helping you plan your mods without creating a disaster.
- Avoiding Costly Mistakes: A little knowledge can save you a lot of money. By understanding the diagram, you're less likely to break something or make an irreversible error.
- Plain Old Learning: Sometimes, it's just satisfying to know how things work, right?
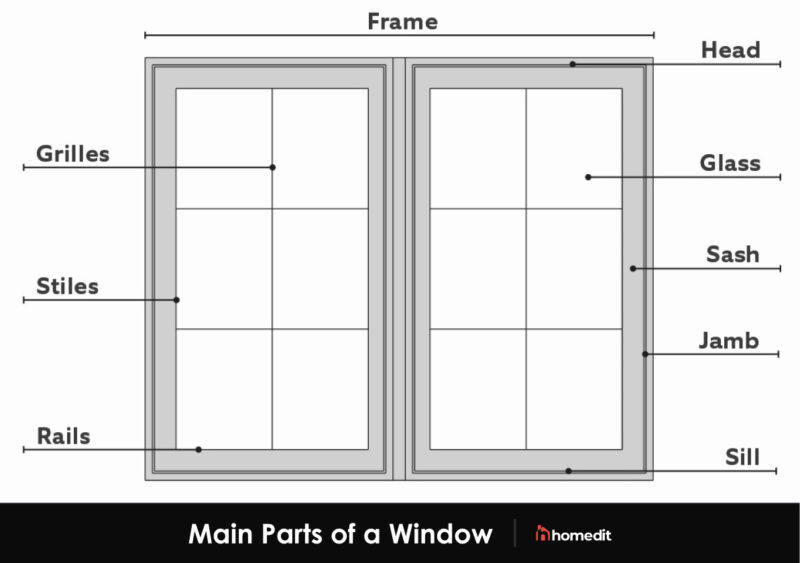
Key Specs and Main Parts of a Window Frame
Let's dive into the anatomy. A window frame isn't just a simple rectangle; it's a carefully engineered system. Here are the key components you'll find in most diagrams:
The Outer Frame:
- Head (or Head Jamb): The horizontal member forming the top of the window frame.
- Sill: The horizontal member forming the bottom of the window frame, often sloped slightly to shed water. This is typically the most vulnerable part of the frame.
- Side Jambs: The vertical members forming the sides of the window frame.
- Exterior Casing: The trim that surrounds the window frame on the outside, covering the gap between the frame and the wall. It provides a weather-tight seal and aesthetic appeal.
- Brickmould: Similar to casing, but often wider and more decorative, used primarily when the window is installed in a brick or masonry wall.
The Inner Frame (Sash):
- Sash: The part of the window that holds the glass. It can be fixed or movable (sliding, pivoting, etc.).
- Rails: The horizontal members of the sash (top and bottom).
- Stiles: The vertical members of the sash (left and right).
- Glazing (Glass): The glass pane itself. Diagrams will often indicate the type of glazing (single-pane, double-pane, low-E, etc.).
- Glazing Beads (or Muntins): Strips of wood or other material that hold the glass in place within the sash. In older windows, these can be quite ornate.
Hardware and Other Components:
- Weather Stripping: Seals used to prevent air and water infiltration around the sash and frame. Different types exist (foam, felt, vinyl) and are often depicted in detail on the diagram.
- Balance System: Found in double-hung windows, these mechanisms (springs, cords, or spiral balances) allow the sash to be held open at any position. The diagram will show the location and type of balance.
- Locking Mechanism: The latch that secures the sash to the frame.
- Drip Cap: A small metal or plastic flashing installed above the head jamb to divert water away from the window.
Symbols and Conventions in a Window Frame Diagram
Diagrams use a visual language, so understanding the symbols is crucial:
- Solid Lines: Typically represent visible edges of the frame components.
- Dashed Lines: Often indicate hidden edges or features behind other parts. These might show the location of internal bracing or the path of weather stripping.
- Different Colors: Can be used to differentiate materials (wood, metal, plastic) or to highlight specific components being discussed in the diagram.
- Hatching/Cross-hatching: Indicates the type of material being used. For example, a specific pattern might represent a particular grade of wood.
- Arrows and Callouts: Used to point to specific parts and provide labels or dimensions.
- Dimensions: Are critical, especially if you're replacing parts. They'll be expressed in inches (") or millimeters (mm). Pay close attention to tolerances.
- Cutaway Views: Sometimes, a diagram will show a cross-section of the frame to reveal internal construction details.
Key Specs: Beyond the visual elements, look for written specifications, such as:
- Material Types: Wood (pine, oak, etc.), vinyl, aluminum, composite.
- Glass Type: Single-pane, double-pane, tempered, low-E.
- U-Factor: Measures the window's insulation value (lower is better).
- Air Leakage Rate: How much air leaks through the window (lower is better).
How It Works: The Window Frame as a System
A window frame isn't just a collection of parts; it's a system designed to perform several key functions:
- Structural Support: The frame provides the necessary support to hold the glass and withstand wind loads.
- Weather Sealing: The frame, along with weather stripping and glazing, creates a barrier against air and water infiltration.
- Operation: For operable windows, the frame allows the sash to open and close smoothly.
- Aesthetics: The frame contributes to the overall appearance of the building.
All of these functions are interconnected. For example, if the sill rots, it weakens the structural support, which can lead to air leaks and difficulty in operating the window. The diagram helps you see these relationships.
Real-World Use: Basic Troubleshooting Tips
Armed with your diagram, you can tackle common window problems:
- Drafts: Check the weather stripping. The diagram will show you where it's located and how it should be positioned. If it's damaged or missing, replace it.
- Leaks: Inspect the sill, head jamb, and side jambs for cracks or rot. Pay attention to the sealant between the frame and the wall. The diagram will show you the best places to apply sealant.
- Sticking Windows: Look for paint buildup between the sash and the frame. The diagram will help you identify the areas that need to be sanded or scraped. Also, check the balance system (if applicable).
- Condensation: Indicates high humidity or a failing seal in double-paned windows. The diagram will show you the construction of the sash and glass, helping you decide if repair is possible or replacement is necessary.
Safety Considerations
Window work can be dangerous, so take these precautions:
- Glass: Always wear safety glasses and gloves when handling glass. Broken glass can cause serious cuts.
- Lead Paint: Older windows may contain lead paint. Take appropriate precautions to avoid exposure (wear a respirator, use wet sanding techniques, etc.).
- Heights: If you're working on a second-story window, use a sturdy ladder and have someone spot you.
- Balance Systems: Be careful when disassembling balance systems, as they can be under tension. Incorrect handling can cause injury.
Remember, if you're unsure about any aspect of the repair, consult a professional.
Download Your Window Frame Diagram
Now that you've got a handle on the terminology and concepts, you're ready to put your knowledge to work. We've prepared a detailed window frame diagram that you can download and use as a reference. It includes labeled parts, common symbols, and helpful annotations. Good luck with your project!
[Hyperlink to download the diagram file]