Positive Crankcase Ventilation System Diagram
Alright, let's dive into the Positive Crankcase Ventilation (PCV) system. If you're serious about wrenching on your car, understanding this system is crucial. A PCV system diagram is your roadmap – it helps you diagnose problems, perform maintenance, and even modify your engine safely. We're going to break down everything from the components to the symbols, so you can confidently tackle PCV-related tasks.
Why Bother with a PCV Diagram?
Think of a PCV diagram as the schematic for your car's breathing. It visually represents the entire system, showing you exactly where each component is located, how they connect, and the direction of airflow. Without it, you're essentially working blind. A diagram is essential for:
- Diagnosis: Identifying leaks, blockages, or faulty components. A diagram lets you trace the system and pinpoint the source of a problem efficiently.
- Repair: Ensuring you're replacing parts correctly and connecting them in the right order. Especially when dealing with older vehicles where vacuum lines can become brittle and disconnected.
- Modification: Planning and executing engine modifications, like installing a catch can, without disrupting the PCV's proper function. Understanding the airflow is paramount.
- Learning: Gaining a deeper understanding of how your engine operates and how the PCV system contributes to its overall health and emissions control.
We have a detailed PCV system diagram available for download at the end of this article. Having it handy while you read will definitely enhance your understanding.
Key Specs and Main Parts
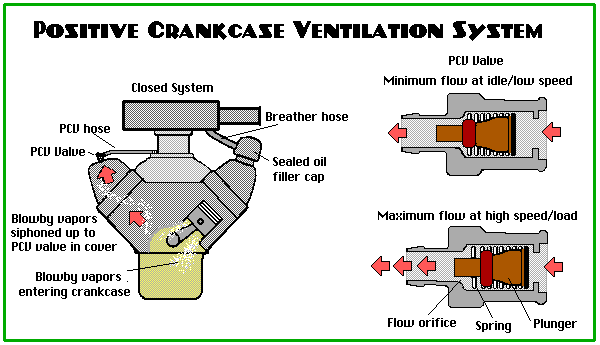
The PCV system's primary job is to vent crankcase gases – which are a mix of unburnt fuel, combustion byproducts, and oil vapors – back into the intake manifold to be re-burned. This prevents pressure buildup in the crankcase, which could damage seals and reduce engine performance. Let's look at the key components:
- PCV Valve: The heart of the system. This spring-loaded valve regulates the flow of crankcase gases into the intake manifold. It's designed to only allow flow in one direction, preventing backfires from entering the crankcase. Failure of this valve is a common cause of issues.
- Crankcase Ventilation Hose(s): These hoses connect the crankcase (usually through the valve cover) to the PCV valve and/or the intake manifold. These hoses carry the crankcase gases.
- Intake Manifold Connection: Where the crankcase gases are drawn into the intake manifold, typically via a vacuum port.
- Fresh Air Inlet: Usually a hose connected to the air filter housing or intake ducting. This allows filtered fresh air to enter the crankcase, displacing the gases that need to be vented.
- Oil Separator (Sometimes): Some engines, especially turbocharged ones, have an oil separator to prevent excessive oil from being drawn into the intake manifold. This helps prevent oil buildup in the intake system and on the intake valves, reducing potential for carbon deposits.
Understanding the path and function of each of these components is key to effective troubleshooting.
Decoding the Symbols: The Diagram's Language
PCV system diagrams use specific symbols to represent components and connections. Here's a breakdown:
- Solid Lines: Typically represent vacuum hoses or tubing. The thickness of the line may indicate the hose diameter.
- Dotted Lines: Can represent control lines, or less critical connections. Always check the diagram's legend.
- Arrows: Indicate the direction of airflow within the hoses. This is crucial for understanding how the system operates.
- Component Symbols: Specific shapes represent each component. For example, the PCV valve might be represented by a small cylinder with a spring symbol inside. The diagram should have a legend that explains each symbol.
- Colors: Some diagrams use colors to distinguish between different types of hoses or connections. Again, refer to the diagram's legend.
Always refer to the diagram's legend to correctly interpret the symbols. Don't assume anything; a wrong interpretation can lead to misdiagnosis and incorrect repairs.
How It Works: The PCV System in Action
The PCV system is relatively simple in principle, but its operation is critical. Here's how it works:
- As the engine runs, blow-by gases (unburnt fuel and combustion byproducts) leak past the piston rings and into the crankcase.
- These gases create pressure in the crankcase.
- Fresh air is drawn into the crankcase through the fresh air inlet, displacing the blow-by gases.
- The blow-by gases are then drawn out of the crankcase through the PCV valve and into the intake manifold.
- The PCV valve regulates the flow of these gases, preventing excessive vacuum from being applied to the crankcase.
- The gases are then re-burned in the engine's cylinders, reducing emissions.
The vacuum created by the engine's intake sucks the blow-by gases through the system. The PCV valve is essential for metering this flow; too much vacuum can suck oil into the intake, while too little can cause pressure buildup in the crankcase.
Real-World Use: Troubleshooting Tips
Here are some basic troubleshooting tips, using the PCV diagram as your guide:
- Vacuum Leaks: Inspect all hoses and connections for cracks, leaks, or loose fittings. A vacuum leak can cause rough idling, poor performance, and increased emissions. Trace each hose on the diagram and physically inspect it.
- Blocked PCV Valve: A clogged PCV valve can cause crankcase pressure to build up, leading to oil leaks and potentially damaging seals. Remove the valve and shake it. You should hear a rattling sound, indicating that the internal plunger is moving freely. If it's clogged, replace it. The diagram will show you its exact location.
- Hose Blockages: Check for kinks or obstructions in the hoses. A blocked hose can restrict airflow and cause similar problems to a clogged PCV valve. Disconnect the hoses and blow compressed air through them to clear any blockages. Refer to the diagram to ensure you're checking the correct hoses.
- Excessive Oil Consumption: If you're burning a lot of oil, it could be a sign that the PCV system is malfunctioning and drawing excessive oil into the intake. Consider installing an oil catch can to prevent oil from reaching the intake manifold. Use the diagram to plan the installation, ensuring the catch can is correctly plumbed into the system.
Safety First: Risky Components
While the PCV system is generally safe, there are a few components that require extra caution:
- Hot Surfaces: Some PCV hoses and components may be located near hot engine parts. Be careful not to touch these parts when the engine is hot.
- Vacuum Lines: Always disconnect vacuum lines with care. If a line is brittle or cracked, it can easily break, potentially causing a vacuum leak.
- Crankcase Pressure: Never remove the oil filler cap or dipstick while the engine is running, as this can release pressurized crankcase gases, which may be hot or contain harmful substances.
Always let the engine cool down before working on the PCV system. Wear gloves to protect your hands from oil and grime. And always disconnect the negative battery terminal before performing any major repairs.
With a PCV system diagram and this knowledge, you're well-equipped to understand, diagnose, and repair this important system. Remember to work safely and take your time. Proper maintenance of the PCV system ensures your engine runs smoothly, efficiently, and with reduced emissions. As promised, you can download the detailed PCV system diagram we've been referencing here.