Power Window Switch Wiring Schematic
Alright, let's dive into the wonderful world of power window switch wiring schematics. If you're an experienced DIYer, a car modder, or just someone who likes to understand how things work under the hood (or, in this case, in the door panel!), understanding this schematic is invaluable. We're going to break down everything from the basic purpose to troubleshooting tips, all while keeping things clear and approachable.
Purpose of a Power Window Switch Wiring Schematic
Why bother with a wiring schematic? Well, several reasons. Primarily, it's your roadmap when tackling power window issues. Trying to diagnose a malfunctioning power window without a schematic is like navigating a city without a map – you're likely to get lost and waste a lot of time. Here's a breakdown:
- Troubleshooting: When your power window refuses to cooperate, the schematic helps you pinpoint the exact cause. Is it the switch, the motor, a broken wire, or a faulty relay? The schematic guides you through the circuit.
- Repairing: Once you've identified the problem, the schematic shows you how to properly repair it. Whether you're replacing a switch, splicing a wire, or rewiring the entire system, the schematic ensures you do it correctly.
- Modifying: Want to add aftermarket accessories or customize your power window system? The schematic is essential for understanding how to integrate new components without causing electrical problems. Perhaps you want to add a remote control feature, or install new window motors for faster operation.
- Learning: Understanding how a power window system works is just plain cool! The schematic gives you a detailed view of the electrical circuitry, helping you learn about basic automotive electrical principles.
Key Specs and Main Parts
Before we jump into the schematic itself, let's identify the key players in a typical power window system:
- Power Window Switch (Driver and Passenger): This is your control center, allowing you to raise and lower the windows. Driver side often has individual controls for all windows.
- Power Window Motor: This is the workhorse, converting electrical energy into mechanical energy to move the window glass.
- Relays (Optional): Some systems use relays to handle the high current draw of the window motors. This protects the switches from burning out. These are essentially electrically controlled switches themselves.
- Fuses or Circuit Breakers: These are safety devices that protect the circuit from overloads and short circuits. Crucial for preventing electrical fires.
- Wiring Harness: The network of wires that connect all the components together. Often color-coded for easier identification.
- Ground Connection: Provides the return path for the electrical current. A good, clean ground is essential for proper operation.
Key Specifications you might find useful (though less directly represented on the schematic) are the voltage of the system (typically 12V DC in automotive applications) and the amperage rating of the fuses protecting the circuit. Knowing the fuse rating is important to ensure you replace a blown fuse with the correct one. Using a fuse with a higher rating can be dangerous.
Symbols: Deciphering the Diagram
A wiring schematic is a visual language. Understanding the symbols is key to fluency. Here's a breakdown of common symbols:
- Solid Lines: Represent wires. The thickness of the line doesn't usually indicate wire gauge, but it may be used for emphasis in some diagrams.
- Dashed Lines: May represent shielded wires, or wires that are grouped together in a harness.
- Color Codes: Wires are typically color-coded to help you identify them in the vehicle. Common colors include red (power), black (ground), blue, green, yellow, etc. The schematic will usually have a key explaining the color codes.
- Circles: Often represent connections. A filled circle usually indicates a permanent connection, while an open circle may indicate a connector.
- Squares: Can represent various components, such as relays, fuses, or circuit breakers. The specific shape or marking within the square usually indicates the component's function.
- Resistor Symbol (Zigzag Line): Represents a resistor, which limits the flow of current.
- Capacitor Symbol (Two Parallel Lines): Represents a capacitor, which stores electrical energy.
- Ground Symbol (Series of Horizontal Lines): Represents a ground connection, the reference point for the electrical circuit.
- Switch Symbol (Line with a Break): Represents a switch, which opens or closes the circuit. Different switch symbols indicate different switch types (e.g., single-pole single-throw (SPST), single-pole double-throw (SPDT), double-pole double-throw (DPDT)). Power window switches are often DPDT or a modified version to achieve reverse polarity.
- Motor Symbol (Circle with an "M"): Represents the electric motor that drives the window regulator.
- Relay Symbol (Coil and Switch): Relays have two parts: a coil that, when energized, activates a switch.
Important: Schematics can vary slightly in their symbol conventions. Always refer to the specific schematic's legend or key for accurate interpretation.
How It Works: A Circuitous Journey
Let's trace the electrical path in a typical power window circuit:
- Power Source: The circuit starts with a power source, usually the car battery. Power flows through a fuse or circuit breaker to protect the circuit from overloads.
- Switch Activation: When you press the power window switch, you complete a circuit. The switch directs power to either the "up" or "down" side of the window motor. This is where the reversing polarity comes into play.
- Motor Operation: The power flows through the motor, causing it to rotate. The motor is connected to a window regulator, which uses a gear mechanism or cable system to move the window glass up or down.
- Ground Return: After passing through the motor, the current returns to the battery through a ground connection, completing the circuit.
- Relay Activation (if applicable): In systems with relays, the switch doesn't directly power the motor. Instead, it activates a relay, which then closes a separate circuit to power the motor. This isolates the switch from the high current draw of the motor.
The clever part of most power window switches is their ability to reverse the polarity of the voltage applied to the motor. This allows the motor to turn in either direction, raising or lowering the window. A DPDT (Double Pole Double Throw) switch is commonly used to achieve this.
Real-World Use: Basic Troubleshooting Tips
Okay, your window's stuck. Time to put that schematic to use. Here's a basic troubleshooting process:
- Check the Fuse: This is the first and easiest step. Use a multimeter to test the fuse for continuity. If it's blown, replace it with a fuse of the correct amperage.
- Test the Switch: Use a multimeter to check if the switch is receiving power and sending power to the motor when activated. If not, the switch may be faulty.
- Check the Motor: If the switch is working, but the motor isn't, the motor may be faulty. You can try applying power directly to the motor to see if it runs. Be careful! Use appropriate jumper wires and avoid short circuits.
- Inspect the Wiring: Look for any broken, frayed, or corroded wires. Use a multimeter to check for continuity in the wiring harness. Pay special attention to ground connections. A bad ground can cause all sorts of problems.
- Test the Relay (if applicable): Use a multimeter to check if the relay is receiving power and switching properly when activated.
Pro Tip: Start with the simplest and most likely causes before moving on to more complex troubleshooting steps. Don't overlook the obvious!
Safety: Handle with Care!
Working with automotive electrical systems can be dangerous. Here are some important safety precautions:
- Disconnect the Battery: Before working on any electrical system, disconnect the negative terminal of the battery to prevent accidental shorts and electrical shocks.
- Use Proper Tools: Use insulated tools designed for automotive electrical work.
- Avoid Water: Never work on electrical systems in wet conditions.
- Be Careful with Wires: Avoid damaging wires. If you need to cut or splice wires, use proper wire strippers and crimpers.
- Double-Check Your Work: Before reconnecting the battery, double-check all your connections to make sure they are secure and correct.
- Fuses are there for a reason! Never replace a fuse with one of a higher amperage rating. This could cause an electrical fire.
- High Current Motors: Power window motors draw significant current. Be cautious when directly powering them for testing purposes, use appropriate wiring and avoid short circuits.
Especially be careful when working around the battery and main power wires. These can deliver a significant shock if shorted to ground.
Now you have a good understanding of power window switch wiring schematics. It's a valuable skill for anyone who likes to work on their own cars. The wiring schematic will empower you to confidently diagnose and repair window malfunctions. With the knowledge you gained here, you should be able to troubleshoot the circuits successfully.
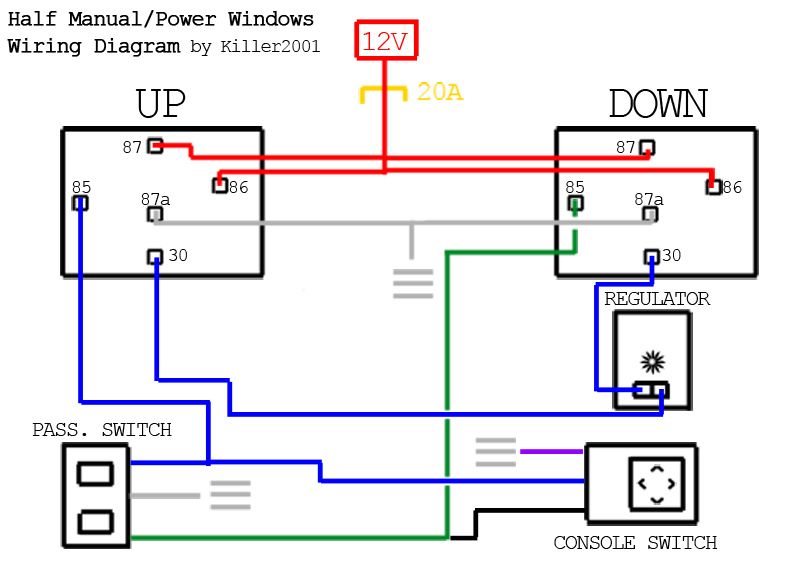
We have a sample wiring diagram file that you can download and use as a reference. It's a common configuration and should help you visualize the concepts we've discussed. Use it wisely, and happy wrenching!