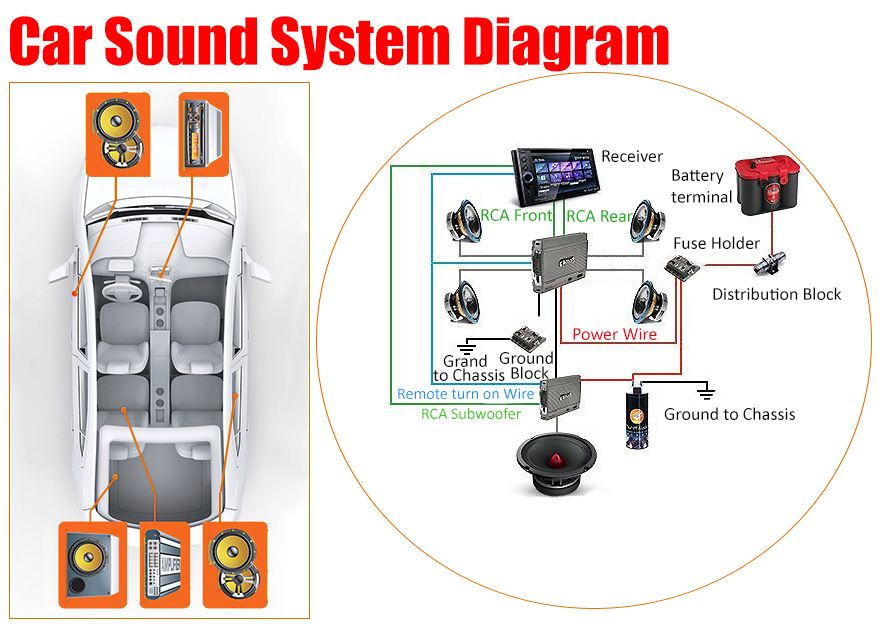
Professional Car Audio Setup Diagram
So, you're looking to upgrade your car audio, or maybe you're troubleshooting an existing system. Understanding a professional car audio setup diagram is absolutely critical. Think of it as the blueprint for your sound system; it shows you how all the components are connected and allows you to diagnose problems efficiently. Whether you're planning a complete overhaul, replacing a faulty amp, or just trying to learn more about how your audio system ticks, this knowledge is power. This article will break down the key elements of such a diagram, explaining the symbols, components, and how everything works together. We also have a downloadable diagram available – keep reading!
Purpose of a Car Audio Setup Diagram
Why bother with a diagram? Here's the deal. These diagrams serve several crucial functions:
- Installation and Upgrades: Planning a new system or adding components? The diagram helps visualize the entire setup, ensuring proper connections and preventing wiring errors. It allows you to map out your wire runs, fuse locations, and the optimal placement of each component before you start cutting and splicing.
- Troubleshooting: When something goes wrong – no sound, distortion, popping noises – a diagram is invaluable. It allows you to trace the signal path and isolate the problem component. You can quickly identify if a wire is loose, a fuse is blown, or a component is malfunctioning.
- Repair and Modification: If you're replacing a component or modifying the system, the diagram helps you understand the original design and how your changes will affect the overall performance.
- Learning and Understanding: Even if you're not actively working on your system, studying a diagram is a great way to learn about car audio principles and how different components interact.
Key Specs and Main Parts
Before diving into the diagram itself, let's review the main components you'll typically find in a professional car audio setup:
- Head Unit (Source Unit): This is the brains of the operation. It provides the audio source (radio, CD, MP3, Bluetooth) and controls the volume, tone, and other settings. Look for specs like RCA pre-out voltage (influences signal strength to amplifiers) and EQ bands (for sound customization).
- Amplifiers (Amps): Amps boost the weak signal from the head unit to a level sufficient to drive speakers. Important specs include RMS power output (continuous power), impedance (measured in ohms – speakers and amps need to match), and THD (Total Harmonic Distortion) (a measure of signal purity).
- Speakers: Speakers convert electrical signals into sound waves. Common types include tweeters (high frequencies), mid-range speakers (mid frequencies), and subwoofers (low frequencies). Specs to consider are power handling (how much power they can handle without damage), sensitivity (how loud they play with a given amount of power), and frequency response (the range of frequencies they reproduce).
- Subwoofers: Dedicated speakers for low-frequency sounds, adding bass to the sound. Enclosure type (sealed, ported, bandpass) impacts sound.
- Crossovers: Crossovers divide the audio signal into different frequency ranges, sending the appropriate frequencies to each speaker. They can be passive (simple circuits built into speakers) or active (electronic devices that provide more precise control). Look for crossover frequency (the point at which the signal is split) and slope (the rate at which frequencies are attenuated).
- Signal Processors (EQs, DSPs): These devices allow you to fine-tune the audio signal, correcting for imperfections in the car's acoustics and tailoring the sound to your preferences. Specs include number of bands (for equalization) and time alignment (to compensate for speaker placement).
- Wiring and Fuses: High-quality wiring is crucial for delivering power and signal effectively. Fuses protect the system from overcurrent and damage. Use appropriate gauge wire; too small, and it can overheat and cause fire.
- Capacitors (Stiffening Caps): Capacitors store electrical energy and provide it quickly to the amplifier during demanding bass peaks, preventing voltage drops and improving bass response. Measured in Farads.
Understanding the Symbols
A car audio setup diagram uses various symbols to represent components, wires, and connections. Here's a breakdown of common symbols:
- Solid Lines: Typically represent audio signal wires. These lines carry the actual audio signal from one component to another.
- Dashed Lines: Often represent power wires or ground wires. Sometimes used for remote turn-on wires.
- Colored Lines: Colors are used to differentiate between different types of wires (e.g., red for power, black for ground, yellow for remote turn-on). The specific color coding can vary, so always refer to the diagram's legend.
- Head Unit Symbol: Usually a rectangle with controls depicted on the front.
- Amplifier Symbol: Often a triangle or a rectangle with input and output terminals.
- Speaker Symbol: A circle, sometimes with a smaller circle inside to represent the tweeter.
- Fuse Symbol: A zigzag line or a small rectangle with a break in the middle.
- Ground Symbol: Three horizontal lines, decreasing in length.
- RCA Connector Symbol: A small circle with a dot in the center. These represent the connectors used for audio signals, typically found on the back of head units and amplifiers.
How It Works: The Signal Path
Understanding how the signal flows through the system is crucial for troubleshooting. Here's a simplified overview:
- Source: The audio signal originates from the head unit (e.g., radio, CD player, Bluetooth).
- Pre-Amplification (Optional): The head unit outputs a low-level signal through RCA pre-outs.
- Signal Processing (Optional): An equalizer (EQ) or digital signal processor (DSP) can be used to shape the audio signal.
- Amplification: The amplifier boosts the signal to a higher level, providing the power needed to drive the speakers.
- Crossover: If using separate components (tweeters, mid-range speakers, subwoofers), crossovers split the signal into different frequency ranges.
- Speakers: The amplified signal is sent to the speakers, which convert the electrical energy into sound waves.
Real-World Use: Basic Troubleshooting Tips
Here are a few basic troubleshooting tips using the diagram:
- No Sound: Check the power wires to the head unit and amplifiers. Are the fuses blown? Use a multimeter to verify voltage at the power and ground connections. Trace the signal path from the head unit to the speakers, looking for loose connections or damaged wires.
- Distortion: Check the speaker wiring. Make sure the impedance of the speakers matches the amplifier's rating. Reduce the gain on the amplifier if it's set too high. Verify that the speakers are not damaged.
- Popping Noises: Check the ground connections. A loose or corroded ground can cause noise in the system. Make sure all ground connections are clean and secure. Also, check RCA cables for damage or poor shielding.
- One Speaker Not Working: Check the speaker wiring. Use a multimeter to check continuity of the speaker wire. Swap the speaker wires at the amplifier to see if the problem moves to the other speaker. If it does, the problem is in the wiring or the amplifier channel.
Safety Considerations
Working with car audio systems involves electricity. Here are some important safety precautions:
- Disconnect the Battery: Always disconnect the negative terminal of the car battery before working on the electrical system. This prevents accidental shorts and potential damage to the components.
- Handle Fuses Carefully: Never replace a fuse with one of a higher amperage rating. This can overload the wiring and cause a fire.
- Use Proper Tools: Use insulated tools to prevent electric shock.
- Wiring: Secure all wiring properly to prevent it from chafing or getting pinched. Use wire ties or loom to protect the wires.
- Capacitors: Be *extremely* careful discharging capacitors. They can hold a dangerous charge, even after the system is turned off. Follow the manufacturer's instructions for discharging them properly. They can cause serious electrical shock.
Understanding your car audio setup diagram is essential for diagnosing and repairing audio issues. It enables a DIYer to troubleshoot their own cars and save money.
You've reached the end! We've covered the core principles for understanding professional car audio setup diagrams. As promised, we have a sample diagram file ready for you to download. It's a great reference tool to have on hand when you're working on your car audio system.