Race Car Push Button Start Wiring Diagram
So, you're thinking about adding a push-button start to your race car – awesome! It's a cool mod, cleans up the dash, and, let's be honest, it just *feels* race car. But before you start hacking away at your wiring harness, you need a solid understanding of the push-button start wiring diagram. That's exactly what we're going to break down here. We'll walk through the purpose, parts, the diagram itself, and a bit of troubleshooting to ensure a smooth installation. We even have a full wiring diagram file available for download – more on that later.
Why Bother Understanding the Wiring Diagram?
Look, you *could* just wing it, but trust me, that's a recipe for electrical disaster. The wiring diagram is your roadmap. Here's why it's essential:
- Preventing Damage: Improper wiring can fry sensitive components like your ECU (Engine Control Unit), immobilizer, or even cause a fire. Understanding the diagram allows you to connect everything correctly, avoiding shorts and overloads.
- Troubleshooting: If your push-button start isn't working as expected, the diagram becomes your diagnostic tool. You can trace wires, check connections, and isolate the problem.
- Customization: Maybe you want to add extra features, like a security kill switch or a remote start. The diagram gives you the foundation to modify the circuit safely and effectively.
- Learning & Skill Development: Even if you're using a pre-made kit, understanding the underlying principles of automotive electrical systems will make you a better mechanic in the long run.
Key Specs and Main Parts of a Push-Button Start System
Before we dive into the diagram, let's identify the core components involved:
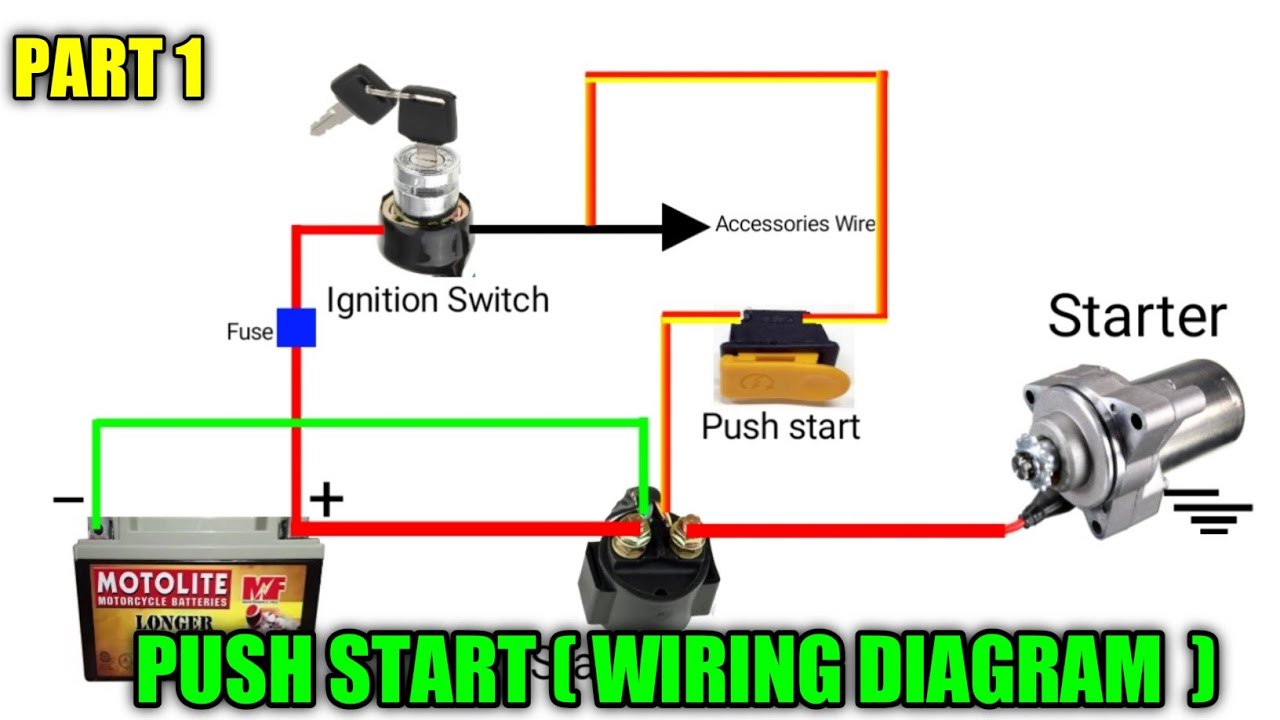
- Push-Button Switch: This is the star of the show. It's a momentary switch – meaning it only completes the circuit while it's being pressed. Key spec: Amperage rating. Make sure it's rated for the current draw of your starting system.
- Relay(s): The starter motor requires a lot of current. The push-button switch itself can't handle that. Relays act as electrical switches, using a small current from the push-button to control a larger current flow to the starter. You might have one or two relays depending on the system. Key spec: Coil voltage and contact amperage.
- Starter Solenoid: This is usually already present on your starter motor. It's an electromagnetic switch that engages the starter motor gear with the flywheel and simultaneously provides high current to the starter motor.
- Ignition Switch Wiring: You'll need to tap into the existing ignition switch wiring to provide power to the system and signal the ECU. This usually involves identifying the "ignition on" and "starter" wires.
- Power Source (Battery): The entire system is powered by the car battery. A good, reliable connection is crucial.
- Fuses: These are your circuit protectors. They are sacrificial components designed to blow and interrupt the current flow in case of a short circuit, preventing damage to other components. Choose the correct amperage rating for each circuit.
- Wiring: Use automotive-grade wiring of the correct gauge (thickness) for each circuit. Undersized wiring can overheat and cause a fire.
Decoding the Wiring Diagram: Symbols, Lines, and Colors
Wiring diagrams are like a secret language, but once you learn the basics, they become incredibly useful. Here's a breakdown of common symbols and conventions:
Common Electrical Symbols:
- ---: Represents a wire. The thickness of the line can sometimes indicate wire gauge, but that's not always consistent.
- ----/\----: Represents a resistor. Resistors limit the current flow in a circuit.
- ----) (----: Represents a capacitor. Capacitors store electrical energy.
- O : Represents a wire connection or splice.
- ---||---: Represents a capacitor (less common).
- __/\/\/\__: Represents a ground connection (chassis ground). This is a connection to the car's metal frame, providing a return path for the current.
- ( ): Represents a fuse. The number inside the parentheses indicates the fuse amperage rating (e.g., (10) for a 10-amp fuse).
- [ ]: Represents a relay. Inside the bracket, you'll find connections for the coil (which activates the relay) and the contacts (which switch the main circuit).
Lines and Colors:
- Solid Lines: Usually represent the main wiring paths.
- Dashed Lines: May indicate optional connections or wires that are only present in certain configurations.
- Colors: Wire colors are *extremely* important. They help you identify wires in the harness. Common colors include:
- Red: Typically used for power (positive +12V).
- Black: Typically used for ground (negative).
- Yellow, Blue, Green, White: Used for various signals and switched circuits.
How a Push-Button Start System Works
The core function of a push-button start system is to replace the mechanical turning of the ignition key with an electronic sequence initiated by pressing the button. Here's a simplified explanation:
- Ignition Activation: When you press the push button, it completes a circuit, energizing the coil of a relay (or relays). This relay allows power to flow to the car's ignition system, effectively turning the "ignition on" (accessory and ignition circuits).
- Starter Engagement: Simultaneously or after a slight delay (depending on the system), another relay is energized, sending power to the starter solenoid.
- Starter Motor Activation: The starter solenoid engages the starter motor, which cranks the engine until it starts.
- Button Release: When you release the push button, the circuit is broken. However, the engine should now be running and powering the ignition system, so the car stays on.
Some systems have built-in safety features, such as requiring the brake pedal to be pressed before the starter will engage. This prevents accidental starting.
Real-World Use: Basic Troubleshooting Tips
So, you've wired everything up, and it's not working. Don't panic! Here are some common issues and troubleshooting steps:
- No Power: Check the main power fuse to the system. Use a multimeter to verify that you have 12V at the power input to the push-button switch. Verify your ground connection.
- Button Doesn't Respond: Use a multimeter to check if the push-button switch is actually closing the circuit when pressed. Check the relay coil is receiving power.
- Starter Doesn't Engage: Check the relay that controls the starter solenoid. Is the relay clicking when the button is pressed? If not, check the relay coil circuit. If it is clicking, check the relay contacts for continuity. Use a multimeter to check if power is reaching the starter solenoid when the relay is activated.
- Engine Cranks But Doesn't Start: The push-button might be wired correctly, but there could be an issue with the ignition system itself (spark plugs, fuel pump, etc.). This requires further diagnosis beyond the push-button start system.
- Blown Fuses: If a fuse blows repeatedly, there's a short circuit somewhere. Carefully inspect the wiring for any damaged insulation or loose connections.
Important note: A multimeter is your best friend for electrical troubleshooting. Learn how to use it to check voltage, continuity, and resistance.
Safety First: Handling Risky Components
Working with automotive electrical systems can be dangerous. Here are some critical safety precautions:
- Disconnect the Battery: Always disconnect the negative terminal of the battery before working on any electrical components. This prevents accidental shorts and shocks.
- Use Proper Tools: Use insulated tools designed for automotive electrical work.
- Wear Safety Glasses: Protect your eyes from sparks and debris.
- Work in a Well-Ventilated Area: Battery acid and other chemicals can release harmful fumes.
- Understand the Wiring: Never guess about wiring connections. Always refer to the wiring diagram and double-check your work.
- Fuses are Crucial: Never bypass a fuse. Fuses are there to protect the circuit. A blown fuse is telling you there is a problem that needs to be addressed, not ignored.
Remember, if you're not comfortable working with electrical systems, it's best to consult a qualified mechanic.
We've covered a lot here, but the best way to solidify your understanding is to study a real wiring diagram. That's why we're offering a downloadable push-button start wiring diagram file. This diagram will give you a visual reference and help you apply the concepts we've discussed. Use it wisely, and always prioritize safety!
Disclaimer: This information is for educational purposes only and should not be considered a substitute for professional advice. Automotive electrical systems can be complex and dangerous. Always consult a qualified mechanic if you are unsure about any aspect of the installation or repair process.
Note: We have the wiring diagram file available for download.