Radio Wiring Diagram For 2004 Chevy Silverado
So, you're looking to dive into the radio wiring of your 2004 Chevy Silverado? Excellent! Whether you're troubleshooting a faulty head unit, installing an aftermarket stereo, or just curious about how it all works, understanding the wiring diagram is crucial. This article will serve as your comprehensive guide, breaking down the complexities and empowering you to tackle your project with confidence. And the best part? We've got the actual wiring diagram file ready for you to download at the end, making this a truly practical resource.
Purpose: Why Understanding the Wiring is Key
Let's be blunt: messing with car electronics without a solid understanding is a recipe for disaster. A wiring diagram isn't just a pretty picture; it's your roadmap. Its purpose is threefold:
- Repairing Existing Problems: Is your radio cutting out? Speakers not working? The wiring diagram helps you trace the circuit, pinpointing breaks, shorts, or faulty components.
- Installing Aftermarket Stereos: Swapping in a new head unit can be a huge upgrade, but you need to know which wire does what to avoid damaging the new unit or your truck's electrical system. This is especially crucial for features like steering wheel controls or OnStar integration.
- General Understanding: Even if you're not facing a specific problem, knowing how your radio system is wired gives you a deeper understanding of your vehicle. This can be invaluable for future troubleshooting or modifications.
Key Specs and Main Parts of the 2004 Silverado Radio Wiring
Before we dive into the diagram itself, let's cover the essential components you'll encounter:
- Head Unit (Radio Receiver): The brains of the operation. This is where you control volume, tuning, and often other vehicle functions.
- Speakers: Front left, front right, rear left, rear right. The wiring diagram will show how each speaker is connected to the head unit (or amplifier, if equipped).
- Wiring Harness: This is the connector that plugs directly into the back of the head unit. It carries all the power, ground, speaker, and control signals.
- Antenna: Receives radio signals. The wiring diagram will show the connection point, and potential amplifier if equipped.
- Ground (Chassis Ground): A crucial connection to the vehicle's metal frame. This provides a return path for the electrical current and is essential for proper operation.
- Power Wires (Constant 12V and Switched 12V): The constant 12V provides power even when the ignition is off (for memory functions), while the switched 12V only provides power when the key is in the accessory or run position.
- OnStar Module (if equipped): Some 2004 Silverados have OnStar. The wiring diagram will show how OnStar integrates with the audio system.
- Amplifier (if equipped): Some models included a factory amplifier. The wiring diagram will show the amplifier's location, power source, and connections to the head unit and speakers.
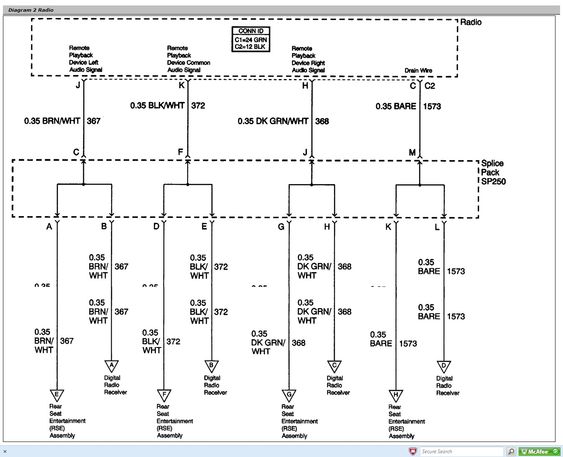
Understanding Wiring Diagram Symbols: Cracking the Code
Wiring diagrams use standardized symbols to represent different components and wires. Here's a breakdown of the most common ones you'll see in the 2004 Silverado radio wiring diagram:
- Solid Lines: Represent wires. Thicker lines often indicate wires carrying more current (like the power wire).
- Dashed Lines: Can represent shielded wires, ground connections, or connections that are optional or dependent on vehicle configuration.
- Circles or Ovals: Often represent connectors. The diagram will show which wires connect to which pins on the connector.
- Resistor Symbol (Zig-Zag Line): Represents a resistor, a component that limits current flow.
- Capacitor Symbol (Two Parallel Lines): Represents a capacitor, a component that stores electrical energy.
- Ground Symbol (Usually a downward-pointing triangle or a series of horizontal lines): Indicates a connection to the vehicle's chassis ground.
- Color Codes: Each wire is usually identified by a color code (e.g., RED, BLU, GRN, YEL). These codes are crucial for identifying the correct wires.
Color Code Abbreviations: It's important to understand common color code abbreviations. Examples include:
- BLK - Black
- RED - Red
- BLU - Blue
- GRN - Green
- YEL - Yellow
- WHT - White
- ORG - Orange
- BRN - Brown
- GRY - Gray
- PNK - Pink
- TAN - Tan
How It Works: Tracing the Circuit
The 2004 Silverado radio system is a relatively straightforward circuit. The head unit receives power from both a constant 12V source (for memory) and a switched 12V source (for operation). It then takes the audio signal from the antenna (or other source, like a CD player) and amplifies it. Finally, it sends the amplified signal to the speakers via individual speaker wires.
The wiring diagram allows you to trace this circuit. For example, if you're troubleshooting a speaker issue, you can use the diagram to identify the speaker wire at the head unit, trace it to the speaker itself, and check for continuity (a complete electrical path) along the way. A break in the wire, a loose connection, or a faulty speaker can all cause the speaker to stop working. Similarly, if you have a parasitic draw and need to find which circuit is causing it, the wiring diagram will provide the details for how to test the voltage and where to safely disconnect the circuit.
Understanding the ground connection is also critical. A poor ground connection can cause all sorts of problems, from weak audio to intermittent power issues. The wiring diagram will show you where the ground wires are located and how they're connected to the chassis.
Real-World Use: Basic Troubleshooting Tips
Here are a few common troubleshooting scenarios and how the wiring diagram can help:
- No Power to Radio: Check the fuses first (both the radio fuse and any related accessory fuses). If the fuses are good, use the wiring diagram to trace the constant 12V and switched 12V wires to the head unit. Use a multimeter to check for voltage at these points. If there's no voltage, the problem is further upstream (likely a wiring break or a faulty ignition switch).
- One Speaker Not Working: Use the wiring diagram to identify the speaker wire for the affected speaker at the head unit. Check for continuity between the head unit and the speaker. If there's no continuity, there's a break in the wire. You can also test the speaker itself with a multimeter to see if it's blown.
- Static or Noise: This could be a grounding issue. Check the ground connections for the head unit and amplifier (if equipped). Make sure they're clean and securely attached to the chassis.
- Aftermarket Radio Installation Problems: Always double-check your wiring connections against the wiring diagram. Make sure you're using the correct adapter harness for your 2004 Silverado. Incorrect wiring can damage your new head unit or your truck's electrical system.
Safety First: Identifying Risky Components
Working with automotive electrical systems can be dangerous. Here are a few key safety points:
- Disconnect the Battery: Always disconnect the negative battery terminal before working on any electrical components. This prevents accidental shorts and potential electrical shocks.
- Identify Airbag Wiring: Be extremely careful when working near airbag modules or wiring. Accidental deployment of an airbag can cause serious injury. The wiring diagram will typically indicate the location of airbag components.
- Use a Multimeter Safely: Learn how to use a multimeter correctly and safely. Improper use can lead to inaccurate readings or even damage to the meter.
- Don't Cut or Splice Wires Unnecessarily: Only cut or splice wires when absolutely necessary. Always use proper crimping tools and connectors to ensure a secure and reliable connection.
- Consult a Professional: If you're not comfortable working with electrical systems, don't hesitate to consult a qualified mechanic or car audio installer.
We've covered a lot of ground here, and I hope this has given you a solid understanding of the 2004 Chevy Silverado radio wiring diagram. Remember, safety is paramount. With a bit of patience and the right tools, you can confidently tackle your radio-related projects. Download the complete wiring diagram for your 2004 Chevy Silverado to have as a reference.