Radio Wiring Harness For 2009 Chevy Silverado
Alright, let's dive into the radio wiring harness for the 2009 Chevy Silverado. This is a crucial piece of the puzzle when you're tackling audio upgrades, troubleshooting electrical gremlins, or even just trying to understand how your truck's sound system is wired. Think of it as the central nervous system for your Silverado's audio experience. Knowing this inside and out can save you a ton of time and frustration.
Purpose of Understanding the Radio Wiring Harness
Why bother learning about this? Several reasons. Maybe you're upgrading to a slick new aftermarket head unit with all the bells and whistles. Or perhaps your factory radio is acting up, and you need to diagnose a wiring issue. Maybe you are looking to splice in an aftermarket amp or subwoofer. Or simply, you want to expand your automotive knowledge. Having a clear understanding of the harness is vital for:
- Aftermarket Radio Installation: Connecting your new head unit correctly is paramount. Incorrect wiring can damage your radio or your truck's electrical system.
- Troubleshooting Audio Problems: No sound? Static? Speaker issues? The harness is ground zero for tracking down the fault.
- Adding Aftermarket Amplifiers/Subwoofers: Tapping into the correct wires for signal and power is crucial for a clean install.
- Repairing Damaged Wiring: Age and wear can take their toll. Identifying damaged wires and knowing how to repair them is essential.
- Learning Basic Automotive Electrics: Understanding the radio harness is a gateway to grasping broader automotive electrical concepts.
Key Specs and Main Parts of the Wiring Harness
The 2009 Silverado radio wiring harness isn't just a single component; it's an interconnected system. Let's break down the key elements:
- The Main Connector(s): These are the primary plugs that connect directly to the back of the factory radio. Often, there are multiple connectors – one for power and ground, one for speakers, and potentially others for features like OnStar or steering wheel controls.
- Power Wires: Usually a 12V constant (battery) wire, a 12V switched (ignition) wire, and a ground wire. The 12V constant provides power to retain radio presets and memory even when the ignition is off. The 12V switched only provides power when the ignition is turned on.
- Speaker Wires: Each speaker in your truck (front left, front right, rear left, rear right) has a positive (+) and negative (-) wire. These are often color-coded.
- Antenna Connector: A coaxial cable that plugs into the radio, providing the radio signal.
- Data Bus Wires (CAN bus): Some functions, like steering wheel controls or vehicle information display, are communicated through the CAN (Controller Area Network) bus. These are usually two wires, CAN High and CAN Low.
- Optional Wires: Depending on your truck's trim level and options, you might find wires for OnStar, backup camera, or external amplifiers.
Understanding the Wiring Diagram Symbols
A wiring diagram is like a roadmap for your electrical system. To navigate it effectively, you need to understand the symbols used. Let's cover some of the basics:
- Lines: Straight lines represent wires. Thicker lines often indicate wires that carry higher current (like power wires).
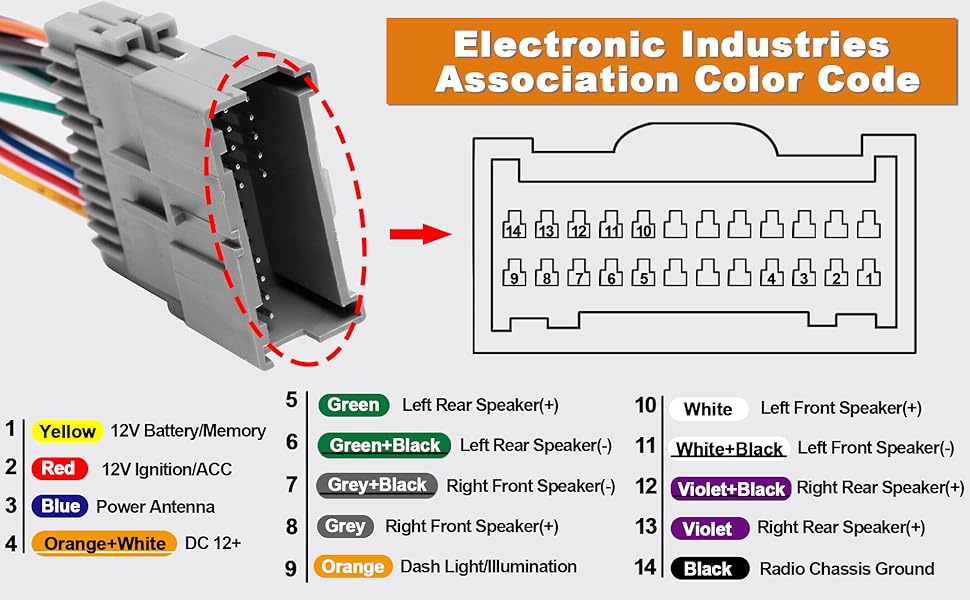
- Colors: Each wire is assigned a color code. Common examples include Red (power), Black (ground), Yellow (constant power), and various colors for speaker wires. The wiring diagram will have a legend explaining the color codes.
- Connectors: Represented by geometric shapes, often rectangles or circles, with pins indicated by small lines extending from the shape.
- Ground Symbol: Typically a series of horizontal lines decreasing in size, indicating a connection to the vehicle's chassis ground.
- Fuses: Represented by a squiggly line inside a rectangle, indicating a circuit protection device.
- Splices: Shown as dots where wires connect, indicating a junction point.
Let's talk about some common wire colors and their typical function in a 2009 Silverado radio harness:
- Yellow: Usually 12V constant (battery power). Important for retaining memory.
- Red: Typically 12V switched (ignition power). Turns the radio on and off with the ignition.
- Black: Ground. Provides a return path for the electrical current.
- White: Often front left speaker positive (+).
- Gray: Often front right speaker positive (+).
- Green: Often rear left speaker positive (+).
- Purple: Often rear right speaker positive (+).
- White with Black Stripe: Often front left speaker negative (-).
- Gray with Black Stripe: Often front right speaker negative (-).
- Green with Black Stripe: Often rear left speaker negative (-).
- Purple with Black Stripe: Often rear right speaker negative (-).
Note: Wire colors can vary slightly depending on the specific trim level and options of your Silverado. Always verify with the wiring diagram for your exact model.
How It Works: The Flow of Electricity
The radio harness acts as a conduit for electrical energy. Here's a simplified explanation:
- Power Source: The battery provides the initial power.
- Power Distribution: The 12V constant wire provides continuous power to the radio, allowing it to retain settings. The 12V switched wire provides power only when the ignition is on.
- Ground Connection: The ground wire completes the circuit, allowing the electrical current to flow back to the battery.
- Signal Input: The antenna connector receives the radio signal.
- Audio Output: The radio processes the signal and sends audio signals through the speaker wires to the speakers.
- Data Communication: The CAN bus wires allow the radio to communicate with other vehicle systems (e.g., steering wheel controls, vehicle information display).
Real-World Use: Basic Troubleshooting
Here are some basic troubleshooting steps you can take using your knowledge of the wiring harness:
- No Power to Radio: Check the 12V constant and 12V switched wires with a multimeter. Also, check the ground connection. Ensure the radio fuse in the fuse box isn't blown.
- No Sound from One Speaker: Check the speaker wires for that speaker. Ensure the connections are secure. Try swapping the speaker with a known working speaker to isolate the problem.
- Static or Distortion: Could be a grounding issue. Check the ground wire for a secure connection. Also, inspect the speaker wires for damage or shorts.
- Steering Wheel Controls Not Working: Check the CAN bus wires. You may need an aftermarket adapter to interface your new radio with the vehicle's CAN bus system.
Safety First: Handling Electrical Components
Working with electrical systems can be dangerous. Always remember these safety precautions:
- Disconnect the Battery: Before working on any electrical component, disconnect the negative terminal of the battery. This prevents accidental shorts and potential electrocution.
- Use a Multimeter: A multimeter is your best friend for testing voltage and continuity. Learn how to use it safely and effectively.
- Be Careful with Wire Strippers: Avoid cutting wires too deeply. You only want to strip the insulation, not damage the wire itself.
- Proper Insulation: Always use electrical tape or heat shrink tubing to insulate exposed wires.
- Double-Check Your Work: Before reconnecting the battery, double-check all your connections to ensure they are secure and properly insulated.
Important Note: Airbag systems are highly sensitive and can be triggered by electrical disturbances. If you are unsure about any electrical work, consult a qualified professional.
Diagram Availability
We have the complete radio wiring diagram for the 2009 Chevy Silverado. Having this resource can make your projects much easier and safer. You can download it by [Link to Download Here]. This diagram will provide specific wire colors and locations for your particular model year.