Relay Mitsubishi Outlander Fuse Box Diagram
For the experienced DIYer tackling electrical work on a Mitsubishi Outlander, understanding the fuse box diagram is absolutely critical. It's not just about replacing a blown fuse; it's about diagnosing electrical problems, adding aftermarket accessories, and generally keeping your Outlander running smoothly. This article breaks down the intricacies of the Outlander's relay and fuse box diagram, covering symbols, functionality, safety, and troubleshooting. Think of it as your comprehensive guide to navigating the often-intimidating world of automotive electrical systems.
Purpose of the Fuse Box Diagram
The fuse box diagram is essentially a roadmap to your vehicle's electrical system. It provides a visual representation of each fuse and relay's location and its specific function. Why is this important? Several reasons:
- Troubleshooting Electrical Issues: When an electrical component malfunctions (e.g., headlights, power windows, radio), the fuse box diagram helps pinpoint the likely culprit by showing which fuse protects that circuit.
- Replacing Blown Fuses: Identifying the correct fuse for replacement is crucial. Using the wrong amperage fuse can lead to further damage or even a fire.
- Adding Aftermarket Accessories: Installing accessories like aftermarket stereos, lights, or security systems requires tapping into the vehicle's electrical system. The diagram helps identify suitable power sources and ensures proper fusing to protect the new component and the vehicle's existing circuits.
- Understanding the Electrical System: Even if you're not currently experiencing problems, studying the diagram can give you a better understanding of how your Outlander's electrical system is designed and how different components interact.
- Preventative Maintenance: Occasionally inspecting your fuses can help identify potential problems before they cause a complete failure. Look for signs of corrosion or overheating.
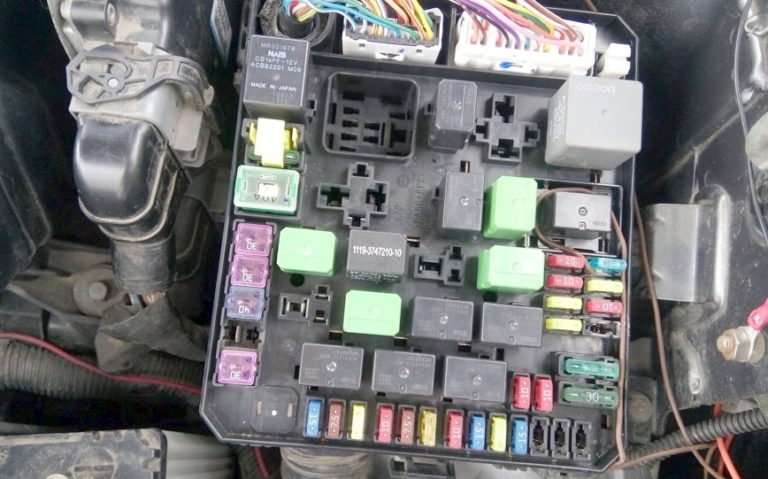
Key Specs and Main Parts
While the exact layout can vary slightly depending on the specific Outlander model year and trim level, the fundamental components and principles remain consistent. Here are the key specs and main parts you'll encounter:
- Fuse Box Locations: Outlanders typically have multiple fuse boxes. The main fuse box is usually located inside the cabin, often under the dashboard on the driver's side. There's also typically a fuse box in the engine compartment, near the battery. Some models might have a third, smaller fuse box. Refer to your owner's manual for the precise location of each in your specific Outlander.
- Fuses: These are safety devices designed to protect electrical circuits from overcurrent. They contain a thin wire that melts and breaks the circuit if the current exceeds a specified level. Fuses are rated in Amperes (Amps or A), indicating the maximum current they can handle. Common fuse ratings include 5A, 7.5A, 10A, 15A, 20A, 25A, 30A, and higher.
- Relays: Relays are electromechanical switches that allow a low-current circuit to control a high-current circuit. They're used to switch on and off components like headlights, fuel pumps, and starter motors. A relay consists of a coil, which creates a magnetic field when energized, and contacts that open or close the circuit.
- Fuse Box Diagram (Legend): This is the critical component. It's a printed or online chart that shows the location of each fuse and relay and its corresponding function. The legend typically includes a description of the circuit protected by each fuse (e.g., "Headlight - Low Beam (Left)," "Power Window - Driver's Side") and the function of each relay.
- Fuse Puller: A small plastic tool designed to safely remove fuses from the fuse box. Using pliers or other metal tools can damage the fuse box or create a short circuit.
Symbols and Conventions in the Diagram
Understanding the symbols used in the fuse box diagram is crucial for accurate interpretation. These diagrams use standardized symbols, but familiarity helps greatly:
- Lines: Solid lines generally represent the wiring harness. Heavier lines may indicate thicker gauge wire used for higher current circuits.
- Colors: Wire colors are often indicated in the diagram. Common colors include red (power), black (ground), and various other colors for different circuits. Understanding Mitsubishi's common wire color codes can be very helpful for tracing circuits.
- Fuse Symbols: Fuses are typically represented by a jagged line or a rectangular box with a diagonal line through it. The amperage rating is usually indicated next to the symbol.
- Relay Symbols: Relays are usually represented by a square or rectangle with internal symbols indicating the coil and contacts. Understanding the difference between a normally open (NO) and normally closed (NC) contact is important when troubleshooting relay-related issues.
- Component Icons: Symbols are used to represent various electrical components, such as headlights, turn signals, windshield wipers, and power windows. These symbols are generally intuitive but may vary slightly depending on the diagram.
- Ground Symbols: The ground symbol (often resembling an upside-down tree or a series of horizontal lines) indicates a connection to the vehicle's chassis, which serves as the return path for the electrical current.
How It Works: The Electrical Flow
The Outlander's electrical system works on the principle of a closed circuit. Power flows from the battery, through a fuse or relay, to the electrical component (e.g., a headlight), and then back to the battery through a ground connection. The fuse protects the circuit by interrupting the flow of current if it exceeds the fuse's amperage rating. The relay allows a low-current signal from a switch to control a high-current circuit, such as the headlights. For example:
- You turn on the headlight switch.
- This sends a low-current signal to the headlight relay.
- The relay's coil is energized, creating a magnetic field that closes the relay's contacts.
- This allows high-current power to flow from the battery, through the headlight fuse, to the headlights.
- The headlights illuminate.
- The current then returns to the battery through a ground connection.
Real-World Use: Basic Troubleshooting Tips
Here are some practical troubleshooting tips using the fuse box diagram:
- Component Not Working: If a component isn't working, the first step is to check the corresponding fuse. Locate the fuse using the diagram, remove it with the fuse puller, and inspect it. If the wire inside the fuse is broken, the fuse is blown and needs to be replaced.
- Repeatedly Blowing Fuses: If a fuse repeatedly blows, it indicates a short circuit or an overcurrent condition in the circuit. Do not replace it with a higher amperage fuse, as this could cause a fire. Instead, investigate the circuit to find the short or overload. This often involves checking the wiring for damage, corrosion, or loose connections.
- Relay Problems: If a relay is suspected of being faulty, you can test it using a multimeter. Check for continuity across the coil terminals when the relay is energized. You can also test the contacts to see if they open and close properly. A common test is to swap the relay with an identical relay from a less critical system (e.g., swapping the fog light relay with the power window relay – after confirming they are identical part numbers and amperage). If the problem moves to the system controlled by the swapped relay, then the original relay is likely the issue.
- Consult Your Manual: Always refer to your Outlander's owner's manual for the most accurate and up-to-date fuse box diagram and electrical specifications.
Safety Considerations
Working with automotive electrical systems can be dangerous. Here are some important safety precautions:
- Disconnect the Battery: Before working on any electrical components, disconnect the negative terminal of the battery. This will prevent accidental short circuits and electrical shocks.
- Never Replace a Fuse with a Higher Amperage Fuse: This can overload the circuit and cause a fire. Always use the correct amperage fuse specified in the diagram.
- Avoid Working in Wet Conditions: Water can conduct electricity and increase the risk of electrical shock.
- Be Careful Around Airbags: Airbags are sensitive to electrical disturbances. Avoid working on any circuits related to the airbag system unless you have the proper training and equipment.
- High-Risk Components: Be particularly careful when working around components such as the fuel pump relay, starter relay, and ignition system components. These components carry high currents and voltages, and improper handling can be dangerous. The airbag system also requires extreme caution.
- Use Proper Tools: Use insulated tools and a multimeter to avoid accidental short circuits and electrical shocks.
By understanding the fuse box diagram and following these safety precautions, you can confidently troubleshoot and repair electrical problems on your Mitsubishi Outlander.
We have the Mitsubishi Outlander Fuse Box Diagram file available for download. This detailed diagram will be an invaluable asset for your future electrical projects. Contact us for the file!